Boring (manufacturing)
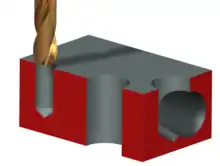
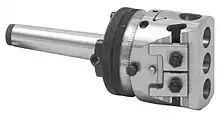
In machining, boring is the process of enlarging a hole that has already been drilled (or cast) by means of a single-point cutting tool (or of a boring head containing several such tools), such as in boring a gun barrel or an engine cylinder. Boring is used to achieve greater accuracy of the diameter of a hole, and can be used to cut a tapered hole. Boring can be viewed as the internal-diameter counterpart to turning, which cuts external diameters.


There are various types of boring. The boring bar may be supported on both ends (which only works if the existing hole is a through hole), or it may be supported at one end (which works for both, through holes and blind holes). Lineboring (line boring, line-boring) implies the former. Backboring (back boring, back-boring) is the process of reaching through an existing hole and then boring on the "back" side of the workpiece (relative to the machine headstock).
Because of the limitations on tooling design imposed by the fact that the workpiece mostly surrounds the tool, boring is inherently somewhat more challenging than turning, in terms of decreased toolholding rigidity, increased clearance angle requirements (limiting the amount of support that can be given to the cutting edge), and difficulty of inspection of the resulting surface (size, form, surface roughness). These are the reasons why boring is viewed as an area of machining practice in its own right, separate from turning, with its own tips, tricks, challenges, and body of expertise, despite the fact that they are in some ways identical.
The first boring machine tool was invented by John Wilkinson in 1775.[1]
Boring and turning have abrasive counterparts in internal and external cylindrical grinding. Each process is chosen based on the requirements and parameter values of a particular application.
Machine tools used


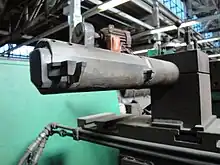
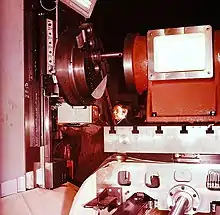
The boring process can be executed on various machine tools, including (1) general-purpose or universal machines, such as lathes (/turning centers) or milling machines (/machining centers), and (2) machines designed to specialize in boring as a primary function, such as jig borers and boring machines or boring mills, which include vertical boring mills (workpiece rotates around a vertical axis while boring bar/head moves linearly; essentially a vertical lathe) and horizontal boring mills (workpiece sits on a table while the boring bar rotates around a horizontal axis; essentially a specialized horizontal milling machine).
Boring mills and milling machines
The dimensions between the piece and the tool bit can be changed about two axes to cut both vertically and horizontally into the internal surface. The cutting tool is usually single point, made of M2 and M3 high-speed steel or P10 and P01 carbide. A tapered hole can also be made by swiveling the head.
Boring machines come in a large variety of sizes and styles. Boring operations on small workpieces can be carried out on a lathe while larger workpieces are machined on boring mills. Workpieces are commonly 1 to 4 metres (3 ft 3 in to 13 ft 1 in) in diameter, but can be as large as 20 m (66 ft). Power requirements can be as much as 200 horsepower (150 kW). Cooling of the bores is done through a hollow passageway through the boring bar where coolant can flow freely. Tungsten-alloy disks are sealed in the bar to counteract vibration and chatter during boring. The control systems can be computer-based, allowing for automation and increased consistency.
Because boring is meant to decrease the product tolerances on pre-existing holes, several design considerations apply. First, large length-to-bore-diameters are not preferred due to cutting tool deflection. Next, through holes are preferred over blind holes (holes that do not traverse the thickness of the work piece). Interrupted internal working surfaces—where the cutting tool and surface have discontinuous contact—are preferably avoided. The boring bar is the protruding arm of the machine that holds the cutting tool(s), and must be very rigid.[2]
Because of the factors just mentioned, deep-hole drilling and deep-hole boring are inherently challenging areas of practice that demand special tooling and techniques. Nevertheless, technologies have been developed that produce deep holes with impressive accuracy. In most cases they involve multiple cutting points, diametrically opposed, whose deflection forces cancel each other out. They also usually involve delivery of cutting fluid pumped under pressure through the tool to orifices near the cutting edges. Gun drilling and cannon boring are classic examples. First developed to make the barrels of firearms and artillery, these machining techniques find wide use today for manufacturing in many industries.
Various fixed cycles for boring are available in CNC controls. These are preprogrammed subroutines that move the tool through successive passes of cut, retract, advance, cut again, retract again, return to the initial position, and so on. These are called using G-codes such as G76, G85, G86, G87, G88, G89; and also by other less common codes specific to particular control builders or machine tool builders.
Lathes
Lathe boring[3] is a cutting operation that uses a single-point cutting tool or a boring head to produce conical or cylindrical surfaces by enlarging an existing opening in a workpiece. For nontapered holes, the cutting tool moves parallel to the axis of rotation. For tapered holes, the cutting tool moves at an angle to the axis of rotation. Geometries ranging from simple to extremely complex in a variety of diameters can be produced using boring applications. Boring is one of the most basic lathe operations next to turning and drilling.
Lathe boring usually requires that the workpiece be held in the chuck and rotated. As the workpiece is rotated, a boring bar with an insert attached to the tip of the bar is fed into an existing hole. When the cutting tool engages the workpiece, a chip is formed. Depending on the type of tool used, the material, and the feed rate, the chip may be continuous or segmented. The surface produced is called a bore.
The geometry produced by lathe boring is usually of two types: straight holes and tapered holes. Several diameters can also be added to each shape hole if required. To produce a taper, the tool may be fed at an angle to the axis of rotation or both feed and axial motions may be concurrent. Straight holes and counterbores are produced by moving the tool parallel to the axis of workpiece rotation.
The four most commonly used workholding devices are the three-jaw chuck, the four-jaw chuck, the collet, and the faceplate. The three-jaw chuck is used to hold round or hex workpieces because the work is automatically centered. On these chucks the runout faces limitations; on late-model CNCs, it can be quite low if all conditions are excellent, but traditionally it is usually at least .001-.003 in (0.025-0.075 mm). The four-jaw chuck is used either to hold irregular shapes or to hold round or hex to extremely low runout (with time spent indicating and clamping each piece), in both cases because of its independent action on each jaw. The face plate is also used for irregular shapes. Collets combine self-centering chucking with low runout, but they involve higher costs.
Limitations
For most lathe boring applications, tolerances greater than ±0.010 in (±0.25 mm) are easily held. Tolerances from there down to ±0.005 in (±0.13 mm) are usually held without especial difficulty or expense, even in deep holes. Tolerances between ±0.004 in (±0.10 mm) and ±0.001 in (±0.025 mm) are where the challenge begins rising. In deep holes with tolerances this tight, the limiting factor is just as often the geometric constraint as the size constraint. In other words, it may be easy to hold the diameter within .002" at any diametrical measurement point, but difficult to hold the cylindricity of the hole to within a zone delimited by the .002" constraint, across more than 5 diameters of hole depth (depth measured in terms of diameter:depth aspect ratio). For highest-precision applications, tolerances can generally be held within ±0.0005 in (±0.013 mm) only for shallow holes. In some cases tolerances as tight as ±0.0001 in (±0.0038 mm) can be held in shallow holes, but it is expensive, with 100% inspection and loss of nonconforming parts adding to the cost. Grinding, honing, and lapping are the recourse for when the limits of boring repeatability and accuracy have been met.
Surface finish (roughness) in boring may range from 8 to 250 microinches, with a typical range between 32 and 125 microinches.
Sometimes a part may require higher accuracy of form and size than can be provided by boring. For example, even in optimized boring, the amount that the diameter varies on different portions of the bore is seldom less than 3 micrometre (.0001 inches, "a tenth"), and it may easily be 5 to 20 micrometre (.0002-.0008 inches, "2 to 8 tenths"). Taper, roundness error, and cylindricity error of such a hole, although they would be considered negligible in most other parts, may be unacceptable for a few applications. For such parts, internal cylindrical grinding is a typical follow-up operation. Often a part will be roughed and semifinished in the machining operation, then heat treated, and finally, finished by internal cylindrical grinding.
The limitations of boring in terms of its geometric accuracy (form, position) and the hardness of the workpiece have been shrinking in recent decades as machining technology continues to advance. For example, new grades of carbide and ceramic cutting inserts have increased the accuracy and surface quality that can be achieved without grinding, and have increased the range of workpiece hardness values that are workable. However, working to tolerances of only a few micrometres (a few tenths) forces the manufacturing process to rationally confront, and compensate for, the fact that no actual workpiece is ideally rigid and immobile. Each time a cut is taken (no matter how small), or a temperature change of a few hundred degrees takes place (no matter how temporary), the workpiece, or a portion of it, is likely to spring into a new shape, even if the movement is extremely small. In some cases a movement of a fraction of a micrometre in one area is amplified in lever fashion to create a positional error of several micrometres for a feature of the workpiece several decimetres away. It is factors such as these that sometimes preclude finishing by boring and turning as opposed to internal and external cylindrical grinding. At the extreme, no perfection of machining or grinding may be enough when, despite the part being within tolerance when it is made, it warps out of tolerance in following days or months. When engineers are confronted with such a case, it drives the quest to find other workpiece materials, or alternate designs that avoid relying so heavily on the immobility of part features on the micro or nano scales.
References
- Pictorial History of England: Being a History of the People, as Well as a History of the Kingdom, Volume 1, By George Lillie Craik, Charles MacFarlane
- Kalpakjian 2001
- Todd & Allen 1994
Bibliography
- Kalpakjian, Schmid (2001), Manufacturing Engineering and Technology, Upper Saddle River, NJ, USA: Prentice Hall
- Todd, Robert H.; Allen, Dell K. (1994), Manufacturing Processes Reference Guide, New York, NY, USA: Industrial Press