Design of plastic components
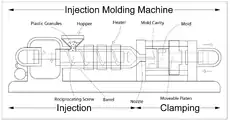
Injection molding has been one of the most popular ways for fabricating plastic parts for a very long time. They are used in automotive interior parts, electronic housings, housewares, medical equipment, compact discs, and even doghouses. Below are certain rule based standard guidelines which can be referred to while designing parts for injection molding considering manufacturability in mind.[1]

Geometric considerations
The most common guidelines refer to the specification of various relationships between geometric parameters which result in easier or better manufacturability. Some of these are as follows:
Wall Thickness
Non-uniform wall sections can contribute to warpage and stresses in molded parts. Sections which are too thin have a higher chance of breakage in handling, may restrict the flow of material and may trap air causing a defective part. Too heavy a wall thickness, on the other hand, will slow the curing cycle and add to material cost and increase cycle time.
Generally, thinner walls are more feasible with small parts rather than with large ones. The limiting factor in wall thinness is the tendency for the plastic material in thin walls to cool and solidify before the mold is filled. The shorter the material flow, the thinner the wall can be. Walls also should be as uniform in thickness as possible to avoid warpage from uneven shrinkage. When changes in wall thickness are unavoidable, the transition should be gradual and not abrupt.
Some plastics are more sensitive to wall thickness than others, where acetal and ABS plastics max out at around 0.12 in. thick (3 mm), acrylic can go to 0.5 in. (12 mm), polyurethane to 0.75 in. (18 mm), and certain fiber-reinforced plastics to 1 in. (25 mm) or more. Even so, designers should recognize that very thick cross sections can increase the likelihood of cosmetic defects like sink.[2]
Draft angles
Draft angle design is an important factor when designing plastic parts. Because of shrinkage of plastic material, injection molded parts have a tendency to shrink onto a core. This creates higher contact pressure on the core surface and increases friction between the core and the part, thus making ejection of the part from the mold difficult. Hence, draft angles should be designed properly to assist in part ejection. This also reduces cycle time and improves productivity. Draft angles should be used on interior and exterior walls of the part along the pulling direction.
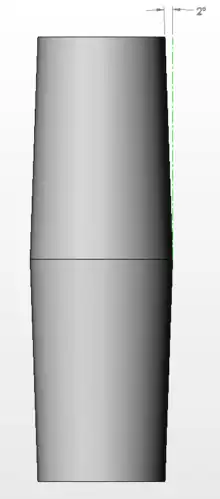
The minimum allowable draft angle is harder to quantify. Plastic material suppliers and molders are the authority on what is the lowest acceptable draft. In most instances, 1degree per side will be sufficient, but between 2 degree and 5 degree per side would be preferable. If the design is not compatible with 1 degree, then allow for 0.5 degree on each side. Even a small draft angle, such as 0.25 degree, is preferable to none at all.[3]
Radius at corners
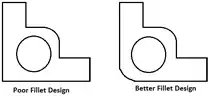
Generously rounded corners provide a number of advantages. There is less stress concentration on the part and on the tool. Because of sharp corners, material flow is not smooth and tends to be difficult to fill, reduces tooling strength and causes stress concentration. Parts with radii and fillets are more economical and easier to produce, reduce chipping, simplify mold construction and add strength to molded part with good appearance.
Sharp Corners general design guidelines in injection molding suggest that corner radii should be at least one-half the wall thickness. It is recommended to avoid sharp corners and use generous fillets and radii whenever required. During injection molding, the molten plastic has to navigate turns or corners. Rounded corners will ease plastic flow, so engineers should generously radius the corners of all parts. In contrast, sharp inside corners result in molded-in stress particularly during the cooling process when the top of the part tries to shrink and the material pulls against the corners. Moreover, the first rule of plastic design i.e. uniform wall thickness will be obeyed. As the plastic goes around a well-proportioned corner, it will not be subjected to area increases and abrupt changes in direction. Cavity packing pressure stays consistent. This leads to a strong, dimensionally stable corner that will resist post-mold warpage.
Hole depth to diameter ratio
Core pins are used to produce holes in plastic parts. Through holes are easier to produce than blind holes which don't go through the entire part. Blind holes are created by pins that are supported at only one end; hence such pins should not be long. Longer pins will deflect more and be pushed by the pressure of the molten plastic material during molding. It is recommended that hole depth-to-diameter ratio should not be more than 2.
Feature Based Rules
Ribs

Rib features help in strengthening the molded part without adding to wall thickness. In some cases, they can also act as decorative features. Ribs also provide alignment in mating parts or provide stopping surfaces for assemblies. However, projections like ribs can create cavity filling, venting, and ejection problems. These problems become more troublesome for taller ribs. Ribs need to be designed in correct proportion to avoid defects such as short shots and provide the required strength. Thick and deep ribs can cause sink marks and filling problems respectively. Deep ribs can also lead to ejection problems. If ribs are too long or too wide, supporting ribs may be required. It is better to use a number of smaller ribs instead of one large rib.
- Recommended values for parameters: Generally, the rib height is recommended to be not more than 2.5 to 3 times the nominal wall thickness. Similarly, rib thickness at its base should be around 0.4 to 0.6 times the nominal wall thickness.
- Minimum base radius for ribs: A fillet of a certain minimum radius value should be provided at the base of a rib to reduce stress. However, the radius should not be so large that it results in thick sections. The radius eliminates a sharp corner and stress concentration. Flow and cooling are also improved. Fillet radius at the base of ribs should be between 0.25 and 0.4 times the nominal wall thicknesses of the part.
- Draft angle for ribs: Draft angle design is an important factor when designing plastic parts. Such parts may have a greater tendency to shrink onto a core. This creates higher contact pressure on the core surface and increases friction between the core and the part, thus making ejection of the part from the mold difficult. Hence, draft angles should be designed properly to assist in part ejection. This also reduces cycle time and improves productivity. Draft angles should be used on interior or exterior walls of the part along the pulling direction. It is recommended that draft angle for rib should be around 1 to 1.5 deg. Minimum draft should be 0.5 per side.
- Spacing between two parallel ribs: Mold wall thickness gets affected due to spacing between various features in the plastic model. If features like ribs are placed close to each other or the walls of the parts, thin areas are created which can be hard to cool and can affect quality. If the mold wall is too thin, it is also difficult to manufacture and can also result in a lower life for the mold due to problems like hot blade creation and differential cooling. It is recommended that spacing between ribs should be at least 2 times the nominal wall.
Boss
Boss, a basic design element in plastics, is typically cylindrical and used as a mounting fixture, location point, reinforcement feature or spacer. Under service conditions, bosses are often subjected to loadings not encountered in other sections of a component.
- Minimum radius at base of boss: Provide a generous radius at the base of the boss for strength and ample draft for easy part removal from the mold. A fillet of a certain minimum radius value should be provided at the base of boss to reduce stress. The intersection of the base of the boss with the nominal wall is typically stressed and stress concentration increases if no radii are provided. Also, the radius at the base of the boss should not exceed a maximum value to avoid thick sections. The radius at base of boss provides strength and ample draft for easy removal from the mold. It is recommended that the radius at the base of boss should be 0.25 to 0.5 times the nominal wall thickness.
- Boss height to outer diameter ratio: A tall boss with the included draft will generate a material mass and thick section at the base. In addition, the core pin will be difficult to cool, can extend the cycle time and affect the cored hole dimensionally. It is recommended that height of boss should be less than 3 times of outer diameter.

- Minimum radius at tip of boss: Bosses are features added to the nominal wall thickness of the component and are usually used to facilitate mechanical assembly. Under service conditions, bosses are often subjected to loadings not encountered in other sections of a component. A fillet of a certain minimum radius value should be provided at the tip of boss to reduce stress.
- Wall thickness of boss: Wall thicknesses for bosses should be less than 60 percent of the nominal wall to minimize sinking. However, if the boss is not in a visible area, then the wall thickness can be increased to allow for increased stresses imposed by self-tapping screws. It is recommended that wall thickness of boss should be around 0.6 times of nominal wall thickness depending on the material.
- Radius at base of hole in boss: Bosses find use in many part designs as points for attachment and assembly. The most common variety consists of cylindrical projections with holes designed to receive screws, threaded inserts, or other types of fastening hardware. Providing a radius on the core pin helps in avoiding a sharp corner. This not only helps molding but also reduces stress concentration. It is recommended that the radius at base of hole in boss should be 0.25 to 0.5 times the nominal wall thickness.
- Minimum draft for boss inner and outer diameter: An appropriate draft on the outer diameter of a boss helps easy ejection from the mold. Draft is required on the walls of boss to permit easy withdrawal from the mold. Similarly, designs may require a minimum taper on the ID of a boss for proper engagement with a fastener. Draft is required on the walls of boss to permit easy withdrawal from the mold. It is recommended that minimum draft on outer surface of the boss should be greater than or equal to 0.5 degree and on inner surface it should be greater than 0.25 degrees.
- Spacing between bosses: When bosses are placed very close to each other, it results in creating thin areas which are hard to cool and can affect the quality and productivity. Also, if the mold wall is too thin, it is very difficult to manufacture and often results in a lower life for the mold, due to problems like hot blade creation and differential cooling. It is recommended that spacing between bosses should be at least 2 times the nominal wall thickness.
- Standalone boss: Bosses and other thick sections should be cored. It is good practice to attach the boss to the sidewall. In this case the material flow is uniform and provides additional load distribution for the part. For better rigidity and material flow, the general guideline suggests that boss should be connected to nearest side wall.
Undercut detection
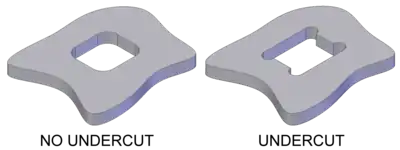
Undercuts should be avoided for ease of manufacturing. Undercuts typically require additional mechanisms for manufacture adding to mold cost and complexity. In addition, the part must have room to flex and deform. Clever part design or minor design concessions often can eliminate complex mechanisms for undercuts. Undercuts may require additional time for unloading molds. It is recommended that undercuts on a part should be avoided to the extent possible.
Fillet
Sharp corners increase concentrations, which are prone to air entrapments, air voids, and sink marks hence weakening the structural integrity of the plastic part. It must be eliminated using radii whenever is possible. It is recommended that an inside radius be a minimum of one times the thickness. At corners, the suggested inside radius is 0.5 times the material thickness and the outside radius is 1.5 times the material thickness. A bigger radius should be used if part design allows
Holes
- Holes can be possibly made on slides but can result in generation of weld lines.
- Minimum spacing between 2 holes or a hole and a sidewall should be equal to the diameter of the hole.
- The hole should be located at a minimum distance of 3 times the diameter from the edge of a part, to minimize stresses.
- A through hole is preferred over a blind hole because core pin that produces a hole can be supported at both ends and is less likely to bend.
- Holes in the bottom of a part are better than holes in side, which require retractable core pins.
- Depth of blind holes should not be more than 2 times the diameter.
- Steps should be used to increase the depth of a deep blind hole.
- For through holes, cutout sections in the part can shorten the length of a small-diameter pin.
- Use overlapping and offset mold cavity projections instead of core pins to produce holes parallel to the die parting line (perpendicular to the mold movement direction).[4]
Simulation
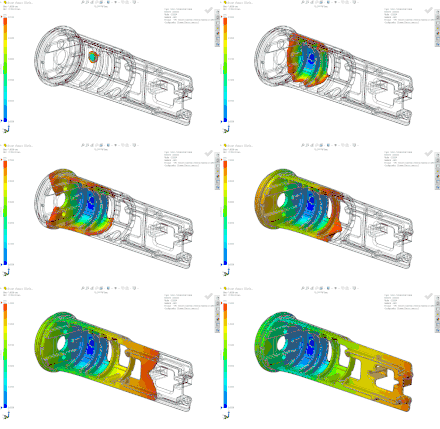
The design of injection moulded components can be further improved and optimised by using injection moulding simulation software such as Autodesk Moldflow[5] and SolidWorks Plastics.[6] This software works with components designed in CAD to simulate how a polymer behaves when it enters a injection mould cavity. It can predict how the molten material flows and freezes, any part geometry that is too thin or too thick and if there are any weaknesses created in the plastic from defects such as weld lines.
When simulation is undertaken in the design phase of a project, in advance of the tool being manufactured, it can help to identify the problems discussed above and allow the designer to iteratively modify and re-simulate the design to make improvements. Use of simulation in the design phase can help to reduce problems with the physical mould and therefore reduce time to market, reduce the use of material and energy, prevent surface defects such as sink and flow marks, and reduce the time taken to inject, cool and eject the part, improving the injection moulding machine's output rate.[7][8]
References
- "DFMPro for Injection Molding".
- "Protomold:Design tips for Rapid Injection Molding".
- "Custom Tips for Injection Molding".
- Greene, Joseph. "Mold requirements".
- https://www.autodesk.co.uk/products/moldflow/overview
- https://www.solidworks.com/product/solidworks-plastics
- https://www.raymont-osman.com/plastic-injection-moulding-simulation-and-analysis/
- https://www.findoutaboutplastics.com/2022/05/6-benefits-of-injection-moulding.html