Fillet weld
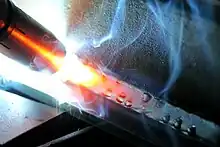
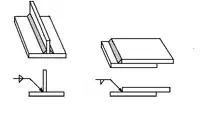
Fillet welding refers to the process of joining two pieces of metal together when they are perpendicular or at an angle. These welds are commonly referred to as tee joints, which are two pieces of metal perpendicular to each other, or lap joints, which are two pieces of metal that overlap and are welded at the edges. The weld is triangular in shape and may have a concave, flat or convex surface depending on the welder's technique. Welders use fillet welds when connecting flanges to pipes and welding cross sections of infrastructure, and when bolts are not strong enough and will wear off easily.[1]

There are two main types of fillet weld: transverse fillet weld and parallel fillet weld.
Aspects

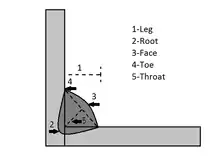
There are 5 pieces to each fillet weld known as the root, toe, face, leg and throat.[2] The root of the weld is the part of deepest penetration which is the opposite angle of the hypotenuse. The toes of the weld are essentially the edges or the points of the hypotenuse. The face of the weld is the outer visual or hypotenuse that you see when looking at a fillet weld. The legs are the other two sides of the triangular fillet weld. The leg length is usually designated as the size of the weld. The throat of the weld is the distance from the center of the face to the root of the weld. Typically the depth of the throat should be at least as thick as the thickness of metal you are welding.[1]
Notation


Fillet welding notation is important to recognize when reading technical drawings. The use of this notation tells the welder exactly what is expected by the fabricator. The symbol for a fillet weld is in the shape of a triangle. This triangle will lie either below a flat line or above it with an arrow coming off of the flat line pointing to a joint. The flat line is called "reference line". The side on which the triangle symbol is placed is important because it gives an indication which side of the joint is to be intersected by the weld. It is recognized that there are two different approaches in the global market to designate the arrow side and other side on drawings; a description of the two approaches is contained in International Standard ISO 2553, they are called "A-System" (which is more commonly used in Europe) and "B-System" (which is basically the ANSI/AWS system used in the US). In "A-System" two parallel lines are used as reference line: one is a continuous line, the other is a dashed line. In the "B-System", there is only one reference line, which is a continuous line. If there is a single reference line (B-System) and the triangle is positioned below the line, then the weld is going to be on the arrow side. If there is a single reference line ("B-System") and the triangle is positioned above the line, then the weld is going to be on the opposite side of the arrow.[3] When you find an arrow pointing to a joint with two triangles, one sitting below and one sitting above the line even with each other, then there is intended to be a fillet weld on the arrow side of the joint as well as the opposite side of the joint.[4] If the weld is to be continuous around a piece of metal such as a pipe or square, then a small circle will be around the point where the flat line and arrow pointing to the joint are connected.[5] Manufacturers also include the strength that the weld must be. This is indicated by a letter and number combination just before the flat line. Examples of this are "E70" meaning the arc electrode must have a tensile strength of 70,000 pounds-force per square inch (480,000 kPa; 4,900 kgf/cm2). There are also symbols that describe the aesthetics of the weld. A gentle curve pointing away from the hypotenuse means a concave weld is required, a straight line parallel with the hypotenuse calls for a flat faced weld, and a gentle curve towards the hypotenuse calls for a convex weld. The surface of the weld can be manipulated either by welding technique or by use of machining or grinding tools after the weld is completed. When reading a manufacturers technical drawings, you might also come across weld dimensions. The weld can be sized in many different ways such as the length of the weld, the measurements of the legs of the weld, and the spaces between welds. Along with a triangle, there will usually be a size for the weld for example (1⁄8”x3⁄8”) to the left of the triangle. This means that the vertical leg of the weld is to be 1⁄8” whereas the horizontal leg is to 3⁄8”. To the right of the triangle, there will be a measurement of exactly how long the weld is supposed to be.[6] If the measurements of the drawing are in mm the welds are likewise measured in mm. For example, the weld would be 3 x 10, the mm being understood automatically.
Intermittent fillet welds
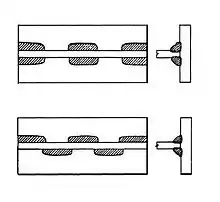
An intermittent fillet weld is one that is not continuous across a joint. These welds are portrayed as a set of two numbers to the right of the triangle instead of just one. The first number as mentioned earlier refers to the length of the weld. The second number, separated from the first by a “-”, refers to the pitch.[7] The pitch is a measurement from midpoint to midpoint of the intermittent welds. Intermittent welding is used when either a continuous weld is not necessary, or when a continuous weld threatens the joint by warping. In some cases intermittent welds are staggered on both sides of the joint. In this case, the notation of the two triangles are not directly on top of each other. Instead, the side of the joint to receive the first weld will have a triangle further to the left than the following side’s triangle notation. As an end result of alternating intermittent fillet welds at each side, the space between welds on one side of the joint will be the midpoint of the opposite side’s weld.[8]
See also
Notes
- Althouse p.185
- Hultenius p.3
- ISO 2553:2013
- Althouse p.186-190
- Haque, pages 2-6
- Haque, p. 4
- Christein, J. P.; Coates, Pamela. "Welding Symbol Basics" (PDF). American Welding Society. Archived (PDF) from the original on July 28, 2018. Retrieved August 10, 2022.
- Althouse p.189
References
- Hultenius, D. (2008). Lecture 14 – Welded Connections.
- Weman, Klas (2003). Welding processes handbook. New York, NY: CRC Press LLC. ISBN 0-8493-1773-8
- ISO 2553:2013, Welding and allied processes - Symbolic representation on drawings - Welded joints
- Cary, Howard B; Scott C. Helzer (2005). Modern Welding Technology. Upper Saddle River, New Jersey: Pearson Education. ISBN 0-13-113029-3.
- Haque, M. E. (2010). Weld connections. Informally published manuscript, Department of Construction Science, Texas A&M University, College Station, Retrieved from http://faculty.arch.tamu.edu/mhaque/cosc421/Weld.pdf%5B%5D.
- Althouse, A. D. (1997). Modern welding. Tinley Park, Ill: Goodheart-Willcox. ISBN 978-1-60525-795-2