Hand embroidery machine
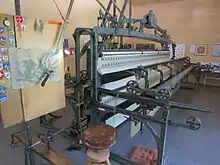
The hand embroidery machine is a manually operated embroidery machine. It was widely used in the Swiss embroidery industry during the late nineteenth and early twentieth centuries.[1][2][3] It was also used in the lace industry near Plauen, Germany,[4] and it played a role in the development of the embroidery industry centered in Hudson County, New Jersey during the early 20th century.[5][6]
Terms and role
The name "hand embroidery machine" – a calque translation from German Handstickmaschine – is somewhat confusing. It's literally a hand-operated stitching machine. Some English authors have referred to them as "hand-looms."[6] Although, strictly speaking, a loom is used to weave textiles, not embroider them. In the Swiss German dialect, this type of embroidery machine was sometimes referred to as a chlüpperli (clothespin) type because the spring-loaded clamps that hold the needles resemble wooden clothespins.
The hand embroidery machine is a multi-needle, satin stitch embroidery machine. Multi-needle refers to fact that the machine has up to two rows of needles. Each needle creates a copy of the design. The satin stitch is created by passing the threaded needle completely through the fabric. The hand machine is the predecessor of the schiffli embroidery machine. The schiffli machine creates a lock stitch similar to a sewing machine. Neither should be confused with the more modern single needle or multi-head embroidery machines.
Machine embroidery and lace were used to embellish linens, clothing, handkerchiefs and curtains. Examples of machine embroidery as well as terminology can be found in Lace, Its Origin and History by Samuel L. Goldenberg.[7]
History
Joshua Heilmann is credited with inventing the first hand embroidery machine in the early nineteenth century near Mulhouse, France, and he received a French patent for his invention in 1829.[8] The broader context in which the invention was developed and used is the Swiss textile industry. This article incorporates a description of Heilmann's machine that was published in a bulletin by the Société industrielle de Mulhausen and in the German Polytechnisches Journal in 1836. The machine was shown at the French Industrial Exposition of 1834.[9] However, the invention did not fully mature until around 1850. Then, they were produced in large numbers. In eastern Switzerland alone, about 16,000 hand embroidery machines were in use by 1908.[1]
Most hand machines were used in private homes. Swiss hand machine embroidery was mostly a cottage industry. A hand machine was typically operated by two people. The operator was known as a stitcher. The assistant was known as a fädlerin (German).[10] The width of the machines varied. The wider the machine, the more difficult it was to operate and the more frequently the work could be interrupted by a broken needle or a broken thread. During the 20th century, hand machines were gradually replaced by schiffli machines. Unlike hand machines which use a single continuous thread, schiffli machines use two threads – one on the front, and one on the back side of the fabric. Schiffli machines were typically powered by an electric motor and were about 20 times faster than a hand machine. Both hand machines and the early schiffli machines used a pantograph to trace the design. Eventually the schiffli pantograph was replaced by Jacquard punch cards and machine embroidery became fully automated. However, hand machines continued to fill a niche, e.g. for small volume jobs.
Many terms that were initially used on hand machines were later applied to schiffli machines. For example, both machines used the French inch and needle spacing was called rapport. Multi color embroidery was commonly done using a hand machine since the needles were re-threaded often and it was just as easy to use a different color.[5] Creating new embroidery designs, enlarging the drawings to scale and adding details for the stitcher were considered the most artistic steps in the process. Trade schools were created to develop the skills that were needed. In 1867, a drawing school, part of the Industrie und Gewerbemuseum (Industry and Trade Museum), opened in St. Gallen.[11] The "museum" included an embroidery collection that served as a source of inspiration. A major contributor to the collection was embroidery business owner Leopold Iklé. Iklé's catalog Industrie und Gewerbemuseum is still in print. An online version of the catalog can be found in the Smithsonian Libraries. The embroidery collection is now part of the St. Gallen Textile Museum. Examples of functioning hand embroidery machines can be seen at the Schaustickerei (Embroidery Machine Museum) in Plauen, Germany, as well as at the Industriekultur Museum in Neuthal, the Textile Museum in St. Gallen, and the Saurer Museum in Arbon, Switzerland.
Construction
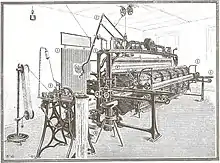
Fig 1. shows a typical hand embroidery machine. The main components are:
- (1) Easel with the embroidery artwork, or embroidery pattern mounted on a board. The operator sat on a stool situated on the left side of the machine. The semi-squatting and semi-stationary posture of the operator was ergonomically very poor (see working conditions in St. Gallen embroidery)[13]
- (2) Pantograph for moving the embroidery frame (4). The pulleys and weights hung from the ceiling balanced the frame and made moving it effortless.
- (3) Gate, or rack
- (4) Fabric, or material to be embroidered – frequently referred to as "goods"
- (5) Front side carriages or trolleys
- (6) Carriage rail
- (7) Hand crank for moving the carriages
- (8) Pedals used to open/close the needle clamps, transfer the needles from the back side to the front side of the fabric
- (9) Needle threading machine. This machine was invented around 1890 and greatly simplified threading of the needles.
Operating principle
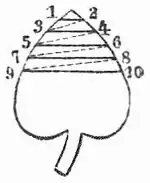
Satin stitch embroidery is created on the surface of a fabric using parallel stitches. Fig. 2 shows the stitch pattern. The thread takes the course shown by the numbers 1-10: 1-2 on the front side of the fabric, 2-3 on the back, 3-4 again on the front, and so on. Notice that a single continuous thread traverses both sides of the fabric.
The hand embroidery machine consists of a large frame, suspended vertically, on which the fabric is stretched. Two sets of clamps, one on either side of the fabric, alternately pass the needles from the front side to the back side.
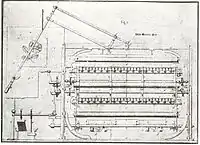
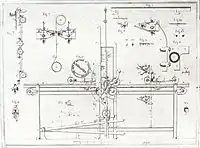
When facing the machine, the frame is seen suspended vertically but is movable so that the material remains vertical. The needles are stationary, while the frame moves on a two-dimensional plane. A stitch can be made between points x1,y1 and x2,y2 by very accurate movement of the frame. The needles move forward or aft, perpendicular to the fabric, in the z dimension. The machine can have between 200-450 needles, arranged in one or two horizontal rows - upper and lower. Thus, two pieces of material can be embroidered at once. This also doubles the machine's capacity. Alternatively, a single piece of fabric can be stretched from e to e3. It is then double embroidered.
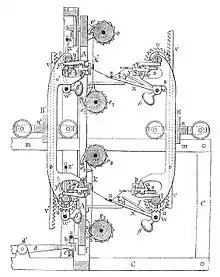
Figure 3 shows a hand machine in side view with its components labeled. The vertical frame A has rails a on rollers b, again sitting in frame c. The frame is supported by a bifurcated lever d, which is drawn broken in Fig. 3, but in reality continues beyond the pivot point d' and has a counterweight at its end. The counter weighted levers keep the frame in balance. The frame is guided near the bottom by the vertical slot f, and at the top by slide rails h and pin g. The frame can move horizontally and vertically, but it cannot rotate. Rollers e, e1, e2, e3 hold the upper and lower material in front of the upper and lower rows of needles. The upper and lower rows move in parallel and are congruent. Two sets of rollers (e and e1, e2 and e3) hold a piece of material parallel to the frame. Each of the four material rollers e, e1, e2, e3 has a ratchet (e', e'1, e'2, e'3). The ratchets allow the material to move vertically in only one direction. Once a horizontal row is completely embroidered, the material is rolled from e to e1 and from e2 to e3.
The needle's movement between the end points of each stitch is translated from the pattern that's mounted on the easel, to the frame that holds the fabric, with the help of a pantograph.
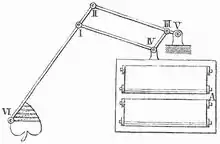
Fig. 4 shows a simplified view of the pantograph connected to the movable frame A. The parallelogram I, II, III, IV has hinged corners. The side II-III is extended to point V, and the side II-I to point VI. The dimensions I-VI and II-V are chosen so that the points V, IV and VI lie on a straight line. Therefore, if you fix point V and let the point VI move around the contour of a shape, point IV will describe an identical shape, but at a smaller size. The point V is mounted on the frame of the embroidery machine, while point IV is connected to the movable frame A. A reduction factor of 6:1 was typical. On the pattern, individual threads are drawn as lines, and the stitches as end points. The machine's operator moves a pointer attached at VI between each end point - from one point to the next, so that the design is reproduced on the fabric.
Hand machine needles are symmetrical, i.e. have points on both ends, and an eye at the center of the shank. The needles are passed through the material by one set of clamps when the first trolley moved towards the frame, and then pulled away from the material by the second set of clamps as the second trolley moves away from the frame. Again refer to the side view in Fig 3. The clamps or pliers sit on opposite sides of the frame in two horizontal rows. The carriage B, B' moves on rollers l and l' which roll on rails m. It carries a wheel frame n n', which have horizontal spacing greater than the width of the material. At the attachment points o, o' are the top and bottom prism shaped rails p, p'. Each clamp has a fixed leg q, q' and a movable jaw r, r'. Each clamp holds a single needle. The action of the clamps is as follows: The "tail" i.e. the clamp's movable leg is constantly under pressure by a closing spring s, s'. On the opposite side of the "tail", however, is a cam t, t' which extends across all of the tails in a row. If the cam's lobe presses on the movable arm of the pliers, then they are opened; if, on the other hand, the cam is turned so that its flat side faces the tongs, the "tails" yield to the pressure of the springs and close. The cams are rotated by pinion gears u, u'. The pinion gear's teeth are enmeshed in a rack gear v, v' which can move up and down.
Fig 3 shows the left support o' positioned against the frame and the right support partially moved away from the frame. One the left support, the thread tensioning mechanism x’ y’ w’ β' and ζ, is in the retracted position. On the right support it is actuating. Thread tensioning is explained in detail below. The trolleys are moved using a hand crank. Notice that the hand crank has four gears. One gear is attached to a handle. That gear is constantly meshed with a second gear. The second gear is attached to an articulating arm so that it can engage one of two other gears. Each of those gears drives a continuous chain which moves a set of trolleys. Movement of trolleys is as follows: beginning on the far left or rear track – the operator begins turning the crank clockwise. When the rear trolleys reach the frame and stop, the articulating arms swings the middle gear so that it engages the front side drive gear. Now, as the handle continues to turn clockwise, the right or front side trolleys move from left to right. Once the thread has been pulled through the material - the sequence is reversed.
Stitching occurs as follows: assume the left carriage has just been driven up against the material. The needles will have pierced the material from the back side, and they will be protruding from the left clamps. The clamps on the right car will be open in preparation to grasp the needles. By alternating the position of the foot pedals - rack gears v and v' move upwards/downwards, rotating both pinion gears u, u' and cams t, t'. The right clamps close and the left clamps open. The needles are now held by the right clamps. The operator continues to turn the hand crank in the same direction as before. Now the left carriage remains stationary, and the right moves away from the material, taking with it the needles and drawing the thread through the fabric. Once the carriage has traveled a short distance, the small rods y will rotate downwards on pivots w due to weights β. Once y has traveled a sufficient distance on pins ζ they will lower the levers x and the cross bars z. The latter lies horizontally, across all of the threads. Rod z gently lies down across the threads, and applies a uniform pressure. The carriage continues to travel until the threads are completely pulled through the material. Without the tensioning mechanism, the threads would be pulled out of the needles instead of being pulled through the fabric.
To make the next stitch, the operator moves the pointer to the next end point on the pattern. He then turns the hand crank in the opposite direction, moving the right carriage towards the frame. As carriage B returns the thread tensioner z is lifted, the needles push through the material from right to left, and the process described above repeats in the opposite direction.
Hand machine problems and developments
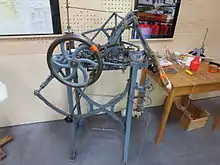
One of the major drawbacks of this machine is the fact that the threads must be pulled completely through the fabric in order to create each stitch. The threads could be at most as long as the rails, typically about one meter long. Depending on the pattern, this is enough thread for about 250-400 stitches. When the thread is used up, all of needles must be re-threaded. Before the invention of the threading machine (around 1890) the threading had to be done by hand. From the East Swiss textile industry there are reports that children had to thread needles from 6 to 8 hours per day, in addition to attending school.[14] Stitching speed and thread capacity are two of the reasons that hand machines were inferior to schiffli machines.
The embroidery machine as a tool
A stitcher considered the embroidery machine to be a tool, not a machine, because it could do absolutely nothing without his labor and skill.[15] The operator had to follow the pattern accurately. He must use the right amount of momentum and timing to operate the wheels and levers with the right amount of force to achieve correct results. Especially when pulling the threads through the fabric. If he pulls too little, loops can form in the thread. If he pulls too hard the threads can break. A stitcher was paid a piecework wage. Interruptions resulted in the loss of wages. Missed stitches and mistakes had to be corrected by a seamstress. The stitcher had to make deductions to pay his assistant. Often the stitcher's wife or one of his children had to help him. Large machines sometimes required two assistants. In addition to threading needles, the assistant had to keep an eye on the machine's progress. The stitcher could not always see all of the threads and needles, especially those of the lower row since they were largely hidden from his view.[16]
References
- Labor, United States Dept of Commerce and; Clark, William Alexander Graham (1908). Swiss embroidery and lace industry. Government Printing Office.
- Schneider, Coleman (1968). Machine Made Embroideries. Globe Lithographing Company.
- Besso, Sabbato Louis (1910). The cotton industry in Switzerland, Vorarlberg, and Italy; a report to the electors of the Gartside scholarships. Publications of the University of Manchester. Economic ser.no. XIII. Gartside reports on industry and commerce. No. 9. Manchester: University Press. hdl:2027/uiug.30112050041133.
- Manufactures, United States Bureau of (1905). Machine-made Lace Industry in Europe: Calais, Plauen, St. Gall, Nottingham. U.S. Government Printing Office.
- Schneider, Coleman (1991-01-01). The Art of Embroidery: In the 90's. Coleman Schneider. ISBN 9780960166244.
- Schwab, David E. (1957). The story of lace and embroidery and handkerchiefs. New York: Fairchild Publications Inc. hdl:2027/coo.31924055324119.
- Goldenberg, Samuel L. (1904). Lace, its origin and history. Brentano's. OCLC 22304371.
- Woodcroft, Bennet (1863). "Joshua Heilmann". Brief Biographies of Inventors of Machines for the Manufacture of Textile Fabrics. London. p. 43. Retrieved 2019-06-04.
{{cite book}}: CS1 maint: location missing publisher (link) - Anonymus (1836). "Heilmann's Stikmaschine". Polytechnisches Journal. 59: 5–24.
- "Textilindustrie in der Ostschweiz", Wikipedia (in German), 2019-05-17, retrieved 2019-05-30
- "best embroidery machine", Wikipedia (in German), 2020-01-27, retrieved 2019-05-28
- Tanner, Seite 138 und Röhlin, Seite 51
- Röhlin, Seite 41f
- Tanner, Seite 166
- Tanner, Kapitel Mentalität der Sticker
- Stickerei-Zeit, Seite 38
External links
- Anne Wanner-JeanRichard - Beginnings of the embroidery industry: hand embroidery
- Anne Wanner-JeanRichard - Hand Embroidery Machine
- Anne Wanner-JeanRichard - Embroidery machine developments
- Anne Wanner-JeanRichard - Iklé machine embroidery patterns
- Anne Wanner-JeanRichard - Artwork design and enlarging for hand embroidery machine
- Saurer Textile Machine Museum Arbon, Switzerland
- Textile Museum St. Gallen, Switzerland
- Sample embroidery drawings 1897
- Textilsammlung Iklé Katalog
General resources
References used in the original German Wikipedia article:
- Stickmaschine. In: Meyers Großes Konversations-Lexikon. 6th edition. Vol. 19, Bibliographisches Institut, Leipzig/Vienna 1909, p. 22–25.
- Albert Tanner: Das Schiffchen fliegt, die Maschine rauscht. Weber, Sticker und Fabrikanten in der Ostschweiz. Unionsverlag; Zürich 1985; ISBN 3-293-00084-3, 978-3-293-00084-1
- Peter Röllin (Konzept): Stickerei-Zeit, Kultur und Kunst in St. Gallen 1870–1930. VGS Verlagsgemeinschaft, St. Gallen 1989, ISBN 3-7291-1052-7, 3729110527