John Chard
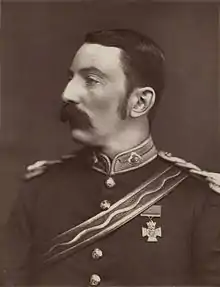
Colonel John Rouse Merriott Chard VC (21 December 1847 – 1 November 1897) was a British Army officer who received the Victoria Cross, the highest military decoration for valour "in the face of the enemy" that can be awarded to members of the British armed forces. He earned the decoration for his role in the defence of Rorke's Drift in January 1879 where he assumed command of the outpost and a small garrison of 139 soldiers and successfully repulsed an assault by some 3,000 to 4,000 Zulu warriors. The battle was recreated in the film Zulu in which Chard was portrayed by Stanley Baker.
Colonel John Rouse Merriott Chard | |
|---|---|
 | |
| Born | 21 December 1847 Plymouth, Devon, England |
| Died | 1 November 1897 (aged 49) Hatch Beauchamp, Somerset, England |
| Allegiance | |
| Service/ | |
| Years of service | 1868–1897 |
| Rank | Colonel |
| Unit | Corps of Royal Engineers |
| Battles/wars | Anglo-Zulu War |
| Awards | Victoria Cross |
Born near Plymouth, Chard attended the Royal Military Academy in Woolwich and was commissioned into the Royal Engineers in July 1868. He was involved with the construction of fortifications in the Bermuda Garrison (three years) and at Malta (two years) before he was deployed to southern Africa at the start of the Anglo-Zulu War. At the end of the war he returned to a hero's welcome in England and was invited to an audience with Queen Victoria. After a series of overseas postings he took up his final position in Perth, Scotland. He retired from the army as a colonel in 1897 after he was diagnosed with terminal cancer and died at his brother's home in Somerset later that year.
Early life
Chard was born at Boxhill near Plymouth on 21 December 1847 to William Wheaton Chard and his wife Jane Brimacombe.[1] He had two brothers and four sisters. His elder brother William Wheaton Chard served with the Royal Fusiliers, rising to the rank of colonel, and his younger brother Charles Edward Chard became rector of a parish church in Hatch Beauchamp, Somerset.[2] He was educated at Cheltenham Grammar School and Plymouth New Grammar School, and after a period of private tuition he enrolled at the Royal Military Academy in Woolwich.[1]
On 14 July 1868, Chard received a commission as a lieutenant in the Royal Engineers and continued his training at Chatham for the next two years.[3] He was posted to Bermuda, along with Lieutenant HP Knacker, in 1870 to construct fortifications at the Naval Dockyard near Hamilton and returned to England four years later for his father's funeral.[2][3] He was then sent to Malta to assist with the improvement of the island's sea defences.[2] He returned to England in 1876 where he was based at Aldershot and Chatham, and was assigned to the 5th Company Royal Engineers.[2][4]
Rorke's Drift

On 2 December 1878, the 5th Company Royal Engineers were sent to the Colony of Natal in response to a request from Lord Chelmsford, commander of the British forces in southern Africa, for an additional unit of engineers to assist with preparations for the invasion of the Zulu Kingdom.[5] After their arrival on 5 January, Chard was dispatched with a small group of sappers to repair and maintain the punts at one of the few crossings of the Buffalo River which ran along the border of Natal and the Zulu Kingdom. A short distance downstream was Rorke's Drift, an isolated mission station used as a staging post for the British invasion force. It consisted of two thatched bungalows about 30 metres (98 ft) apart—the western building was used as a hospital, and the eastern building had been converted into a storehouse.[6] Garrisoned at the Drift were Chelmsford's quartermaster general, Major Henry Spalding, a company of the 2nd Battalion 24th Regiment of Foot commanded by Lieutenant Gonville Bromhead, and a large company of the 3rd Natal Native Contingent (NNC).[7]
Chard's group arrived on 19 January and set up camp near the crossing. On the morning of 22 January, he received an order that his sappers were required at Isandlwana 10 miles (16 km) to the east, where Chelmsford had set up an advanced camp for his main invasion column which had marched into Zulu territory two weeks before. However, when he arrived Chard was informed that only his men were required and that he should return to Rorke's Drift.[8] While at Isandlwana, Chard had witnessed a Zulu army approaching the camp in the distance and upon his return to the Drift at about 1 pm, he informed Spalding of the situation.[9] Spalding decided to depart the Drift to hurry British reinforcements en route from Helpmekaar, but before he left, he checked a copy of the Army List which confirmed that Chard was senior to Bromhead. Therefore, Chard, a "notoriously relaxed" man with no combat experience, was unexpectedly placed in command of the small garrison.[10]

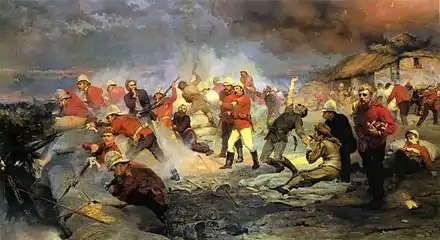
Unconcerned by the presence of the Zulus nearby, Chard returned to his tent by the river crossing, but he was soon after disturbed by two NNC officers on horseback who informed him that the camp at Isandlwana had been overwhelmed and annihilated by the Zulus.[11] Returning to the station, Chard found Bromhead and Assistant Commissary James Dalton had already instructed the troops to use mealie bags to construct a defensive perimeter between the storehouse and hospital. Chard consented and by 4 pm the hastily constructed perimeter was complete.[12] Soon afterwards, the Zulu impi, which contained some 3,000–4,000 men, was sighted advancing on their position. This caused the NNC troops to panic and desert the station, reducing the number of defenders from around 350 to approximately 140 (including 30 sick and wounded).[13] Chard immediately ordered an additional barricade of biscuit boxes to be built across the inner perimeter to provide a smaller fall-back area should the Zulus overwhelm a part of the thinly manned perimeter.[14]
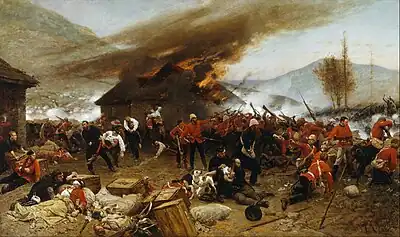
The first waves of Zulu assault were repulsed by British volley fire, but the attackers pushed on relentlessly, particularly along a vulnerable section of the British perimeter by the hospital which became the centre of fierce hand-to-hand combat.[15] With British casualties mounting, Chard ordered his troops to withdraw behind the biscuit boxes, which left the western half of the station in Zulu hands, including the hospital, which was subsequently set alight by the attackers.[16] Once inside, Chard ordered the construction of a redoubt made from a tall pyramid of mealie bags to provide shelter to the wounded and form the last line of defence.[17] The Zulus continued to attack in intermittent waves during the night, but they were illuminated by the burning thatch, which enabled the defenders to spot their advances. By 5 am, the exhausted Zulus had abandoned the attack, and British reinforcements arrived later that morning. Chard counted 351 dead Zulus scattered around the perimeter.[18][19] The British suffered 17 killed and 10 wounded.[20]
Victoria Cross, later career and death
Chard remained at Rorke's Drift for several weeks after the battle and assisted with the construction of a new stone perimeter wall. However, conditions at the camp were poor; Chard became ill with fever and was taken to Ladysmith for treatment.[4] Once recovered he was attached to Colonel Evelyn Wood's column for the second invasion of the Zulu Kingdom.[1] Meanwhile, Chard's report of the battle had been dispatched to England and received with enthusiasm by the British press and public.[21] The War Office subsequently promoted Chard to captain and brevet major and awarded him and 10 other defenders of the station with Victoria Crosses, the highest decoration for valour that could be awarded to British troops.[2][22] The citation for the award was published in the London Gazette on 2 May 1879:[23]
THE Queen has been graciously pleased to signify Her intention to confer the decoration of the Victoria Cross on the undermentioned Officers and Soldiers of Her Majesty's Army, whose claims have been submitted for Her Majesty's approval, for their gallant conduct in the defence of Rorke's Drift, on the occasion of the attack by the Zulus, as recorded against their names, viz.:—
For their gallant conduct at the defence of Rorke's Drift, on the occasion of the attack by the Zulus on the 22nd and 23rd January, 1879.
Royal Engineers Lieutenant (now Captain and Brevet Major) J. R. M. Chard
2nd Battalion 24th Regiment Lieutenant (now Captain and Brevet Major) G. Bromhead
The Lieutenant-General commanding the troops reports that, had it not been for the fine example and excellent behaviour of these two Officers under the most trying circumstances, the defence of Rorke's Drift post would not have been conducted with that intelligence and tenacity which so essentially characterised it.
The Lieutenant-General adds, that its success must, in a great degree, be attributable to the two young Officers who exercised the Chief Command on the occasion in question.

Some of Chard and Bromhead's superiors, however, were resentful of the adulation bestowed on the pair.[10] Wood took a particular dislike to his new subordinate. Unimpressed with his temperament and sceptical of his role in the battle, he denounced Chard as a "useless officer" and "a dull, heavy man, scarcely able to do his regular work".[10][24][25] Lieutenant General Sir Garnet Wolseley, who thought the desperate defence of the Rorke's Drift was merely a case of "rats [fighting] for their lives which they could not otherwise save" presented Chard with his VC on 16 July. Likely influenced by Wood, he subsequently said of Chard that a "more uninteresting or more stupid-looking fellow I never saw".[10][25]
Chard was present in the British square during the decisive victory at the Battle of Ulundi and remained in Africa until the end of the war.[4] His arrival back in Portsmouth in October 1879 was greeted with celebration. In addition to a series of presentations and dinners bestowed in his honour, he attended Balmoral Castle to dine with Queen Victoria who was impressed by his modest and unassuming demeanour.[1][26] Chard returned to duty at Devonport in January 1880 and was posted to Cyprus in December 1881. His brevet majority was substantiated on 17 July 1886 and he returned to England in March 1887 to take up a position in Preston.[4] He was ordered to Singapore in December 1892 and received a promotion to lieutenant colonel.[4] He returned to England in 1896 and took up his final post as Commanding Royal Engineer at Perth, Scotland, and was promoted to colonel on 8 January 1897.[4]
While stationed in Perth, Chard—a lifelong pipe smoker—was diagnosed with cancer of the tongue.[27] He underwent two operations: the second—which took place in March 1897—resulted in the removal of his tongue but despite this it was reported that he could still converse clearly.[4] However, by August it was discovered the cancer was terminal and Chard retired to his brother, Charles', rectory at Hatch Beauchamp, Somerset. After two weeks of "terrible suffering", Chard died on 1 November 1897.[2] He was unmarried.[2] He was buried at The Church of St John the Baptist in Hatch Beauchamp, Somerset.
Legacy

Chard was buried in the churchyard by the south east transept of the Church of St John the Baptist in Hatch Beauchamp. Among the numerous messages of sympathy and floral tributes was a wreath of laurel leaves sent by the Queen, who had remained in contact with Chard and frequently enquired about his health. The wreath bore the handwritten inscription "A mark of admiration and regard for a brave soldier from his sovereign".[28] In 1899 a stained glass memorial window dedicated to Chard was installed in the south wall of the church's chancel.[29] Another memorial donated by the Royal Engineers was placed in Rochester Cathedral.[30][31] A display at the Royal Engineers Museum in Gillingham, Kent, commemorates Chard's leadership at Rorke's Drift and includes the Webley Revolver he used in the battle.[32]
Welsh actor Stanley Baker portrayed Chard in the 1964 film Zulu which depicted the defence of Rorke's Drift. Baker acquired Chard's campaign medal and a "cast copy" of his Victoria Cross at an auction in 1972 but they were sold by his family after his death in 1976.[26] However, in 1996 the Victoria Cross was discovered to be the original rather than a copy after its metallic characteristics were compared with the bronze ingot from which all Victoria Crosses are cast. The medal was subsequently acquired by Lord Ashcroft, owner of the world's largest collection of VCs, and is on display at the Imperial War Museum, London.[33]
Chard was commemorated by the South African military with the John Chard Decoration and the John Chard Medal which were awarded to members of the Citizen Force. Instituted by Queen Elizabeth II in 1952, the Medal and the Decoration were awarded for 12 years and 20 years service respectively until 2003 when they were superseded by the Medalje vir Troue Diens and the Emblem for Reserve Force Service.[34]
Notes
- Vetch, R.; Jones, M. (3 January 2008). "Chard, John Rouse Merriott (1847–1897), army officer". Oxford Dictionary of National Biography (online ed.). Oxford University Press. doi:10.1093/ref:odnb/5137. (Subscription or UK public library membership required.)
- "Lieutenant John Rouse Merriott Chard VC". Royal Engineers Museum. 2009. Archived from the original on 9 June 2010. Retrieved 2 February 2013.
- Greaves (p.230)
- Greaves (p.231)
- Greaves (p. 81)
- Knight (p. 565)
- Knight (p. 492)
- Knight (p.369)
- Greaves (p.102)
- Knight (p.564)
- Knight (pp. 561–562)
- Greaves (p. 109)
- Greaves (p. 12)
- Knight (p. 570)
- Greaves (pp. 115–117)
- Greaves (pp. 118–120)
- Knight (p. 591)
- Knight (p. 613)
- Greaves (p. 143)
- Greaves (p. 159)
- Knight (pp.650–652)
- Greaves (p.184)
- "No. 24717". The London Gazette. 2 May 1879. p. 3177.
- Greaves (p.181)
- Greaves (p.186)
- Greaves (p.190)
- Knight (p.687)
- Greaves (pp.232–233)
- Greaves (p.233)
- "Why visit Rochester Cathedral" (PDF). Rochester Link. Diocese of Rochester. October 2011. p. 9. Retrieved 2 February 2013.
- Robert Hamilton, Vetch (1901). . In Lee, Sidney (ed.). Dictionary of National Biography (1st supplement). Vol. 1. London: Smith, Elder & Co.
- Visually Impaired Person Awareness. "Royal Engineers Museum". Retrieved 3 February 2018.
- "Lord Ashcroft interview: Our bravest of the brave". The Daily Telegraph. 16 October 2010. Archived from the original on 9 May 2013. Retrieved 2 February 2013.
- "Chard medals returned" (PDF). South African Soldier. Department of Defence. October 2006. p. 14. Archived from the original (PDF) on 13 July 2016. Retrieved 2 February 2013.
References
- Greaves, Adrian (2002). Rorke's Drift. Cassell Military Paperbacks. ISBN 978-0-3043-6641-5.
- Knight, Ian (2010). Zulu Rising: The Epic Story of Isandlwana and Rorke's Drift. Macmillan. ISBN 978-0-330-44593-1.
External links
- John Rouse Merriott Chard (biography, photos and memorial details)
- Portraits of John Chard at the National Portrait Gallery, London