Point diffraction interferometer
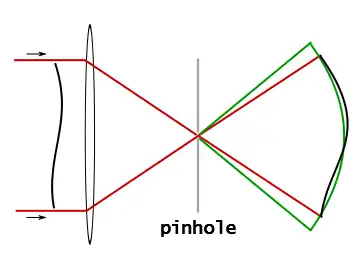
A point diffraction interferometer (PDI)[1][2][3] is a type of common-path interferometer. Unlike an amplitude-splitting interferometer, such as a Michelson interferometer, which separates out an unaberrated beam and interferes this with the test beam, a common-path interferometer generates its own reference beam. In PDI systems, the test and reference beams travel the same or almost the same path. This design makes the PDI extremely useful when environmental isolation is not possible or a reduction in the number of precision optics is required. The reference beam is created from a portion of the test beam by diffraction from a small pinhole in a semitransparent coating.[4][5] The principle of a PDI is shown in Figure 1.

The device is similar to a spatial filter. Incident light is focused onto a semi-transparent mask (about 0.1% transmission). In the centre of the mask is a hole about the size of the Airy disc, and the beam is focused onto this hole with a Fourier-transforming lens. The zeroth order (the low frequencies in Fourier space) then passes through the hole and interferes with the rest of beam. The transmission and the hole size are selected to balance the intensities of the test and reference beams. The device is similar in operation to phase-contrast microscopy.
Development in PDI systems

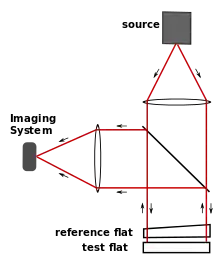
PDI systems are valuable tool to measure absolute surface characteristics of an optical or reflective instruments non destructively. The common path design eliminates any need of having a reference optics, which are known to overlap the absolute surface form of a test object with its own surface form errors. This is a major disadvantage of a double path systems, such as Fizeau interferometers, as shown in Figure 2. Similarly the common path design is resistant to ambient disturbances.[4]
The main criticisms of the original design are (1) that the required low-transmission reduces the efficiency, and (2) when the beam becomes too aberrated, the intensity on-axis is reduced, and less light is available for the reference beam, leading to a loss of fringe contrast. Lowered transmission was associated with lowered signal to noise ratio. These problems are largely overcome in the phase-shifting point diffraction interferometer designs, in which a grating or beamsplitter creates multiple, identical copies of the beam that is incident on an opaque mask. The test beam passes through a somewhat large hole or aperture in the membrane, without losses due to absorption; the reference beam is focused onto the pinhole for highest transmission. In the grating-based instance, phase-shifting is accomplished by translating the grating perpendicular to the rulings, while multiple images are recorded. The continued developments in phase shifting PDI have achieved accuracy orders of magnitude greater than standard Fizeau based systems.[6]
Phase-shifting [see Interferometry] versions have been created to increase measurement resolution and efficiency. These include a diffraction grating interferometer by Kwon[7] and the Phase-Shifting Point Diffraction Interferometer.[5][6][8][9]
Types of phase-shifting PDI systems
Phase-shifting PDI with single pinhole

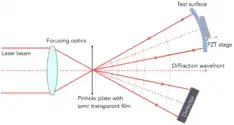
Gary Sommargren[11] proposed a point diffraction interferometer design which directly followed from the basic design where parts of the diffracted wavefront was used for testing and the remaining part for detection as shown in Figure 3. This design was a major upgrade to existing systems. The scheme could accurately measure the optical surface with variations of 1 nm. The phase shifting was obtained by moving the test part with a piezo electric translation stage.[12][13] An unwanted side effect of moving the test part is that the defocus also moves distorting the fringes. Another downsides of Sommargren's approach is that it produces low contrast fringes [14] and an attempt to regulate the contrast also modifies the measured wavefront.
PDI systems using optical fibres
In this type of point diffraction interferometer the point source is a single mode fiber. The end face is narrowed down to resemble a cone and is covered with metallic film to reduce the light spill. Fibre is arranged so that they generate spherical waves for both testing and referencing. End of an optical fibre is known to generate spherical waves with an accuracy greater than .[15] Although optical fibre based PDIs provide some advancement over the single pinhole based system, they are difficult to manufacture and align.

Two-beam phase-shifting PDI
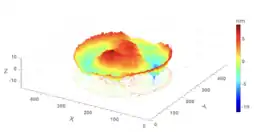
Two-beam PDI provides a major advantage over other schemes by availing two independently steerable beams. Here, the test beam and reference beam are perpendicular to each other, where the intensity of reference can be regulated. Similarly, an arbitrary and stable phase shifts can be obtained relative to the test beam keeping the test part static. The scheme as shown in Figure 4 is easy to manufacture and provides user-friendly measuring conditions similar to Fizeau type interferometers. At the same time renders following additional benefits:
- Absolute surface form of the test part.
- High numerical aperture (NA = 0.55).
- Clear fringe patterns of high contrast.
- High accuracy of surface form testing (wavefront RMS error 0.125 nm).
- Wave-front RMS repeatability 0.05 nm.
- Can measure depolarising test parts.
The device is self-referencing, therefore it can be used in environments with a lot of vibrations or when no reference beam is available, such as in many adaptive optics and short-wavelength scenarios.

Applications of PDI
Interferometry has been used for various quantitative characterisation of optical systems indicating their overall performance. Traditionally, Fizeau interferometers have been used to detect optical or polished surface forms but new advances in precision manufacturing has allowed industrial point diffraction interferometry possible. PDI is especially suited for high resolution, high accuracy measurements in laboratory conditions to noisy factory floors. Lack of reference optics makes the method suitable to visualise absolute surface form of optical systems. Therefore, a PDI is uniquely suitable to verify the reference optics of other interferometers. It is also immensely useful in analysing optical assemblies used in Laser based systems. Characterising optics for UV lithography. Quality control of precision optics. Verifying the actual resolution of an optical assembly. Measuring the wavefront map produced by X-ray optics. PS-PDI can also be used to verify rated resolution of space optics before deployment.
See also
References
- Linnik, W. P. (1933). "A Simple Interferometer for the Investigation of Optical Systems". C. R. Acad. Sci. URSS. 5: 210.
- Smartt, R. N.; W. H. Steel (1975). "Theory and application of Point-Diffraction interferometers". Japanese Journal of Applied Physics. 14 (S1): 351–356. Bibcode:1975JJAPS..14..351S. doi:10.7567/jjaps.14s1.351.
- Smartt, R. N.; Strong, J. (1972). "Point-Diffraction Interferometer". Journal of the Optical Society of America. 62: 737. Bibcode:1974JOSA...62..737S.
- Neal, Robert M.; Wyant, James C. (2006-05-20). "Polarization phase-shifting point-diffraction interferometer". Applied Optics. 45 (15): 3463–3476. Bibcode:2006ApOpt..45.3463N. doi:10.1364/AO.45.003463. hdl:10150/280372. ISSN 1539-4522. PMID 16708090.
- Voznesenskiy, Nikolay; Voznesenskaia, Mariia; Petrova, Natalia; Abels, Artur (2012-12-18). Mazuray, Laurent; Wartmann, Rolf; Wood, Andrew P; de la Fuente, Marta C; Tissot, Jean-Luc M; Raynor, Jeffrey M; Kidger, Tina E; David, Stuart; Benítez, Pablo; Smith, Daniel G; Wyrowski, Frank; Erdmann, Andreas (eds.). "Alignment of phase-shifting interferograms in the two-beam point diffraction interferometer". Optical Systems Design 2012. 8550. International Society for Optics and Photonics: 85500R–85500R–8. doi:10.1117/12.980910. S2CID 123535031.
{{cite journal}}: Cite journal requires|journal=(help) - "Product — Difrotec". difrotec.com. Retrieved 2017-03-20.
- Kwon, Osuk (February 1984). "Multichannel phase-shifted interferometer". Optics Letters. 9 (2): 59–61. Bibcode:1984OptL....9...59K. doi:10.1364/ol.9.000059. PMID 19718235.
- Medecki, Hector (1996). "A Phase-Shifting Point Diffraction Interferometer". Optics Letters. 21 (19): 1526–1528. Bibcode:1996OptL...21.1526M. doi:10.1364/OL.21.001526. PMID 19881713.
- Naulleau, Patrick (1999). "Extreme-ultraviolet phase-shifting point-diffraction interferometer: a wave-front metrology tool with subangstrom reference-wave accuracy". Applied Optics. 38 (35): 7252–7263. Bibcode:1999ApOpt..38.7252N. doi:10.1364/ao.38.007252. PMID 18324274.
- Otaki, Katsura; Bonneau, Florian; Ichihara, Yutaka (1999-01-01). "Absolute measurement of a spherical surface using a point diffraction interferometer". Optical Engineering for Sensing and Nanotechnology (ICOSN '99). 3740: 602–605. doi:10.1117/12.347755. S2CID 119631152.
{{cite journal}}: Cite journal requires|journal=(help) - "Interferometer". str.llnl.gov. Retrieved 2017-03-20.
- G. E. Sommargren, U.S. Patent No. 554840 1996 .
- Rhee, Hyug-Gyo; Kim, Seung-Woo (2002-10-01). "Absolute distance measurement by two-point-diffraction interferometry". Applied Optics. 41 (28): 5921–5928. Bibcode:2002ApOpt..41.5921R. doi:10.1364/AO.41.005921. ISSN 1539-4522. PMID 12371550.
- Voznesenskiy, Nikolay; Voznesenskaia, Mariia; Petrova, Natalia; Abels, Artur (2013-05-13). "Concept, realization and performance of a two-beam phase-shifting point diffraction interferometer". In Lehmann, Peter H; Osten, Wolfgang; Albertazzi, Armando (eds.). Optical Measurement Systems for Industrial Inspection VIII. Vol. 8788. International Society for Optics and Photonics. pp. 878805–878805–13. doi:10.1117/12.2020618. S2CID 109782639.
- Chkhalo, Nikolay I.; Kluenkov, Evgeniy B.; Pestov, Aleksey E.; Raskin, Denis G.; Salashchenko, Nikolay N.; Toropov, Mikhail N. (2008-01-01). "Manufacturing and investigation of objective lens for ultrahigh resolution lithography facilities". SPIE Proceedings. 7025: 702505–702505–6. doi:10.1117/12.802351. S2CID 55343344.
{{cite journal}}: Cite journal requires|journal=(help) - "Difrotec D7 is a high accuracy industrial point diffraction interferometer". www.difrotec.com. Retrieved 2017-04-28.
External links
- Making sure the space camera is up for the job before deployment: A case study by the Interferometer manufacturer Difrotec OÜ.