Time-of-flight diffraction ultrasonics
Time-of-flight diffraction (TOFD) method of ultrasonic testing is a sensitive and accurate method for the nondestructive testing of welds for defects. TOFD originated from tip diffraction techniques which were first published by Silk and Liddington[1] in 1975 which paved the way for TOFD. Later works on this technique are given in a number of sources which include Harumi et al. (1989), Avioli et al. (1991), and Bray and Stanley (1997).


Bray and Stanley (1997) summarized TOFD as tip-diffraction techniques which utilized the principle that the tips of a crack when struck by a wave will diffract the signals back to the other location on the surface. The depth of these tips can be determined from the diffracted energy.[2]
TOFD was invented in the UK in the 1970s initially as a research tool.[3] The use of TOFD enabled crack sizes to be measured more accurately, so that expensive components could be kept in operation as long as possible with minimal risk of failure.
Principle of operation
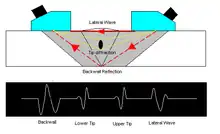
Measuring the amplitude of reflected signal is a relatively unreliable method of sizing defects because the amplitude strongly depends on the orientation of the crack. Instead of amplitude, TOFD uses the time of flight of an ultrasonic pulse to determine the position and size of a reflector.
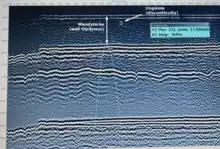
In a TOFD system, a pair of ultrasonic probes sits on opposite sides of a weld. One of the probes, the transmitter, emits an ultrasonic pulse that is picked up by the probe on the other side, the receiver. In undamaged pipes, the signals picked up by the receiver probe are from two waves: one that travels along the surface and one that reflects off the far wall. When a crack is present, there is a diffraction of the ultrasonic wave from the tip(s) of the crack. Using the measured time of flight of the pulse, the depth of a crack tips can be calculated automatically by simple trigonometry.
Applications
Phased Array + TOFD combination is commonly used to inspect pipeline welds.
Reliability
One of the limitations of TOFD is the "dead zone' created by the lateral wave signal just below the inspection surface (or OD surface in case of the pipe).[4] The dead zone is approximately 5 mm and there is no flaw detection in this zone. Calibration blocks with side drilled holes as shown in Reference[4] and ISO 10863 used to validate the "dead zone" and sizing accuracy.
Features
- A computerised and automated system for weld inspection.
- Probes are mounted on a buggy that travels along a weld, recording data as it moves.
- Compared to conventional methods of ultrasonic testing, TOFD is sensitive to cracks and measures their dimensions accurately.
- TOFD has a dead zone where it is not sensitive to defects, hence TOFD ought always to be supplemented by a conventional pulse-echo examination or phased array. The pulse echo probes are commonly mounted on the same buggy as the TOFD probes.
- Requires ultrasound technicians with advanced training.
References
- M.G. Silk, B.H. Lidington (1975). "The potential of scattered or diffracted ultrasound in the determination of crack depth". Non-Destructive Testing. 8 (3): 146–151. doi:10.1016/0029-1021(75)90024-9. ISSN 0029-1021.
- Bray, Don (2003). "Ultrasonic Systems for Industrial Nondestructive Evaluation". Ultrasonic Nondestructive Evaluation Engineering and Biological Material Characterization. doi:10.1201/9780203501962.ch3. ISBN 978-0-8493-1462-9.
- J. P. Charlesworth, J. A. G. Temple (2001). Engineering Applications of Ultrasonic Time-of-Flight Diffraction Second Edition. Research Studies Press LTD. p. 254. ISBN 978-0-86380-239-3.
- ASTM, E2373 (2012). Nondestructive Testing Vol 3.03, Standard Practice for Use of Time of Flight Diffraction (TOFD) Technique. West Conshohocken, PA: American Society for Testing of Materials. pp. 1251–62. ISBN 9780803187290.
Further reading
Standards
- ISO/DIS 10863:11, Welding – Use of time-of-flight diffraction technique (TOFD) for examination of welds
- EN 583-6, Non-destructive testing – Ultrasonic examination – Part 6: Time-of-flight diffraction technique as a method for detection and sizing of discontinuities
- EN 15617, Non-destructive testing of welds – Time-of-flight diffraction technique (TOFD) – Acceptance levels
Other sources
- Engineering Applications of Ultrasonic Time-of-Flight Diffraction, 2nd ed., J. P. Charlesworth and J. A. G. Temple, Research Studies Press, 2002.
External links
- TOFD: – An Alternate Non-Destructive Testing Procedure to Replace Traditional Methods
- NDT.net Database Search returns over 500 hits for the search term 'TOFD'
- TOFD Principles on NDT.net