Mirror mount
A mirror mount is a device that holds a mirror.[1] In optics research, these can be quite sophisticated devices, due to the need to be able to tip and tilt the mirror by controlled amounts, while still holding it in a precise position when it is not being adjusted.

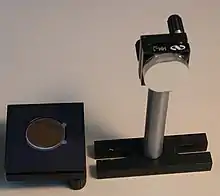
An optical mirror mount generally consists of a movable front plate which holds the mirror, and a fixed back plate with adjustment screws. Adjustment screws drive the front plate about the axes of rotation in the pitch (vertical) and yaw (horizontal) directions. An optional third actuator often enables z-axis translation.[2]
Precision mirror mounts can be quite expensive, and a notable amount of engineering goes into their design. Such sophisticated mounts are often required for lasers, interferometers, and optical delay lines.
Types of mirror mount

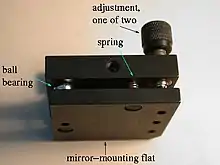
The most common type of mirror mount is the kinematic mount.[3] This type of mount is designed according to the principles of kinematic determinacy. Typically, the movable frame that holds the mirror pivots on a ball bearing which is set into a hole in the fixed frame. Ideally, this hole should be trihedral (pyramid-shaped). Often a conical hole is used due to easier manufacture. The frame is pivoted by means of two micrometers or fine-thread screws, tipped with steel ball bearings. One of these ball bearings rests in a V-groove, the other rests on a flat surface. On cheaper mounts, the flat surface may be simply the material of the mount. In more expensive mounts, the flat surface (and perhaps the hole and v-groove too) may be made out of a much harder material (often sapphire), set into the frame.
The reason for this strange mechanism is that the first ball (ideally) makes contact with the fixed frame at exactly three points, the second ball at two, and the third ball at just one. These six points of contact exactly constrain the six degrees of freedom for motion of the movable frame. This leads to precise movement of the frame when the micrometers or screws are turned, without unnecessary wobble or friction.
A disadvantage of kinematic mounts is that the center of the mirror moves along its normal axis, when the mirror is rotated. This is because the center of rotation is the middle of the first ball bearing, not the center of the mirror. For optical cavities and interferometers, it is often desirable to be able to align the mirrors separately from adjustments to the length of the cavity. For these applications and others, a more sophisticated mount is required.

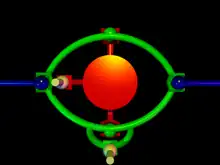
One way of eliminating this translation along the axis is to set the first ball on a fine-thread screw as well. By appropriate adjustment of all three screws, the mirror can be tilted in either direction without translation. The screws can by driven by a motor under computer control to make this seem to the operator like simple rotation about a virtual pivot point in the center of the mirror surface. The translation can instead be eliminated mechanically by using a gimbal mount, which uses two rings that each pivot about a line running through the center of the mirror. This gives kinematically correct two-axis rotation about the center of the mirror.
With both types of mount, springs are needed to keep the frame pressed against the ball bearings, unless the mount is designed to be used only in an orientation where gravity will keep the frame in place. Following the cantilever principle, a large mount allows finer control than a smaller one. The frames are ideally made of a light material, to make the resonant frequency of the structure high. This reduces vibration, since many common sources of vibration are relatively low frequency. For stability, the fixed frame is supported by a rigid mount that is securely bolted to a supporting surface. In a laboratory environment, this is typically an optical table. A shock can cause the mount to move away from the ball bearings, but because there are only 6, hard contacts, the mirror will return to the original position, preserving the alignment.
The mount itself has to avoid deformation of the mounted optics. Stress from mounting can introduce aberration in the light reflected from a mirror, or photoelasticity inside a lens. In some lasers the mirrors have to be easily replaced, in which case the mount needs to be designed to allow the mirror to be removed and replaced without losing the correct alignment.
Operation
The fine-thread screws show a slip and stick behaviour; when used manually, a torque is applied with two fingers until the thread slips a bit, then the new position is read on a scale. Inexpensive screws do long slips and lack a scale. Precision micrometers perform better and provide a scale for reference. When used remotely, an electric motor is used to apply short pulses of torque. The motor is firmly connected with the screw and the thread and nothing else so that the pulse is absorbed by friction. To read out the position electronically, a rotary encoder is attached. When the ball is not completely centered on the screw and the axis is not normal to the mirror surface (which is an explicit feature of some convenience mirror mounts), a small sinus movement of the mirror is overlaid onto the linear movement, which a controller could compensate for. For analog fine control (5 nm), piezos are built into the mobile frame.
Applications

Laser cavity end mirrors need very precise alignment. Due to their low divergence laser beams need precise steering mirrors. For rapid prototyping on an optical table mirror mounts can be used to hold other elements besides mirrors, for example lenses often need to be aligned for minimal coma. Sometimes prisms only need two axes alignment and can be mounted on a mirror mount rather than a three-axis prism table.
Critical phase matched crystals can be aligned and tuned precisely with a standard mirror mount. The same is true for small etalons, retarders and polarizers. Furthermore, mirror mounts using magnets instead of springs allow the mobile frame to be removed and later replaced in exactly the same position.
Related devices
- Although rotation can be achieved by a semi gimbal mount most rotation stages are not designed based on the principles of kinematic determinacy.
- A linear motion bearing or linear stage having kinematic determinacy uses two V-grooves sliding on a cylinder, a flat surface sliding on a second parallel cylinder, and a flat surface joining the screw.
- The hexapod known from flight simulators allows motion with six degrees of freedom. For kinematic determinacy each leg consists of a ball set in a trihedral hole in the fixed frame, a ball joining a flat plate in the fixed frame, and a ball joining a trihedral hole in the mobile frame. The mobile part of the leg is connected with a thread which runs in thread of the fixed part.
- A screw thread join gets kinematic determinacy the same way as any other rotation bearing.
- The ball bearing and cylindrical roller bearing are overdetermined, having more points of contact than required for kinematic determinacy. This leads to decreased precision as the joints wear.
- The flexure bearing and piezoelectric element offer higher precision than other mechanical bearings.
References
- "Optical Mirror Mounts Infographic". Newport.com. Retrieved 18 September 2017.
- "Optical Mirror Mount Guide". Archived from the original on 2017-10-18.
- "Kinematic Mounts". Archived from the original on January 15, 2010. Retrieved February 1, 2010.