Ductility
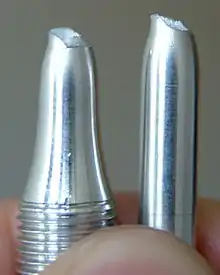
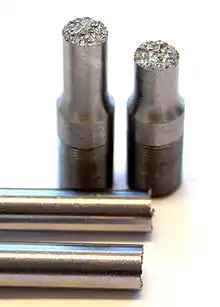
Ductility is a mechanical property commonly described as a material's amenability to drawing (e.g. into wire).[1] In materials science, ductility is defined by the degree to which a material can sustain plastic deformation under tensile stress before failure.[2][3] Ductility is an important consideration in engineering and manufacturing. It defines a material's suitability for certain manufacturing operations (such as cold working) and its capacity to absorb mechanical overload.[4] Some metals that are generally described as ductile include gold and copper.[5] However, not all metals experience ductile failure as some can be characterized with brittle failure like cast iron. Polymers generally can be viewed as ductile materials as they typically allow for plastic deformation.[6]


Malleability, a similar mechanical property, is characterized by a material's ability to deform plastically without failure under compressive stress.[7][8] Historically, materials were considered malleable if they were amenable to forming by hammering or rolling.[1] Lead is an example of a material which is relatively malleable but not ductile.[5][9]
Materials science

Ductility is especially important in metalworking, as materials that crack, break or shatter under stress cannot be manipulated using metal-forming processes such as hammering, rolling, drawing or extruding. Malleable materials can be formed cold using stamping or pressing, whereas brittle materials may be cast or thermoformed.
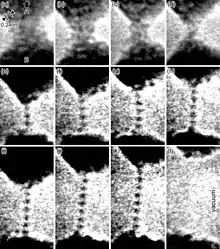
High degrees of ductility occur due to metallic bonds, which are found predominantly in metals; this leads to the common perception that metals are ductile in general. In metallic bonds valence shell electrons are delocalized and shared between many atoms. The delocalized electrons allow metal atoms to slide past one another without being subjected to strong repulsive forces that would cause other materials to shatter.
The ductility of steel varies depending on the alloying constituents. Increasing the levels of carbon decreases ductility. Many plastics and amorphous solids, such as Play-Doh, are also malleable. The most ductile metal is platinum and the most malleable metal is gold.[11][12] When highly stretched, such metals distort via formation, reorientation and migration of dislocations and crystal twins without noticeable hardening.[13]
Quantification of ductility
Basic definitions
The quantities commonly used to define ductility in a tension test are percent elongation (sometimes denoted as ) and reduction of area (sometimes denoted as ) at fracture.[14] Fracture strain is the engineering strain at which a test specimen fractures during a uniaxial tensile test. Percent elongation, or engineering strain at fracture, can be written as:[15][16][17]
Percent reduction in area can be written as:[15][16][17]
where the area of concern is the cross-sectional area of the gage of the specimen.
According to Shigley's Mechanical Engineering Design [4] significant denotes about 5.0 percent elongation.
Effect of Sample Dimensions
An important point concerning the value of the ductility (nominal strain at failure) in a tensile test is that it commonly exhibits a dependence on sample dimensions. This is unfortunate, since a universal parameter should exhibit no such dependence (and, indeed, there is no dependence for properties such as stiffness, yield stress and ultimate tensile strength). This occurs because the measured strain (displacement) at fracture commonly incorporates contributions from both the uniform deformation occurring up to the onset of necking and the subsequent deformation of the neck (during which there is little or no deformation in the rest of the sample). The significance of the contribution from neck development depends on the “aspect ratio” (length / diameter) of the gauge length, being greater when the ratio is low. This is a simple geometric effect, which has been clearly identified. There have been both experimental studies[18] and theoretical explorations[19][20][21][22] of the effect - mostly based on Finite Element Method (FEM) modelling. Nevertheless, it is not universally appreciated and, since the range of sample dimensions in common use is quite wide, it can lead to highly significant variations (by factors of up to 2 or 3) in ductility values obtained for the same material in different tests.
A more meaningful representation of ductility would be obtained by identifying the strain at the onset of necking, which should be independent of sample dimensions. Unfortunately, this point is not easy to identify on a (nominal) stress-strain curve, because the peak (representing the onset of necking) is often relatively flat. Moreover, some (brittle) materials fracture before the onset of necking, such that there is no peak. In practice, for many purposes it is preferable to carry out a different kind of test, designed to evaluate the toughness (energy absorbed during fracture), rather than use ductility values obtained in tensile tests.
In an absolute sense, “ductility” values are therefore virtually meaningless. The actual (true) strain in the neck at the point of fracture bears no direct relation to the raw number obtained from the nominal stress-strain curve - the true strain in the neck is often considerably higher. Also, the true stress at the point of fracture is usually higher than the apparent value according to the plot. The load often drops while the neck develops, but the sectional area in the neck is also dropping (more sharply), so the true stress there is rising. There is no simple way of estimating this value, since it depends on the geometry of the neck. While the true strain at fracture is a genuine indicator of “ductility”, it cannot readily be obtained from a conventional tensile test.
The Reduction in Area (RA) is defined as the decrease in sectional area at the neck (usually obtained by measurement of the diameter at one or both of the fractured ends), divided by the original sectional area. It is sometimes stated that this is a more reliable indicator of the “ductility” than the elongation at failure (partly in recognition of the fact that the latter is dependent on the aspect ratio of the gauge length, although this dependence is far from being universally appreciated). There is something in this argument, but the RA is still some way from being a genuinely meaningful parameter. One objection is that it is not easy to measure accurately, particularly with samples that are not circular in section. Rather more fundamentally, it is affected by both the uniform plastic deformation that took place before necking and by the development of the neck. Furthermore, it is sensitive to exactly what happens in the latter stages of necking, when the true strain is often becoming very high and the behavior is of limited significance in terms of a meaningful definition of strength (or toughness). There has again been extensive study of this issue.[23][24][25]
Ductile–brittle transition temperature

(a) Brittle fracture
(b) Ductile fracture
(c) Completely ductile fracture
Metals can undergo two different types of fractures: brittle fracture or ductile fracture. Failure propagation occurs faster in brittle materials due to the ability for ductile materials to undergo plastic deformation. Thus, ductile materials are able to sustain more stress due to their ability to absorb more energy prior to failure than brittle materials are. The plastic deformation results in the material following a modification of the Griffith equation, where the critical fracture stress increases due to the plastic work required to extend the crack adding to the work necessary to form the crack - work corresponding to the increase in surface energy that results from the formation of an addition crack surface.[26] The plastic deformation of ductile metals is important as it can be a sign of the potential failure of the metal. Yet, the point at which the material exhibits a ductile behavior versus a brittle behavior is not only dependent on the material itself but also on the temperature at which the stress is being applied to the material. The temperature where the material changes from brittle to ductile or vice versa is crucial for the design of load-bearing metallic products. The minimum temperature at which the metal transitions from a brittle behavior to a ductile behavior, or from a ductile behavior to a brittle behavior, is known as the ductile-brittle transition temperature (DBTT). Below the DBTT, the material will not be able to plastically deform, and the crack propagation rate increases rapidly leading to the material undergoing brittle failure rapidly. Furthermore, DBTT is important since, once a material is cooled below the DBTT, it has a much greater tendency to shatter on impact instead of bending or deforming (low temperature embrittlement). Thus, the DBTT indicates the temperature at which, as temperature decreases, a material’s ability to deform in a ductile manner decreases and so the rate of crack propagation drastically increases. In other words, solids are very brittle at very low temperatures, and their toughness becomes much higher at elevated temperatures.
For more general applications, it is preferred to have a lower DBTT to ensure the material has a wider ductility range. This ensures that sudden cracks are inhibited so that failures in the metal body are prevented. It has been determined that the more slip systems a material has, the wider the range of temperatures ductile behavior is exhibited at. This is due to the slip systems allowing for more motion of dislocations when a stress is applied to the material. Thus, in materials with a lower amount of slip systems, dislocations are often pinned by obstacles leading to strain hardening, which increases the materials strength which makes the material more brittle. For this reason, FCC structures are ductile over a wide range of temperatures, BCC structures are ductile only at high temperatures, and HCP structures are often brittle over wide ranges of temperatures. This leads to each of these structures having different performances as they approach failure (fatigue, overload, and stress cracking) under various temperatures, and shows the importance of the DBTT in selecting the correct material for a specific application. For example, zamak 3 exhibits good ductility at room temperature but shatters when impacted at sub-zero temperatures. DBTT is a very important consideration in selecting materials that are subjected to mechanical stresses. A similar phenomenon, the glass transition temperature, occurs with glasses and polymers, although the mechanism is different in these amorphous materials. The DBTT is also dependent on the size of the grains within the metal, as typically smaller grain size leads to an increase in tensile strength, resulting in an increase in ductility and decrease in the DBTT. This increase in tensile strength is due to the smaller grain sizes resulting in grain boundary hardening occurring within the material, where the dislocations require a larger stress to bypass the grain boundaries and continue to propagate throughout the material. It has been shown that by continuing to refine ferrite grains to reduce their size, from 40 microns down to 1.3 microns, that it is possible to eliminate the DBTT entirely so that a brittle fracture never occurs in ferritic steel (as the DBTT required would be below absolute zero).[27]
In some materials, the transition is sharper than others and typically requires a temperature-sensitive deformation mechanism. For example, in materials with a body-centered cubic (bcc) lattice the DBTT is readily apparent, as the motion of screw dislocations is very temperature sensitive because the rearrangement of the dislocation core prior to slip requires thermal activation. This can be problematic for steels with a high ferrite content. This famously resulted in serious hull cracking in Liberty ships in colder waters during World War II, causing many sinkings. DBTT can also be influenced by external factors such as neutron radiation, which leads to an increase in internal lattice defects and a corresponding decrease in ductility and increase in DBTT.
The most accurate method of measuring the DBTT of a material is by fracture testing. Typically four-point bend testing at a range of temperatures is performed on pre-cracked bars of polished material. Two fracture tests are typically utilized to determine the DBTT of specific metals: the Charpy V-Notch test and the Izod test. The Charpy V-notch test determines the impact energy absorption ability or toughness of the specimen by measuring the potential energy difference resulting from the collision between a mass on a free-falling pendulum and the machined V-shaped notch in the sample, resulting in the pendulum breaking through the sample. The DBTT is determined by repeating this test over a variety of temperatures and noting when the resulting fracture changes to a brittle behavior which occurs when the absorbed energy is dramatically decreased. The Izod test is essentially the same as the Charpy test, with the only differentiating factor being the placement of the sample; In the former the sample is placed vertically, while in the latter the sample is placed horizontally with respect to the bottom of the base. [28]
For experiments conducted at higher temperatures, dislocation activity increases. At a certain temperature, dislocations shield the crack tip to such an extent that the applied deformation rate is not sufficient for the stress intensity at the crack-tip to reach the critical value for fracture (KiC). The temperature at which this occurs is the ductile–brittle transition temperature. If experiments are performed at a higher strain rate, more dislocation shielding is required to prevent brittle fracture, and the transition temperature is raised.
See also
- Deformation
- Work hardening, which improves ductility in uniaxial tension by delaying the onset of instability
- Strength of materials
References
- Brande, William Thomas (1853). A Dictionary of Science, Literature, and Art: Comprising the History, Description, and Scientific Principles of Every Branch of Human Knowledge : with the Derivation and Definition of All the Terms in General Use. Harper & Brothers. p. 369.
- Kalpakjian, Serope, 1928- (1984). Manufacturing processes for engineering materials. Reading, Mass.: Addison-Wesley. p. 30. ISBN 0-201-11690-1. OCLC 9783323.
{{cite book}}: CS1 maint: multiple names: authors list (link) - "Ductility - What is Ductile Material". Nuclear Power. Retrieved 2020-11-14.
- Budynas, Richard G. (2015). Shigley's Mechanical Engineering Design—10th ed. McGraw Hill. p. 233. ISBN 978-0-07-339820-4..
- Chandler Roberts-Austen, William (1894). An Introduction to the Study of Metallurgy. London: C. Griffin. p. 16.
- Ductility and its effect on material failure. The Engineering Archive. (n.d.). https://theengineeringarchive.com/material-science/page-ductility-material-failure.html
- "Malleability - Malleable Materials". Nuclear Power. Archived from the original on 2020-09-25. Retrieved 2020-11-14.
- DOE FUNDAMENTALS HANDBOOK MATERIAL SCIENCE. Vol. 1, Module 2 – Properties of Metals. U.S. Department of Energy. January 1993. p. 25.
- Rich, Jack C. (1988). The Materials and Methods of Sculpture. Courier Dover Publications. p. 129. ISBN 978-0-486-25742-6..
- Masuda, Hideki (2016). "Combined Transmission Electron Microscopy – In situ Observation of the Formation Process and Measurement of Physical Properties for Single Atomic-Sized Metallic Wires". In Janecek, Milos; Kral, Robert (eds.). Modern Electron Microscopy in Physical and Life Sciences. InTech. doi:10.5772/62288. ISBN 978-953-51-2252-4. S2CID 58893669.
- Vaccaro, John (2002) Materials handbook, Mc Graw-Hill handbooks, 15th ed.
- Schwartz, M. (2002) CRC encyclopedia of materials parts and finishes, 2nd ed.
- Lah, Che; Akmal, Nurul; Trigueros, Sonia (2019). "Synthesis and modelling of the mechanical properties of Ag, Au and Cu nanowires". Sci. Technol. Adv. Mater. 20 (1): 225–261. Bibcode:2019STAdM..20..225L. doi:10.1080/14686996.2019.1585145. PMC 6442207. PMID 30956731.
- Dieter, G. (1986) Mechanical Metallurgy, McGraw-Hill, ISBN 978-0-07-016893-0
- "Ductility Review - Strength Mechanics of Materials - Engineers Edge". www.engineersedge.com. Retrieved 2020-07-14.
- Askeland, Donald R. (2016). "6-4 Properties Obtained from the Tensile Test". The science and engineering of materials. Wright, Wendelin J. (Seventh ed.). Boston, MA. p. 195. ISBN 978-1-305-07676-1. OCLC 903959750.
- Callister, William D. Jr. (2010). "6.6 Tensile Properties". Materials science and engineering : an introduction. Rethwisch, David G. (8th ed.). Hoboken, NJ. p. 166. ISBN 978-0-470-41997-7. OCLC 401168960.
- Matic, P (1988). "The Relation of Tensile Specimen Size and Geometry Effects to Unique Constitutive Parameters for Ductile Materials". Proceedings of the Royal Society of London. A. Mathematical and Physical Sciences. 417 (1853): 309–333. doi:10.1098/rspa.1988.0063. S2CID 43033448.
- Havner, K (2004). "On the Onset of Necking in the Tensile Test". International Journal of Plasticity. 20 (4–5): 965–978. doi:10.1016/j.ijplas.2003.05.004.
- Kim, H (2005). "Finite Element Analysis of the Onset of Necking and the Post-Necking Behaviour During Uniaxial Tensile Testing". Materials Transactions. 46 (10): 2159–2163. doi:10.2320/matertrans.46.2159.
- Joun, M (2007). "Finite Element Analysis of Tensile Testing with Emphasis on Necking". Computational Materials Science. 41 (1): 63–69. doi:10.1016/j.commatsci.2007.03.002.
- Osovski, S (2013). "Dynamic Tensile Necking: Influence of Specimen Geometry and Boundary Conditions". Mechanics of Materials. 62: 1–13. doi:10.1016/j.mechmat.2013.03.002. hdl:10016/17020.
- Choung, J (2008). "Study on True Stress Correction from Tensile Tests". Journal of Mechanical Science and Technology. 22 (6): 1039–1051. doi:10.1007/s12206-008-0302-3. S2CID 108776720.
- Ho, H (2019). "Modelling Tensile Tests on High Strength S690 Steel Materials Undergoing Large Deformations". Engineering Structures. 192: 305–322. doi:10.1016/j.engstruct.2019.04.057. S2CID 182744244.
- Samuel, E (2008). "Inter-Relation between True Stress at the Onset of Necking and True Uniform Strain in Steels - a Manifestation of Onset to Plastic Instability". Materials Science and Engineering A-Structural Materials Properties Microstructure and Processing. 480 (1–2): 506–509. doi:10.1016/j.msea.2007.07.074.
- "FRACTURE OF MATERIALS" (PDF). U.S. Naval Academy. Archived (PDF) from the original on 2022-10-09. Retrieved 2 July 2022.
- Qiu, Hai; Hanamura, Toshihiro; Torizuka, Shiro (2014). "Influence of Grain Size on the Ductile Fracture Toughness of Ferritic Steel". ISIJ International. 54 (8): 1958–1964. doi:10.2355/isijinternational.54.1958.
- "Ductile-Brittle Transition Temperature and Impact Energy Tests - Yena Engineering". 18 November 2020.