PowerPoint 2007
Inserting Sound

Introduction
 PowerPoint allows you to
add sound
to your presentation in several ways. You can do this by using a sound file
on your computer
, choosing from hundreds of sounds available through the
clip organizer
, or playing tracks from an
audio CD
. Do you want the music to play through the entire presentation, or would you prefer the music only to play on one slide? PowerPoint not only allows you to use sound, but it also allows you to customize sound options so you can play the sounds you want, the way that you want.
In this lesson, you will learn how to insert sound from three sources and how to set various sound options.
Sounds on file
Download the example to work along with the video.
To insert a sound file from your computer:
- Select the slide where you want to add sound.
- Select the Insert tab.
- Click the drop-down arrow on the Sound command in the Media Clips group.

- Select Sound from File from the menu. The Insert Sound dialog box will appear.

- Locate the sound file on your computer.
- Select the file.
- Click OK . A sound icon and a dialog box will appear.

- Select Automatically or When Clicked . Automatically will start the sound automatically as soon as the slide appears in Slide Show view, while When Clicked will start the sound when you click.

Click, drag, and release the button to move the sound icon to a different location on the slide.
Sound options
On the Sound Tools Options tab, there are several options you can control that determine how the sound is used in the presentation. These include:

- Preview : Listen to the sound that will play
- Slide Show Volume : Change the volume to low, medium, high, or mute
- Hide During Show : Hide or display the sound icon during the slide show
- Loop Until Stopped : Have sound play until you stop it by clicking or advancing to the next slide
The Picture Tools Format tab appears when a sound is inserted because the sound icon is a picture. You can format the sound icon just like any picture.
To delete the sound:
- Select the sound icon .
- Press the Delete key on your keyboard.
Sounds in the clip organizer
To insert a sound from the clip organizer:
- Select the slide where you want to add sound.
- Select the Insert tab.
- Click the drop-down arrow on the Sound command in the Media Clips group.

- Select Sound from Clip Organizer from the menu. The Clip Art task pane will appear.

- Enter keywords in the search field.
- Click Go . Clip art sound results will appear in the task pane.
- Click a sound file in the task pane to insert it. A sound icon and a dialog box will appear.

- Click Automatically or When Clicked . Automatically will start the sound automatically as soon as the slide appears in Slide Show view, while When Clicked will start the sound when you click.
To preview sound from the clip organizer:
- Enter keywords in the search field.
- Click Go . Clip art sound results will appear in the task pane.
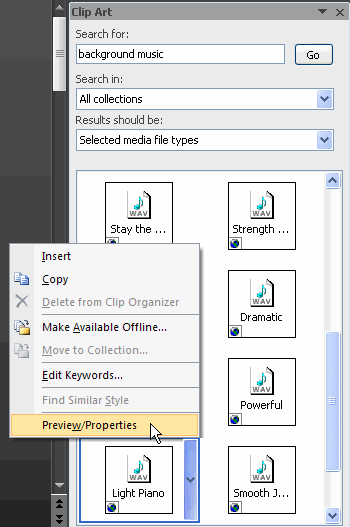
- Move your cursor over a sound option, and a drop-down arrow will appear.
- Click the drop-down arrow.
- Select Preview/Properties from the menu. The sound file will play, and a dialog box will appear.

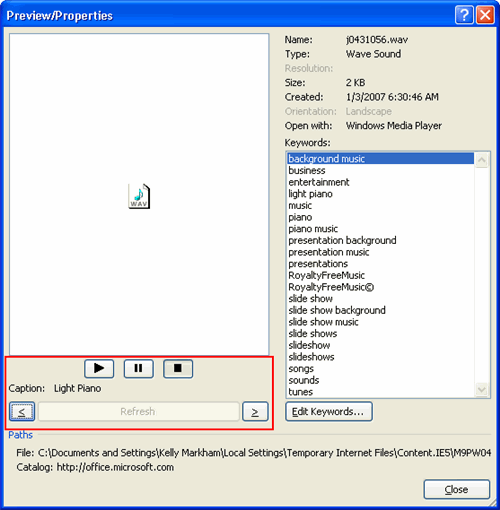
About the Preview dialog box
- Information on the right includes file name and type.
- Use the sound controls to play, pause, and stop the sound file.
- The name of the current sound file is to the right of the word Caption, below the sound controls.
- Click the Next and Previous arrows to open and listen to an additional sound file.
- Click the Close button to close the dialog box. The last active sound file appears selected in the Clip Art task pane.

- Insert the sound file if you want.
Sounds on CD
To play tracks from a CD:
- Select the Insert tab.
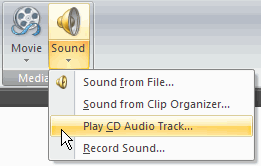
- Click the drop-down arrow on the Sound command.
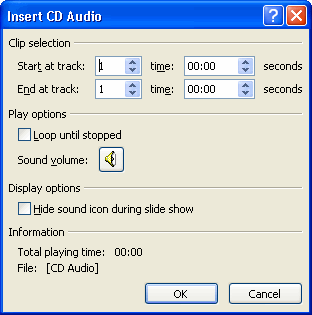
- Select Play CD Audio Track from the menu. The Insert CD Audio dialog box will appear.

- Enter the Start at track: and End at track: information in the Clip selection section.

- Choose whether you want to Loop the tracks until stopped and adjust the volume in the Play Options section.
- Choose to display or hide the sound icon during the slide show in the Display Options section.
- Click OK. A CD sound icon and a dialog box will appear.
- Select Automatically or When Clicked .
To add sound from a CD, you must have a music CD inserted into your computer's CD-ROM drive.
The CD Audio Tools Options tab
Once you have inserted tracks from a CD, a CD Audio Tools Options tab appears. Many of the commands are similar to the commands available when you insert other sounds; however, some of the options are different.

Functions in the Play and Setup groups include:
- Preview : Listen to the sound that will play
- Slide Show Volume : Change the volume to low, medium, high, or mute
- Edit the Track and Time fields : Change the tracks that play and the time in the track that playback starts or stops
- Change How to Play Track: Click the drop-down menu next to Play Track to change whether the CD tracks play automatically or when clicked
- Hide During Show : Hide or display the sound icon during the slide show
- Loop Until Stopped : Have sound play until you stop it by clicking or advancing to the next slide
Challenge!
Use the Company Overview presentation or any other presentation you choose to complete this challenge.
- Open a presentation.
- Insert a sound from a file on your computer , if you have one.
- Insert a sound from the clip organizer .
- Preview sounds in the clip organizer.
- Insert tracks 2 and 3 from a CD .
- Delete one of the sound icons.