
/en/excelformulas/interactive-birthday-budget-blues/content/

If anyone gave at least $50, they'll receive a free tote bag. I was going to type Free Gift for each person who donated at least $50, but I'm really busy today. Do you think you could handle this for me?"
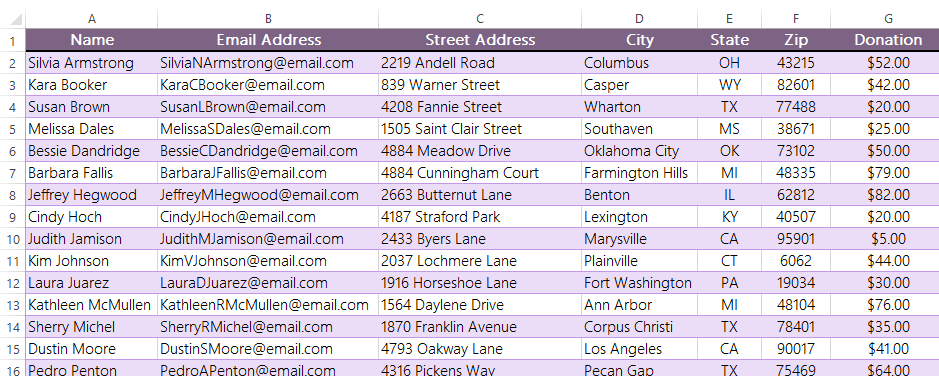
Once you've downloaded our spreadsheet, open the file in Excel or another spreadsheet application. As you can see, our coworker Jordan has already added a ton of information—there are several different columns, and each row contains the contact information for one person, along with the amount of money that person donated.

So if a person donated at least $50, we need to write the words Free Gift in that donor's row. We could go through each row, look at the value, and then write Free Gift if the value is at least $50. But there are a lot of people on the spreadsheet, so it could be really time consuming to do this manually. What we really need is way to make our spreadsheet do this automatically.
While you might never have used it before, the IF function can simplify these kinds of problems. The IF function can look at a value in a cell to see if it meets a basic condition (in our example, if the value is greater than or equal to 50). Then it can then add text to an empty cell. Here, we can use the IF function to look at each person's donation, then add the words Free Gift if they donated at least $50. Basically, the IF function can do the same thing we were planning to do, only it can do it much faster.
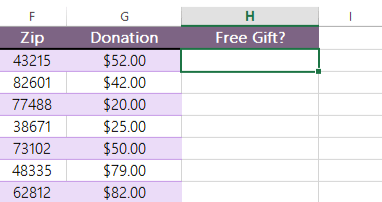
If you've never used the IF function before, don't worry—it's not complicated, although the syntax is a bit different from other formulas you may have used. Before you get started, it's best to decide where the results from the function will go. In our case, we'll go ahead and insert a new column to the right of column G.

Now that we have our new column, we'll start building our formula. We'll need to have a formula on each row, so we'll start by typing the formula in cell H2. As with any formula, you'll start with an equals sign (=). Then type the function name, followed by an open parenthesis. So far, it should look like this:
=IF(
Now, we'll add our arguments. The arguments will tell the IF function what to look for and what to write in the cell depending on the outcome.
The first argument sets up the condition we want to test. For this formula, we want to know if the value in cell G2 is greater than or equal to 50. We'll use some mathematical operators ( > for greater than and = for equals ) to write the condition:
=IF(G2>=50
The next argument will tell the function what to write if the condition is true (that is, if the value is greater than or equal to 50). This means the person will be getting a free gift, so we'll have it write Free Gift. Because this argument is text, we'll need to put it in double quotes (" "). And, as with any function, we'll need to use a comma to separate each argument:
=IF(G2>=50, "Free Gift"
The final argument will tell the function what to write if the condition is false. This means the person won't get a free gift. We could make the function write something like None or No, but in this case we actually just want the cell to remain blank. To do this, we'll just type double quotes ("") with no text inside. This is also our last argument, so go ahead and close the parentheses:
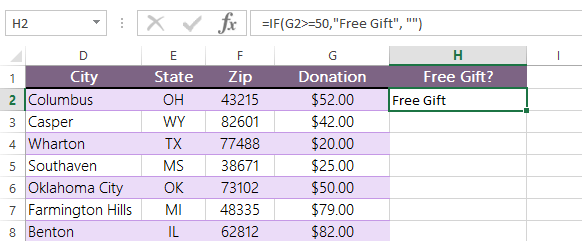
=IF(G2>=50, "Free Gift", "")
OK, you're done! When you press Enter, the words Free Gift should appear in the cell.

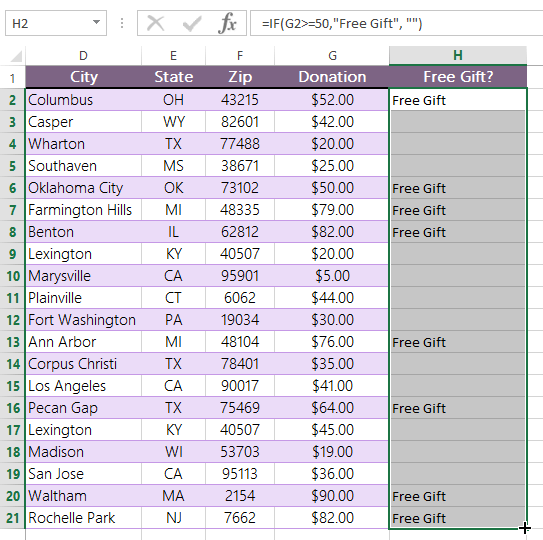
Now we can just drag the fill handle down to add the formula to the other cells in column H:

Excellent—our function is working perfectly! If we wanted to go a step further, we might sort or filter the results to show only those donors who earned the free gift. For now, it looks like we're ready to send this back.

I don't know how you did it so fast, but it really saves me a lot of trouble. You know, I think we probably have a spare tote bag if you want one for yourself!"
/en/excelformulas/using-concatenate-to-combine-names/content/