Lesson 6: Spell and Grammar Check
/en/wordxp/use-autocorrect-and-find-and-replace/content/
Introduction
By the end of this lesson, you should be able to:
- Use the spelling and grammar check
Spelling and grammar check
Not only does Word allow you to Undo possible mistakes in your document and Paste corrections, but it also automatically reviews your grammar and spelling as you type. Green wavy lines are placed underneath possible grammar mistakes, and red wavy lines are placed under possible spelling mistakes. All of Word's grammar and spelling errors may not be correct, so you can choose to ignore these error markings and keep typing, or you can correct the mistakes and/or add the corrections to Word's dictionary.
Checking spelling as you type
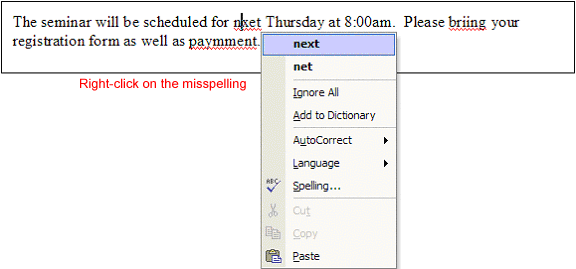
Word puts a red wavy line under possible spelling mistakes.

If you click on the suspected misspelling, Word gives you one or more suggested corrections.

To use Spell Check as You Type:
- Place your I-beam over the misspelled word and right-click.
- A menu list displays the following options: Bold-faced suggested spellings, Ignore, add to Dictionary, AutoCorrect, Language, and Spelling.
- Select the bold-faced suggestion to replace the incorrectly spelled word in the document.
- Select Ignore, and Word ignores all future instances of this spelling in this document.
- Select Add to Dictionary, and Word adds the underlined word to the dictionary so it won't be flagged as an error in any other document you create.
- Select AutoCorrect to add the correct spelling to your list of words that Word automatically corrects as you type.
- Select Language to specify a word as part of another language, preventing Word from seeing this word as a mistake.
- If you select spelling, the Spelling and Grammar dialog box appears.
Checking grammar as you type
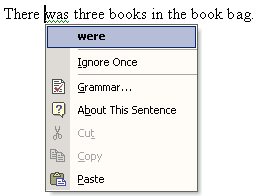
Word puts a green wavy line under possible grammar mistakes.
To work on suspected grammatical mistakes:
- Place your I-beam over the grammatical mistake and right-click.
- A menu list displays the following options: bold-faced grammar suggestion, Ignore, Grammar, and About this Sentence.
- Select Ignore, and Word ignores the grammatical mistake it believes to exist.
- Select Grammar, and the Grammar dialog box appears.
- Select About this Sentence, and the Office Assistant will offer you reasons as to why Word believes this to be a grammatical error.

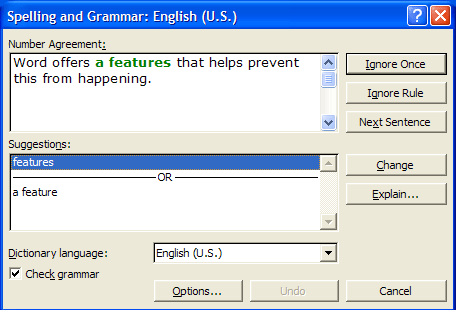
The Spelling and Grammar dialog box

To use the Spelling and Grammar dialog box:
- Choose one of the following options, depending on what you think of Word's suggestions:
- Click Ignore Once to ignore this one instance of the grammatical error in your document.
- Click Ignore Rule to ignore this grammatical error and all other grammatical errors of this type in the document.
- Click Next Sentence to take you to the next grammatical error listed in your document.
- Click Change to replace the error with what is in the Suggestion box.
- Click Explain to open the Office Assistant, which will offer you reasons for this error.
 If the red and green wavy lines distract you, you can turn them off:
- Choose Tools Options from the menu bar. The Options dialog box appears.
- Click the Spelling and Grammar tab.
- Uncheck Check Spelling as You Type or Check Grammar as You Type so the check box is empty.
- Click OK.
 Don't forget to use the spelling and grammar check!
Did you know?
Have you ever realized after typing a long paragraph that you accidentally left the caps lock on and all of your letters are in upper case? Fortunately, you will not have to retype the text to correct this mistake. Word offers a quick solution by allowing you to either select the upper-case text and pressing Shift+F3 or clicking Format on the menu bar and selecting Change Case. Choose the correct option from the Change Case dialog box.
/en/wordxp/align-text/content/


 Don't forget to use the spelling and grammar check!