Tracheal Rapid Sequence Intubation
- Article Author:
- Matthew Schrader
- Article Editor:
- Ivan Urits
- Updated:
- 7/25/2020 7:39:02 AM
- For CME on this topic:
- Tracheal Rapid Sequence Intubation CME
- PubMed Link:
- Tracheal Rapid Sequence Intubation
Introduction
Rapid sequence intubation (RSI) is a technique that is used when rapid control of the airway is needed as a precaution for patients that may have risks of pulmonary aspiration. This method is utilized by clinicians across multiple medical specialties, including critical care physicians, anesthesiologists, and emergency medical personnel.
RSI is indicated for a patient in acute respiratory failure due to inadequate oxygenation or ventilation, and for airway protection in a patient with an altered mental status.
A systematic approach to RSI is important to ensure the success of the procedure. The clinician should assess the risk before the intervention and place the patient in an optimal position with an understanding of the anatomy involved. All necessary supplies must be available at the bedside, including alternative options to secure the airway in case of failure.
Anatomy and Physiology
Assessing Airway Risk:
Several parameters need to be evaluated before the start of the procedure. Multiple mnemonics exist to help a clinician determine if an airway will be difficult, including L.E.M.O.N.
L: Look Externally (facial trauma, beard, loose teeth, dentures, large incisors)
These factors can be an indication of a difficult airway.
E: Evaluate the 3-3-2 rule
- Can 3 fingers fit between the incisors?
- Can 3 fingers fit between the tip of the chin and the hyoid bone?
- Can 2 fingers fit from the top of the thyroid notch to the hyoid bone?
A decrease in these distances can be an indication of a difficult airway.
M: Mallampati score
Assess how much of the posterior pharynx and uvula can be seen.
- Mallampati 1 score indicates that the entirety of the uvula can be visualized.
- Mallampati 2 score indicates that half of the uvula can be visualized.
- Mallampati 3 score indicates that only the base of the uvula can be visualized.
- Mallampati 4 score indicates that the uvula cannot be visualized.
A higher Mallampati score is an indication of a more difficult airway.
O: Obstruction or Obesity
Obesity (body mass index > 30) can be a predictor of a difficult airway.
Obstruction of the airway, including head and neck cancer, epiglottitis, can indicate a difficult airway.
N: Neck Mobility
Assess the mobility of the neck.
A neck that cannot be maneuvered into an ideal position due to trauma, c-collar, or rigidity can lead to a more difficult airway.
Positioning and Anatomy:
Proper positioning of the patient is vital to the success of the procedure. Ideally, the neck should be flexed at the lower cervical spine (C6-C7) and extended at the upper cervical spine (C1-C2). This position is called the "sniffing position." This allows for the best visualization of the anatomy, including the epiglottis and vocal cords.
SEE MEDIA ITEM 4
The epiglottis serves as the primary landmark that will direct successful endotracheal intubation. The origin of the epiglottis can be found at the base of the tongue. The valley between the tongue and the epiglottis is called the vallecula. When intubating with a Macintosh blade (discussed later), the tip of the blade should ideally be placed at the base of the tongue in the vallecula, and a ventral and inferior movement of the blade reveals the vocal cords.
SEE MEDIA ITEM 3
The Cormack and Lehane Grading system allow the provider to evaluate their view of the vocal cord and estimates the chance of successful intubation. A Grade 1 view of the cords using this system indicates a high likelihood of successful intubation. In this grade, the provider can see nearly the entirety of the vocal cord anatomy. Successive grades reveal less of the cords and have a decreased rate of successful intubation.
SEE MEDIA ITEM 2
Indications
Rapid sequence intubation is indicated for a patient in acute respiratory failure due to poor oxygenation or ventilation, and for a patient that cannot protect their airway due to altered mental status. RSI may also be used in a patient with an acute upper gastrointestinal bleed with a high risk of aspiration.
Contraindications
There are few absolute contraindications for rapid sequence intubation. These contraindications include complete upper airway obstruction and the loss of facial or oropharyngeal landmarks, which will require a surgical airway to be placed.
Relative contraindications are related to issues that may lead to the procedure failure. This can be due to injuries to the airway, anatomic abnormalities, and the proficiency of the clinician. These relative contraindications can be evaluated using the L.E.M.O.N. mnemonic and Cormack and Lehane Grading system discussed above.
Equipment
There are many supplies necessary in preparation for rapid sequence intubation:
- Endotracheal tube with an inflatable cuff with sterile lubricant
- Laryngoscope handle and blades
- Suction x2
- Bag valve mask
- End-tidal carbon dioxide monitor
- Induction agents
- Tracheal tube inducer (bougie)
- Supraglottic airway such as laryngeal mask airway
- Video-assisted laryngoscopy (glidescope)
- Pulse oximetry
- IV access
- Push dose pressors
Before the initiation of the procedure, the clinician should make sure that the lighting in the room is adequate. The clinician should test the lighting source on the laryngoscope and test the inflation of the endotracheal tube. An easily viewed pulse oximeter should be available.
Endotracheal Tube Size:
Generally, a 7.0 to 7.5 mm internal diameter size tube should be placed in a female patient, and a 7.5 to 8.0 mm tube should be placed in a male. Smaller tube sized are not adequately large enough to perform a bronchoscopy if it becomes necessary.
Blade Selection:
The most commonly used laryngoscope blades are the Macintosh and Miller blades. The Macintosh blade has a curved spatula used to approximate the curvature of the tongue and move the epiglottis, mandible, hyoid bone and other soft tissues out of the view of the glottis. A Macintosh 3 has a 13-cm blade and fits most average-sized adults. A Macintosh 4 blade is 15.5-cm and allows the practitioner a longer blade to utilize if necessary. The Macintosh blade should be placed inside the vallecula at the base of the tongue. A Miller blade is flat and designed to go over the epiglottis to reveal the vocal cords.
SEE MEDIA ITEM 1
Induction Agents:
An in-depth discussion on the agents used to induce and paralyze patients undergoing RSI is outside the scope of this article. However, below are 2 charts of the frequently used induction and paralytic agents and their differing characteristics.
SEE MEDIA ITEM 5
Technique
Once the patient, supplies, and team have been properly prepared, induction agents can be administered to the patient first, followed by paralytic agents. The bag valve mask should be utilized to pre-oxygenate the patient as much as possible. The clinician performing the rapid sequence intubation should ensure a tight seal of the bag valve mask to the patient's face.
After allowing the paralytic agents to take effect after 60 seconds, the patient's mouth should be opened with the scissoring technique. The scissoring technique involves placing the right thumb on the right middle finger and inserting the right hand into the patient's mouth. The clinician then "scissors" the patient's mouth open, crossing the thumb and middle finger. The laryngoscope should then be inserted into the patient's mouth with a sweeping motion from right to left, moving the tongue out of view.
The clinician should then locate the epiglottis and place the laryngoscope in the vallecula. A ventral and inferior motion should be performed with a rigid wrist without abduction or "rocking" of the wrist. To obtain a better view and clear debris, suctioning can be performed. Pressure can be applied to the thyroid cartilage to manipulate the glottis into view. Once the clinician has located the glottis, the endotracheal tube can be passed through the vocal cords. Once passed, the stilette can be removed from the endotracheal tube. The tube should be advanced based on the Chula formula, which is ETT tube depth=0.1 (Height in CM) + 4. This equation will give the depth that the endotracheal tube should be advanced when measured at the teeth of the patient.
After the tube is advanced to the proper distance, the cuff should then be inflated. The end-tidal capnography, condensation on the endotracheal tube, bilateral lung sounds should all be used to verify placement initially. A chest x-ray should be performed to assure adequate placement.
Complications
When the clinician is unable to place the endotracheal tube with direct laryngoscopy using the standard technique, multiple tools can be used.
- A video-assisted laryngoscope can be used to get a better view of the glottis.
- A grade 4 Cormack and Lehane view of the anatomy may prompt the clinician to utilize the tracheal tube inducer or bougie. A bougie is a long rod-shaped medical device with a curve at the tip. This item is introduced into the patient’s airway, and an attempt is made to place the tube inside the trachea. If the bougie is swept along the wall of the trachea, the signature ridges of the tracheal rings can be felt. The endotracheal tube can then be introduced over the bougie. The bougie will guide the endotracheal tube into the trachea.
- A supraglottic airway such as a laryngeal mask airway can be placed if endotracheal intubation is not possible.
Enhancing Healthcare Team Outcomes
At least two to three medical professionals are required to manage the airway for rapid sequence intubation. A clear delineation of roles is necessary for successful endotracheal intubation. The lead clinician is responsible for directing the team, managing the patient's airway, and intubating the patient.
A nursing staff member is responsible for providing induction and paralytic medications at the onset of the procedure. The nurse should wait for the clinician performing the intubation to give approval prior to administering medications. An independently trained clinician that can procure equipment, operate the bag valve mask, apply cricoid pressure, and confirm tube placement after completion of the intubation should be at the bedside as well. Discussion and preparation for a backup plan in case of procedure failure should be addressed prior to the start of the procedure.
(Click Image to Enlarge)
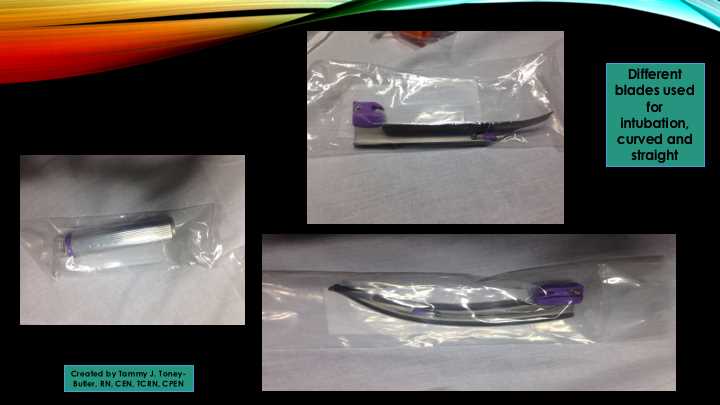
Blades and equipment needed for endotracheal intubation, curved and straight blades, disposable examples
Contributed by Tammy J. Toney-Butler, RN, CEN, TCRN, CPEN
(Click Image to Enlarge)

Cormack-Lehane Grading System
Contributed by Dr. Sean Hunt, DO
(Click Image to Enlarge)
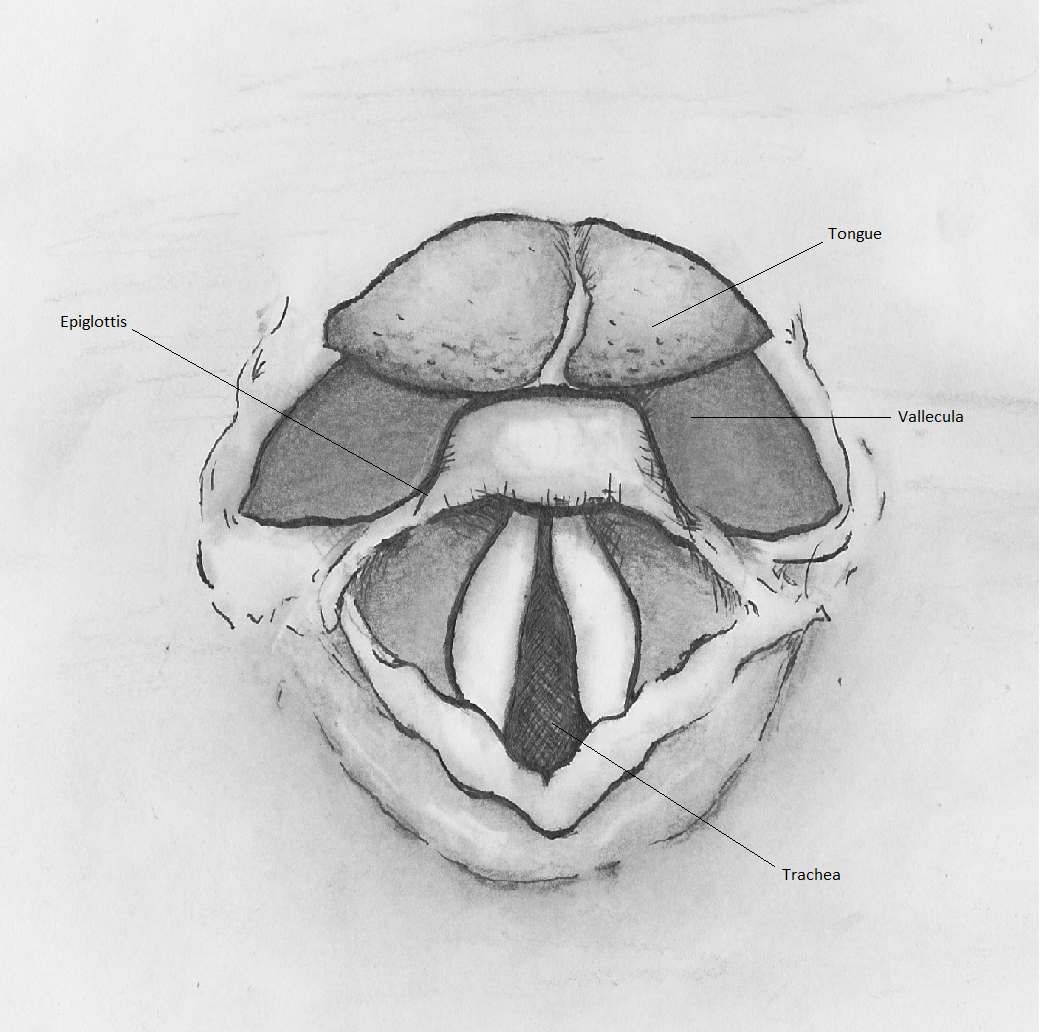
Superior View of the Glottis
Contributed by Dr. Sean Hunt, DO
(Click Image to Enlarge)
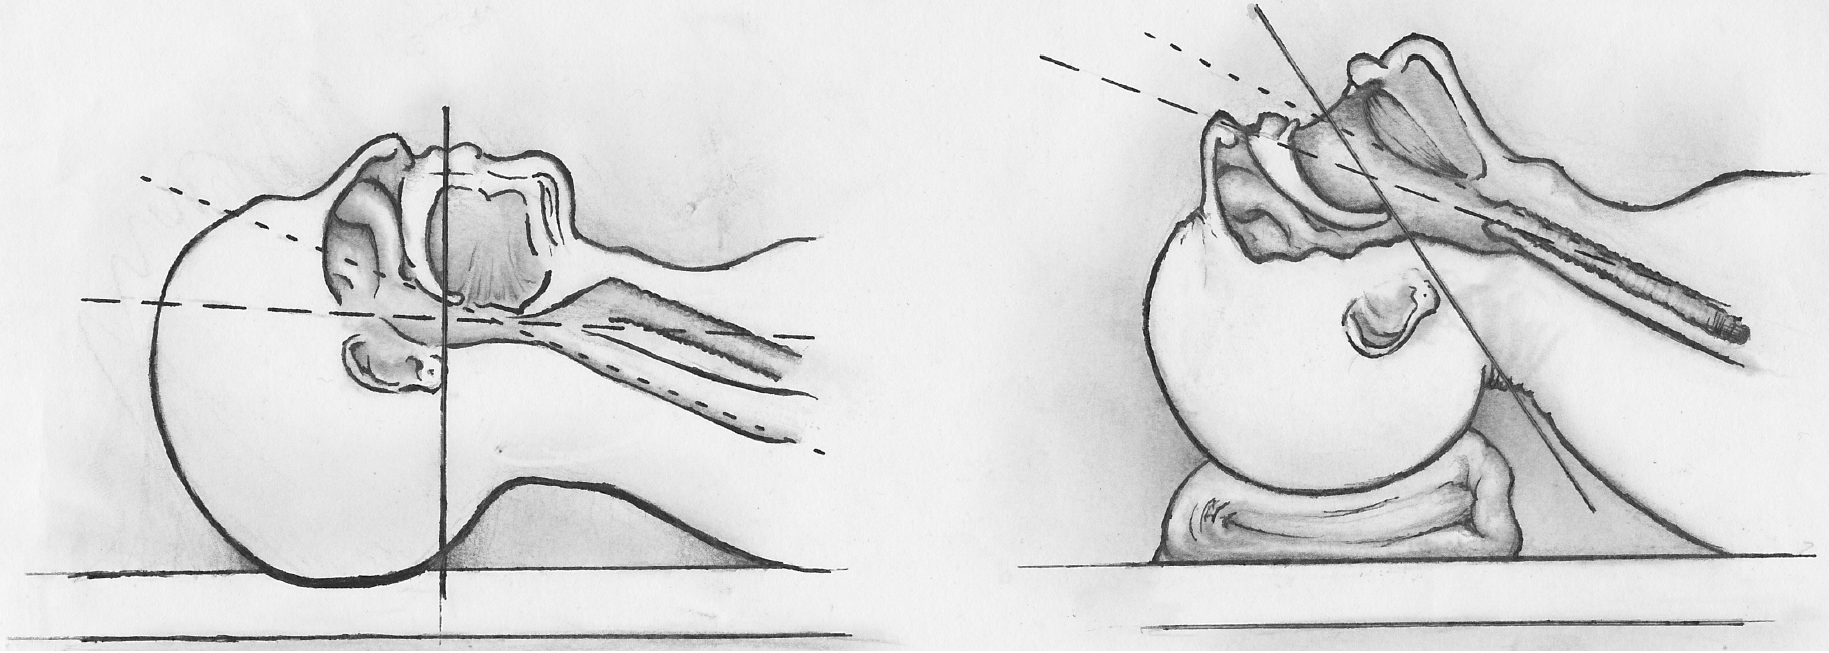
Sniffing Position
Contributed by Dr. Sean Hunt, DO
(Click Image to Enlarge)

Induction and Paralytic Medications
Created and Contributed By Matthew Schrader, DO, MPH