5

I have just bought a 5v Pi fan for my Pi3. I'm using Retropie 4.1 for the OS. I have connected the red and black wires of the fan to ground and GPIO 18 respectively.

How can I get the fan to start when the CPU temp reaches a certain temperature?

I have read a tutorial on thepihut -- but there is a resister involved (I get how that works and can figure out the code part). I want to use the CPU temperature from the Pi3 itself to control turning the fan on or off (if the CPU temp can be read by the OS, of course). I'm not worried about the speed of fan yet, I just want the fan to come on when CPU is at 45C or higher.

The following website (hackernoon) uses a relay to create the temp controler and that is in the code.

I know I need to change the way the fan is connected to the Pi; the bit that stumps me is the code.

YetAnotherRandomUser
  • 1,100
  • 1
  • 10
  • 32
Peter Swiggs
  • 59
  • 1
  • 4
  • 2
    I doubt there is such a thing as a "5v 0.2ma Pi fan", but if there was the amount of air you could move with 1mW of power is negligible. This wouldn't matter as the Pi doesn't need a fan. – Milliways Feb 20 '17 at 11:43
  • Yes I had tried google, All day in fact I was googling for solutions. The 2 websites I provided had both parts of my solution code wise but I lack knowledge of how to combine them to use the code for my fan. Also thank to @sir_ian and his answer I am able to start testing code and progressing my knowledge and better utilising information I find in google.better. – Peter Swiggs Feb 23 '17 at 10:14

5 Answers5

6
from gpiozero import LED
#we are using the LED sub-module just as a generic output
fan = LED(18) #for the positive, put the negative in one of the grounds
def cputemp():
    f = open("/sys/class/thermal/thermal_zone0/temp")
    CPUTemp = f.read()
    f.close()
    StringToOutput= str(int(CPUTemp)/1000)

while True:
    cputemp()
    if StringToOutput >= 45:
        fan.on()
    elif StringToOutput < 45:
        fan.off

This is some fairly simple code that gets the temperature from /sys/class/thermal/thermal_zone0/temp in thousandths Celsius divides by 1000 for Celsius and checks if it is more than 45. if it is it turns the "fan" on and if not , it stays off. But you'll almost certainly never need a fan as long as you're not doing anything stupid.

This code was adapted from a SE question but i am not sure which.

sir_ian
  • 970
  • 4
  • 14
  • 37
  • Thankyou very much for this, the code is brilliant and is a perfect start for my own growth within the pi area. I am currently about to start my retropie from scratch due to settings across retro arch being confusing. easier to start from default. Will test the code once i have written the image to SD card and updated everything. Will report back my success or problems. – Peter Swiggs Feb 23 '17 at 10:10
  • Haven't had the chance to try this script, but won't the loop run many times per second? Shouldn't there be something like `sleep(x)` (imported ofcourse `from time import sleep`) to make it only check once every x seconds? – Ivan Koshelev Jul 27 '20 at 07:28
5

Using PWM and a NPN transistor
Let me begin by saying I'm not an electrical engineer. If someone who knows more sees a problem with what I present, please do comment!

I found an excellent write-up for doing this with an Arduino here. I too, however, am using a RaspberryPi (RPi3). One concern that I've seen pointed out is that pulling power from GPIO18 to run the fan can have adverse consequences. Instead, what I propose below is pulling the 5v from a 5v RPi pin. Then use PWM and switching to control the passage of the 5v to the fan.

Here's what I used: I happen to live in China, and the total cost, with shipping, for these parts (multiple of each) was less than $2 (USD). Maybe look on Alibaba.

  • 1x 5v fan
  • 1x 330 ohm resistor
  • 1x NPN transistor (2N4401)
  • 1x diode (1N4001)
  • 1x Raspberry Pi

Connect the fan to the Raspberry Pi using the following circuit:
Get ready for some soldering. I was able to solder all of the components together, wrap them around the fan itself, and still put the fan inside my RPi case. The case description says the fan is quiet. That's a lie which is why I run it at 65% speed!

schematic

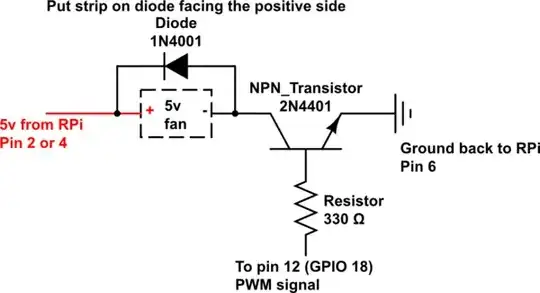
simulate this circuit – Schematic created using CircuitLab

  • 5v connects to pin 2 or 4
  • ground connects to pin 6
  • PWM connects to pin 12 (GPIO 18)

Read the link to the Arduino instructions above for more detailed in formation of what's going on.

Installing software:
To run the fan, I installed the pigpio library. You can install this library from the terminal as follows:

  • Dependencies: sudo apt-get install build-essential
  • Download pigpio: wget abyz.me.uk/rpi/pigpio/pigpio.zip
  • Decompress: unzip pigpio.zip && cd PIGPIO
  • Build and install: make && sudo make install

Now we have the program we'll use to control the fan via PWM.

Running the fan:
You can create a new bash script with the following content. And set it to run @reboot in root's crontab. Modify the variables at the beginning of the script to your liking. If you want to see what is happening, set DEBUG=1 and information will be written to /tmp/debug. I wouldn't leave this on once you've confirmed that it's all working though as this would perform unnecessary writes to your SD card. This script assumes you have python installed.

Disclaimer: I have been running my RPi3 with this script for 17+ months as of Jan 2019. If these settings or any settings you use burn up your fan or cause harm to your Raspberry Pi, I cannot be held responsible. Use and make changes at your own risk!

#!/bin/bash

fanSpeed=65 # run the fan at 65% speed; mine was too noisy at 100%. Be careful not to set this too low, or your fan may not spin!
thresholdF=135  # Turn the fan on when we're above this temp
thresholdC=$(/usr/bin/python -c "print ($thresholdF-32)/1.8")
DEBUG=0

function debug {
    [ $DEBUG -eq 1 ] && echo "[$(date +%m%d.%H%M%S)] $0: $@" >> /tmp/debug
}

function set_fan {
    percent=$1  # integer value
    GPIO=18     # GPIO pin number; 18 is hardware PWM
    freq=25000  # This is the frequency of the PWM signal; increase if you hear a whine

    debug "setting PWM on GPIO $GPIO at ${percent}%"
    [ $percent  -gt 0 ] && /usr/local/bin/pigs hp $GPIO $freq 1000000   # spin up the fan before cranking back
    sleep 1
    /usr/local/bin/pigs hp $GPIO $freq $(/usr/bin/python -c "print 10000*$percent")
}

function get_temp {
    echo "$(/opt/vc/bin/vcgencmd measure_temp | grep -oP "\d+.\d")"
}

# returns 1 if we're above our threshold or 0 if we aren't
function is_too_hot {
    echo $(/usr/bin/python -c "print 1 if $thresholdC<$(get_temp) else 0")
}

debug "fan script started"
# start pigpiod daemon if not already running
[ $(pidof pigpiod | wc -l) -eq 0 ] && /usr/local/bin/pigpiod && debug "pigpiod service started"

debug "threshold F: $thresholdF"
debug "threshold C: $thresholdC"

# start a loop to continue checking CPU temp and switching fan as necessary
state=off
while :
do
    while [ $(is_too_hot) -eq 1 ]
    do
        if [ "$state" == "off" ]; then
            debug "turning the fan on: $(get_temp) (CPU temp) > $thresholdC (threshold)"
            set_fan $fanSpeed && state="on" # turn the fan on
        fi
        sleep 300   # run the fan for 5 minutes before checking temp again
    done
    if [ "$state" == "on" ]; then
        debug "turning the fan off: $(get_temp) (CPU temp) <= $thresholdC (threshold)"
        set_fan 0 && state="off"
    fi
    sleep 60    # wait one minute before checking temp again
done

It's not hard to imagine how this script could be modified to run the fan at different speeds for different temperatures.

b_laoshi
  • 351
  • 4
  • 9
  • 1
    Hello and welcome. Note that circuit has a major drawback: the transistor on the *high-side* (near + voltage with respect to the load) is not a useful circuit with an NPN transistor. It is unfortunately somewhat viral and often-posted but still wrong. Connect the emitter (the arrow) to ground and put the load (fan) between collector and +5V. See https://raspberrypi.stackexchange.com/a/28201/19949 – Ghanima Aug 05 '17 at 10:53
  • @Ghanima was correct! I did not have the circuit drawn correctly! The corrected circuit is now shown above. I don't know what I was looking at when I drew it up initially, but I can't possibly have been looking at the circuit I had put together! – b_laoshi Nov 10 '17 at 14:23
  • Why do you use 330 ohm? How much current do you consider with how much hFE? – sevenOfNine Apr 17 '18 at 23:12
  • 1
    This was simply an adaptation of an [Arduino guide](https://static.sparkfun.com/learn/materials/44/DC_motor_circuits_notes_2up.pdf) for accomplishing the same thing. I just used the same resistor they showed in their diagrams. Their write-up said to use a 220 or 330 ohm resistor. I'll be the first to admit that I'm limited in the extent of my knowledge regarding circuitry. If you can suggest improvements in another comment with an explanation (so I can learn something new). I'll happily update my answer. – b_laoshi Apr 19 '18 at 07:52
  • @b_laoshi Thank you for your comment. Concerning the circuitry, I am stuyding now. When I understand the equation, I will write the comment about the resistance value. – sevenOfNine Apr 20 '18 at 03:59
4

gpiozero has a CPUTemperature class allowing you to easily control devices based on the Pi's running temperature. And you should just use OutputDevice to control the fan:

from gpiozero import OutputDevice, CPUTemperature

fan = OutputDevice(18)
cpu = CPUTemperature()

while True:
    if cpu.temperature > 45:
        fan.on()
    else:
        fan.off()
ben_nuttall
  • 2,381
  • 11
  • 15
1

I've seen that tutorial too, it didn't work correctly so I fixed it and now it's been about a month it's working fine.Imade a youtube video about it, to check out the connections and step by step tutorial click on >> this link. actually in that video I'll show you how to make it launch on startup automatically!

In this methode use a S8050 transistor, and this is fixed code:

#!/usr/bin/env python3
# coding: utf-8

import os
import time
import signal
import sys
import RPi.GPIO as GPIO
pin = 36 # The pin ID, edit here to change it
maxTMP = 50 # The maximum temperature in Celsius after which we trigger the fan
GPIO.setmode (GPIO.BOARD)

def setup():
    GPIO.setmode(GPIO.BOARD)
    GPIO.setup(pin,GPIO.OUT)
    GPIO.setwarnings(False)
    return()
def getCPUtemperature():
    res = os.popen('vcgencmd measure_temp').readline()
    temp =(res.replace("temp=","").replace("'C\n",""))
    print("temp is {0}".format(temp)) #comment here for stop testing
    return temp
def fanON():
    setPin(True)
    return()
def fanOFF():
    setPin(False)
    return()
def getTEMP():
    CPU_temp = float(getCPUtemperature())

    if CPU_temp>maxTMP:
        fanON()

    else:
        fanOFF()

    return()
def setPin(mode): # A little redundant function but useful if you want to add logging
    GPIO.output(pin, mode)
    return()
try:
    setup()
    while True:
        getTEMP()
        time. sleep(8) # Read the temperature every 8 sec, increase or decrease this limit if you want
except KeyboardInterrupt: # trap a CTRL+C keyboard interrupt
    GPIO.cleanup()

Good luck!

Hossein RM
  • 11
  • 2
0

Many of the other Answers were correct at the time, BUT the kernel now includes temperature control capabilities.
Only a single line needs to be added to cmdline.txt

dtoverlay=gpio-fan,temp=60000

to switch the fan on at 60℃ - 60000 millicelcius (the default is 55℃ but you can select any temperature). The fan turns off when the temperature falls by 10℃.

This uses the gpio-fan overlay (which has been available in the kernel since late 2018) and should be included in recent versions of Raspbian. (Read /boot/overlays/README for description of this and other Device Tree overlays.)

See https://raspberrypi.stackexchange.com/a/105820/8697

Milliways
  • 54,718
  • 26
  • 92
  • 182