Constrictor knot
The constrictor knot is one of the most effective binding knots.[1][2][3][4] Simple and secure, it is a harsh knot that can be difficult or impossible to untie once tightened. It is made similarly to a clove hitch but with one end passed under the other, forming an overhand knot under a riding turn. The double constrictor knot is an even more robust variation that features two riding turns.
| Constrictor knot | |
|---|---|
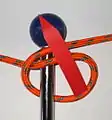
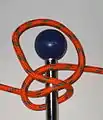
 Left: constrictor knot Right: double constrictor knot | |
| Names | Constrictor knot, gunner's knot |
| Category | Binding |
| Related | Clove hitch, transom knot, strangle knot, miller's knot, boa knot, cross constrictor knot |
| Releasing | Jamming |
| ABoK | #176, #355, #364, #430, #1188, #1189, #1249, #1250, #1251, #1252, #2052, #2097, #2489, #2560, #3441, #3700, #3853 |
History
First called "constrictor knot" in Clifford Ashley's 1944 work The Ashley Book of Knots, this knot likely dates back much further.[5] Although Ashley seemed to imply that he had invented the constrictor knot over 25 years before publishing The Ashley Book of Knots,[1] research indicates that he was not its only originator, but his Book of Knots does seem to be the source of subsequent knowledge and awareness of the knot.[6][7]
Although the description is not entirely without ambiguity, the constrictor knot is thought to have appeared under the name "gunner's knot" in the 1866 work The Book of Knots,[8][9] written under the pseudonym Tom Bowling.[lower-alpha 1] The knot is described in relation to the clove hitch, which he illustrated and called the "builder's knot". He wrote, "The Gunner's knot (of which we do not give a diagram) only differs from the builder's knot, by the ends of the cords being simply knotted before being brought from under the loop which crosses them."[10] But Bowling is simply an extraction and translation of the knotting work contained in the huge French Traite de L'Art de la Charpenterie, first published in 1841, which says "Le nœud de bombardier, que nous n'avons point figuré, ne differe du nœud d'artificier qu'en ce que les bouts du cordage sont croisés en nœud simple, avant de sortir de dessous la ganse qui les croise, fig.46."[11] When J. T. Burgess copied from Bowling, he changed this text to merely state "when the ends are knotted, the builder's knot becomes the gunner's Knot."[12] Although a clove hitch with knotted ends is a workable binding knot,[lower-alpha 2] Burgess was not actually describing the constrictor knot. In 1917, A. Hyatt Verrill illustrated Burgess's clove hitch variation in Knots, Splices and Rope Work.[13]
The constrictor knot was clearly described but not pictured as the "timmerknut" ("timber knot") in the 1916 (2nd) edition of the Swedish book Om Knutar ("On Knots") by Hjalmar Öhrvall.[14] Finnish scout leader Martta Ropponen presented the knot in her 1931 scouting handbook Solmukirja ("Knot Book"),[15] one of the first published works known to contain an illustration of the constrictor knot.[5] Cyrus L. Day relates that, "she had never seen it in Finland, she wrote to me in 1954, but had learned about it from a Spaniard named Raphael Gaston, who called it a whip knot, and told her it was used in the mountains of Spain by muleteers and herdsmen."[7] The Finnish name "ruoskasolmu" ("whip knot") was a translation from Esperanto, the language Ropponen used to correspond with Gaston.[5] But even this explicit occurrence of the constrictor remains in doubt, as the name "whip knot" is not applied to the constrictor in other works, and otherwise is used for the strangle knot, tied in the ends of whip tails. Also in 1931 – and so of essentially same date as for Ropponen – James Drew presented the constrictor (as a strangle knot that can be tied in the bight) in Lester Griswold's Handicrafts book; but Drew did not show it in his on book of knots later published. (As Drew knew Clifford Ashley, it is suspected that he might have learned the knot from him; Ashley does praise Handicrafts in his Book of Knots.)
Tying method
The method shown below is the most basic way to tie the knot around a post (that is, using a working end).[16]

- Make a turn around the object and bring the working end back over the standing part.
- Continue around behind the object.
- Pass the working end over the standing part and then under the riding turn and standing part, forming an overhand knot under a riding turn.
- Be sure the ends emerge between the two turns as shown. Pull firmly on the ends to tighten.
There are also at least three methods to tie the constrictor knot in the bight and slip it over the end of an object to be bound.
Twisting method
Using both hands when the end of the object to tie to is available:[17]
 1 : Both hands holding the rope, thumbs are used to form a Z with the rope
 2 : thumbs with the rope are rotated 90 degrees to cross each other forming loops
 3 : The resulting two loops are folded around the crossing point and held together.
 4 : the resulting two loops are slipped together over the end
If one or both of the ends are folded in between the two loops and lead in the opposite direction, the knot becomes slipped.
Folding method
Using one hand when the end of the object to tie to is available:[18]
 1 : Bight turned into an underhand (overhand) loop and slipped loosely over the end of the object
 2 : The loop is grabbed from under, at the other side of crossing point, twisted half a turn (counter-)clockwise to form a number 8,
 3 : Then lead over the loop crossing point and slipped a second time over the end, and finally tightened.
If the rope is to be stretched in tension, the grabbing at stage 2 may first tighten the top side rope, the bottom side rope may be pulled to tighten the knot itself, and the bottom rope side may be tightened by the knot at the next pole. If one or both of the ends are folded and led in the opposite direction before the last loop is folded over the objects end, the knot becomes slipped and therefore easier to untie: It also makes it possible to stretch either side rope tight by pulling at the slip loops.
Variations
Double constrictor knot
If a stronger and even more secure knot is required an extra riding turn can be added to the basic knot to form a double constrictor knot. It is particularly useful when tying the knot with very slippery twine, especially when waxed.[2] Adding more than one extra riding turn does not add to its security and makes the knot more difficult to tighten evenly.

- Make a turn around the object and bring the working end back over the standing part.
- Make a second turn following the same path as the first
- Pass the working end over the standing part, then thread it back under the standing part and both riding turns, forming an overhand knot under two riding turns.
- Be sure the ends emerge between the turns as shown. The double constrictor may require more careful dressing to distribute the tension throughout the knot. After working up fairly tight, pull firmly on the ends to finish.
Slipped constrictor knot
This variation is useful if it is known beforehand that the constrictor will need to be released. Depending on the knotting material and how tightly it is cinched, the slipped form can still be very difficult to release.

- Make a turn around the object and bring the working end back over the standing part.
- Continue around behind the object, and then again over the standing part back to the side of the first turn.
- Pass a bight of the working end under the point where the first riding pass and the standing part cross to form a slip loop.
- Be sure the slip loop bight and both ends emerge from in between the two turns as shown.
- To release, tug on the working end so that the bight passes back through the knot.
The slipped constrictor can also be tied in the bight and slipped over the object to constrict. Despite its advertised advantage (quick release), the slipped constrictor knot can also be hard to release when worked extremely tight in certain rope materials.
Cross constrictor knot
This variation is similar to the double constrictor knot but has the two riding turns crossing each other rather than riding along. It is unclear whether it is more secure than the double constrictor, and has the unhelpful aspect of being thicker at the bridge of the knot, with three rope diameters.
 Step 1 of tying Cross constrictor knot: simple knot
 Step 2 of tying Cross constrictor knot: simple knot, sides pulled to form 3 loops
 Step 3 of tying Cross constrictor knot: simple knot side loop folded over the middle loop
 Step 4 of tying Cross constrictor knot: the far side loop folded over the simple knot
 Final step of tying Cross constrictor knot: object through the 3 loops
 A : turn around object at right side then at left side forming a figure-eight just like on a cleat
 B : Complete the Figure-eight lashing
 C : Complete the overhand knot with the main line under both riding turns, entering from left
 D : Dress
 E : Tighten
There are two types depending on which direction the two riding turns cross. When the bottom riding turn is along the grove of the ends wrapping around each other on their way out, it gives a slightly lower knot height and may be seen as a strangle knot with an extra riding turn across.
Usage

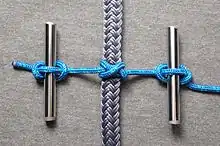
The constrictor knot is appropriate for situations where secure temporary or semi-permanent binding is needed. Made with small-stuff it is especially effective, as the binding force is concentrated over a smaller area. When tying over soft material such as the neck of a bag, take care to keep the wraps of the knot together. The constrictor knot can damage or disfigure items it is tied around.[3] To exert extreme tension on the knot without injuring the hands, one can fashion handles using marlinespike hitches made around two rods.[2]
Constrictor knots can be used for temporarily binding the fibres of a rope (or strand ends) together while splicing, or when cutting to length and before properly whipping the ends. Constrictor knots can also be quite effective as improvised hose clamps or cable ties.[19] The knot has also been recommended as a surgical knot for ligatures in human and veterinary surgery, where it has been shown to be far superior to any of the knots commonly used for ligation.[4] Noted master-rigger Brion Toss says of the constrictor: "To know the knot is to constantly find uses for it…"[2]
For spearguns, the constrictor knot is the usual knot used to secure modern, toggled, Dyneema, cord wishbones into the hollow, bulk-rubber loops, which are used to power the spear. Usually tied with braid, Kevlar or Dyneema cord of approximately 1.4-2mm diameter.
Releasing

A heavily tightened constrictor knot will likely jam. If the ends are long enough, one can sometimes untie it by pulling one end generally parallel to the bound object and a bit up away from it, and prying it into the opposite end's part to open the knot. Tools that can be forced between parts of the knot (such as picks and marlinespikes) may help.
If the ends have been trimmed short, or the knot is otherwise hopelessly jammed, it can be easily released by cutting the riding turn with a sharp knife. The knot will spring apart as soon as the riding turn is cut. If care is taken not to cut too deeply, the underlying wraps will protect the bound object from being damaged by the knife.[20]
Security
The constrictor and double constrictor are both extremely secure when tied tightly around convex objects with cord scaled for the task at hand. If binding around a not fully convex, or square-edged object, arrange the knot so the overhand knot portion is stretched across a convex portion, or a corner, with the riding turn directly atop it.[2] In situations where the object leaves gaps under the knot and there are no corners, it is possible to finish the constrictor knot off with an additional overhand knot, in the fashion of a reef knot, to help stabilize it. Those recommendations aside, constrictor knots do function best on fully convex objects.
If the constricted object (such as a temporarily whipped rope) ends very close to where a constrictor binds it, a boa knot may prove a more stable solution.
Notes
- The name "Tom Bowling" was widely associated with nautical themes, see The Adventures of Roderick Random and Charles Dibdin. The Book of Knots is most often attributed to Paul Rapsey Hodge or Frederick Chamier. For additional discussion see Ashley(1944), p. 11.
- A clove hitch finished with a full reef knot is still used for securing cabling in aerospace applications. See Cable lacing#Styles.
External links
- Constrictor Knot animated and illustrated
- Grog. "Constrictor Knot". Animated Knots. Retrieved October 16, 2005.
References
- Clifford W. Ashley, The Ashley Book of Knots (New York: Doubleday, 1944), 224-225.
- Brion Toss, The Complete Rigger's Apprentice (Camden, Maine: International Marine, 1998), 10-13.
- Geoffrey Budworth, The Complete Book of Knots (London: Octopus, 1997), 136-139.
- Taylor, Howard; Grogono, Alan W. (March 2014). "The constrictor knot is the best ligature". Annals of the Royal College of Surgeons of England. 96 (2): 101–105. doi:10.1308/003588414X13814021677638. PMC 4474235. PMID 24780665.
- Cyrus Lawrence Day, The Art of Knotting and Splicing, 4th ed. (Annapolis: Naval Institute Press, 1986), 112.
- Johansson, Sten (April 1983), "Letters", Knotting Matters, London: International Guild of Knot Tyers (3): 13–14
- Cyrus Lawrence Day, Quipus and Witches' Knots (Lawrence: The University of Kansas Press, 1967), 110-111.
- Pieter van de Griend (1992). A Letter to Lester. Århus: Privately published. ISBN 87-983985-0-4.
- Pieter van de Griend (July 2007). "The Constrictor Knot Revisited". Knot News. International Guild of Knot Tyers - Pacific Branch (62). ISSN 1554-1843.
- Bowling (pseudonym), Tom (1890) [1866], The Book of Knots (6th ed.), London: W. H. Allen, p. 8,
- Emy, Amand Rose (1870). Traite de L'Art de la Charpenterie [Treatise on the Art of Carpentry] (in French). Vol. 2 (2 ed.). Paris: Dunod. p. 589. OCLC 1016271841.
- Joseph Tom Burgess, Knots, Ties, and Splices (London: George Routledge & Sons, 1884), viii, 101.
- A. Hyatt Verrill, Knots, Splices and Rope Work, Third Revised Edition (New York: Norman W. Henly Publishing Co., 1917; 2006 Dover republication), 33-35. (second revised edition online)
- Hjalmar Öhrvall, Om Knutar, Second edition, (Stockholm: Albert Bonniers Förlag, 1916), 78.(Online version)
- Martta E. Ropponen, Kaarina Westling illustrator, Solmukirja, Suomen Partioliiton Kirjasia N:4 (Porvoo, Finland: WSOY, 1931), 58-59.
- "Constrictor Knot: Instrument Method". Retrieved 4 May 2014.
- "Constrictor Knot: Twisting Method". Retrieved 4 May 2014.
- "Constrictor Knot: Folding Method". Retrieved 4 May 2014.
- "How to Tie the Impossible Knot". HowStuffWorks. 2015-06-18. Retrieved 2022-10-12.
- Geoffrey Budworth, The Ultimate Encyclopedia of Knots (London: Hermes House, 1999), 159.