Magnetic force microscope
Magnetic force microscopy (MFM) is a variety of atomic force microscopy, in which a sharp magnetized tip scans a magnetic sample; the tip-sample magnetic interactions are detected and used to reconstruct the magnetic structure of the sample surface. Many kinds of magnetic interactions are measured by MFM, including magnetic dipole–dipole interaction. MFM scanning often uses non-contact AFM (NC-AFM) mode.


Overview
In MFM measurements, the magnetic force between the sample and the tip can be expressed as [1][2]
where is the magnetic moment of the tip (approximated as a point dipole), is the magnetic stray field from the sample surface, and µ0 is the magnetic permeability of free space.
Because the stray magnetic field from the sample can affect the magnetic state of the tip, and vice versa, interpretation of the MFM measurement is not straightforward. For instance, the geometry of the tip magnetization must be known for quantitative analysis.
Typical resolution of 30 nm can be achieved,[3] although resolutions as low as 10 to 20 nm are attainable.[4]
Important dates
A boost in the interest to MFM resulted from the following inventions:[1][5][6]
Scanning tunneling microscope (STM) 1982, Tunneling current between the tip and sample is used as the signal. Both the tip and sample must be electrically conductive.
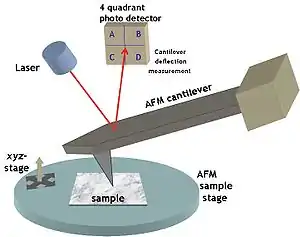
Atomic force microscopy (AFM) 1986, forces (atomic/electrostatic) between the tip and sample are sensed from the deflections of a flexible lever (cantilever). The cantilever tip flies above the sample with a typical distance of tens of nanometers.
Magnetic Force Microscopy (MFM), 1987[7] Derives from AFM. The magnetic forces between the tip and sample are sensed.[8][9] Image of the magnetic stray field is obtained by scanning the magnetized tip over the sample surface in a raster scan.[10]
MFM components
The main components of an MFM system are:
- Piezoelectric scanning
- Moves the sample in an x, y and z directions.
- Voltage is applied to separate electrodes for different directions. Typically, a 1 volt potential results in 1 to 10 nm displacement.
- Image is put together by slowly scanning sample surface in a raster fashion.
- Scan areas range from a few to 200 micrometers.
- Imaging times range from a few minutes to 30 minutes.
- Restoring force constants on the cantilever range from 0.01 to 100 N/m depending on the material of the cantilever.
- Magnetized tip at one end of a flexible lever (cantilever); generally an AFM probe with a magnetic coating.
- In the past, tips were made of etched magnetic metals such as nickel.
- Nowadays, tips are batch fabricated (tip-cantilever) using a combination of micromachining and photolithography. As a result, smaller tips are possible, and better mechanical control of the tip-cantilever is obtained.[11][12][13]
- Cantilever: can be made of single-crystalline silicon, silicon dioxide (SiO2), or silicon nitride (Si3N4). The Si3N4 cantilever-tip modules are usually more durable and have smaller restoring force constants (k).
- Tips are coated with a thin (< 50 nm) magnetic film (such as Ni or Co), usually of high coercivity, so that the tip magnetic state (or magnetization M) does not change during the imaging.
- The tip-cantilever module is driven close to the resonance frequency by a piezoelectric crystal with typical frequencies ranging from 10 kHz to 1 MHz.[5]
Scanning procedure
Often, MFM is operated with the so-called "lift height" method.[14] When the tip scans the surface of a sample at close distances (< 10 nm), not only magnetic forces are sensed, but also atomic and electrostatic forces. The lift height method helps to enhance the magnetic contrast through the following:
- First, the topographic profile of each scan line is measured. That is, the tip is brought into a close proximity of the sample to take AFM measurements.
- The magnetized tip is then lifted further away from the sample.
- On the second pass, the magnetic signal is extracted.[15]
Modes of operation
Static (DC) mode
The stray field from the sample exerts a force on the magnetic tip. The force is detected by measuring the displacement of the cantilever by reflecting a laser beam from it. The cantilever end is either deflected away or towards the sample surface by a distance Δz = Fz/k (perpendicular to the surface).
Static mode corresponds to measurements of the cantilever deflection. Forces in the range of tens of piconewtons are normally measured.
Dynamic (AC) mode
For small deflections, the tip-cantilever can be modeled as a damped harmonic oscillator with an effective mass (m) in [kg], an ideal spring constant (k) in [N/m], and a damper (D) in [N·s/m].[16]
If an external oscillating force Fz is applied to the cantilever, then the tip will be displaced by an amount z. Moreover, the displacement will also harmonically oscillate, but with a phase shift between applied force and displacement given by:[5][6][9]
where the amplitude and phase shifts are given by:
Here the quality factor of resonance, resonance angular frequency, and damping factor are:
Dynamic mode of operation refers to measurements of the shifts in the resonance frequency. The cantilever is driven to its resonance frequency and frequency shifts are detected. Assuming small vibration amplitudes (which is generally true in MFM measurements), to a first-order approximation, the resonance frequency can be related to the natural frequency and the force gradient. That is, the shift in the resonance frequency is a result of changes in the spring constant due to the (repelling and attraction) forces acting on the tip.
The change in the natural resonance frequency is given by
- , where
For instance, the coordinate system is such that positive z is away from or perpendicular to the sample surface, so that an attractive force would be in the negative direction (F<0), and thus the gradient is positive. Consequently, for attractive forces, the resonance frequency of the cantilever decreases (as described by the equation). The image is encoded in such a way that attractive forces are generally depicted in black color, while repelling forces are coded white.
Image formation
Calculating forces acting on magnetic tips
Theoretically, the magneto-static energy (U) of the tip-sample system can be calculated in one of two ways:[1][5][6][17] One can either compute the magnetization (M) of the tip in the presence of an applied magnetic field () of the sample or compute the magnetization () of the sample in the presence of the applied magnetic field of the tip (whichever is easier). Then, integrate the (dot) product of the magnetization and stray field over the interaction volume () as
and compute the gradient of the energy over distance to obtain the force F.[18] Assuming that the cantilever deflects along the z-axis, and the tip is magnetized along a certain direction (e.g. the z-axis), then the equations can be simplified to
Since the tip is magnetized along a specific direction, it will be sensitive to the component of the magnetic stray field of the sample which is aligned to the same direction.
Imaging samples
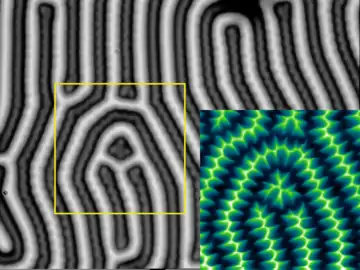
The MFM can be used to image various magnetic structures including domain walls (Bloch and Neel), closure domains, recorded magnetic bits, etc. Furthermore, motion of domain wall can also be studied in an external magnetic field. MFM images of various materials can be seen in the following books and journal publications:[5][6][19] thin films, nanoparticles, nanowires, permalloy disks and recording media.
Advantages
The popularity of MFM originates from several reasons, which include:[2]
- The sample does not need to be electrically conductive.
- Measurement can be performed at ambient temperature, in ultra high vacuum (UHV), in liquid environment, at different temperatures, and in the presence of variable external magnetic fields.
- Measurement is nondestructive to the crystal lattice or structure.
- Long-range magnetic interactions are not sensitive to surface contamination.
- No special surface preparation or coating is required.
- Deposition of thin non-magnetic layers on the sample does not alter the results.
- Detectable magnetic field intensity, H, is in the range of 10 A/m
- Detectable magnetic field, B, is in the range of 0.1 gauss (10 microteslas).
- Typical measured forces are as low as 10−14 N, with the spatial resolutions as low as 20 nm.
- MFM can be combined with other scanning methods like STM.
Limitations
There are some shortcomings or difficulties when working with an MFM, such as: the recorded image depends on the type of the tip and magnetic coating, due to tip-sample interactions. Magnetic field of the tip and sample can change each other's magnetization, M, which can result in nonlinear interactions. This hinders image interpretation. Relatively short lateral scanning range (order of hundreds micrometers). Scanning (lift) height affects the image. Housing of the MFM system is important to shield electromagnetic noise (Faraday cage), acoustic noise (anti-vibration tables), air flow (air isolation), and static charge on the sample.
Advances
There have been several attempts to overcome the limitations mentioned above and to improve the resolution limits of MFM. For example, the limitations from air flow has been overcome by MFMs that operate at vacuum.[20] The tip-sample effects have been understood and solved by several approaches. Wu et al., have used a tip with antiferromagnetically coupled magnetic layers in an attempt to produce a dipole only at the apex.[21]
References
- D.A. Bonnell (2000). "7". Scanning Probe Microscopy and Spectroscopy (2 ed.). Wiley-VCH. ISBN 0-471-24824-X.
- D. Jiles (1998). "15". Introduction to Magnetism and Magnetic Materials (2 ed.). Springer. ISBN 3-540-40186-5.
- L. Abelmann; S. Porthun; et al. (1998). "Comparing the resolution of magnetic force microscopes using the CAMST reference samples". J. Magn. Magn. Mater. 190 (1–2): 135–147. Bibcode:1998JMMM..190..135A. doi:10.1016/S0304-8853(98)00281-9.
- Nanoscan AG, Quantum Leap in Hard Disk Technology
- H. Hopster & H.P. Oepen (2005). "11-12". Magnetic Microscopy of Nanostructures. Springer.
- M. De Graef & Y. Zhu (2001). "3". Magnetic Imaging and Its Applications to Materials: Experimental Methods in the Physical Sciences. Vol. 36. Academic Press. ISBN 0-12-475983-1.
- Magnetic Force Microscopy Archived July 19, 2011, at the Wayback Machine
- Y. Martin & K. Wickramasinghe (1987). "Magnetic Imaging by Force Microscopy with 1000A Resolution". Appl. Phys. Lett. 50 (20): 1455–1457. Bibcode:1987ApPhL..50.1455M. doi:10.1063/1.97800.
- U. Hartmann (1999). "Magnetic Force Microscopy". Annu. Rev. Mater. Sci. 29: 53–87. Bibcode:1999AnRMS..29...53H. doi:10.1146/annurev.matsci.29.1.53. S2CID 99174136.
- History of Probing Methods
- L. Gao; L.P. Yue; T. Yokota; et al. (2004). "Focused Ion Beam Milled CoPt Magnetic Force Microscopy Tips for High Resolution Domain Images". IEEE Transactions on Magnetics. 40 (4): 2194–2196. Bibcode:2004ITM....40.2194G. doi:10.1109/TMAG.2004.829173. S2CID 28850293.
- A. Winkler; T. Mühl; S. Menzel; et al. (2006). "Magnetic Force Microscopy Sensors using Iron-filled Carbon Nanotubes". J. Appl. Phys. 99 (10): 104905–104905–5. Bibcode:2006JAP....99j4905W. doi:10.1063/1.2195879.
- K. Tanaka; M. Yoshimura & K. Ueda (2009). "High-Resolution Magnetic Force Microscopy Using Carbon Nanotube Probes Fabricated Directly by Microwave Plasma-Enhanced Chemical Vapor Deposition". Journal of Nanomaterials. 2009: 147204. doi:10.1155/2009/147204.
- Magnetic Force Microscopy (MFM) manual
- I. Alvarado, "Procedure to Perform Magnetic Force Microscopy (MFM) with VEECO Dimension 3100 AFM", NRF, 2006 Archived May 29, 2011, at the Wayback Machine
- Cantilever Analysis
- R. Gomez; E.R. Burke & I.D. Mayergoyz (1996). "Magnetic Imaging in the Presence of External Fields: Technique and Applications". J. Appl. Phys. 79 (8): 6441–6446. Bibcode:1996JAP....79.6441G. doi:10.1063/1.361966. hdl:1903/8391.
- Gama, Sergio; Ferreira, Lucas D. R.; Bessa, Carlos V. X.; Horikawa, Oswaldo; Coelho, Adelino A.; Gandra, Flavio C.; Araujo, Raul; Egolf, Peter W. (2016). "Analytic and Experimental Analysis of Magnetic Force Equations". IEEE Transactions on Magnetics. 52 (7): 1–4. doi:10.1109/tmag.2016.2517127. S2CID 21094593.
- D. Rugar; H.J. Mamin; P. Guenther; et al. (1990). "Magnetic Force Microscopy: General Principles and Application to Longitudinal Recording Media". J. Appl. Phys. 68 (3): 1169–1183. Bibcode:1990JAP....68.1169R. doi:10.1063/1.346713.
- Archived July 21, 2013, at the Wayback Machine
- Point-dipole response from a magnetic force microscopy tip with a synthetic antiferromagnetic coating
