Excel 2013
Saving and Sharing Workbooks
Sharing workbooks
Excel 2013 makes it easy to share and collaborate on workbooks using OneDrive. In the past, if you wanted to share a file with someone you could send it as an email attachment. While convenient, this system also creates multiple versions of the same file, which can be difficult to organize.
When you share a workbook from Excel 2013, you're actually giving others access to the exact same file. This lets you and the people you share with edit the same workbook without having to keep track of multiple versions.
In order to share a workbook, it must first be saved to your OneDrive.
To share a workbook:
- Click the File tab to access Backstage view, then click Share.
 Clicking Share
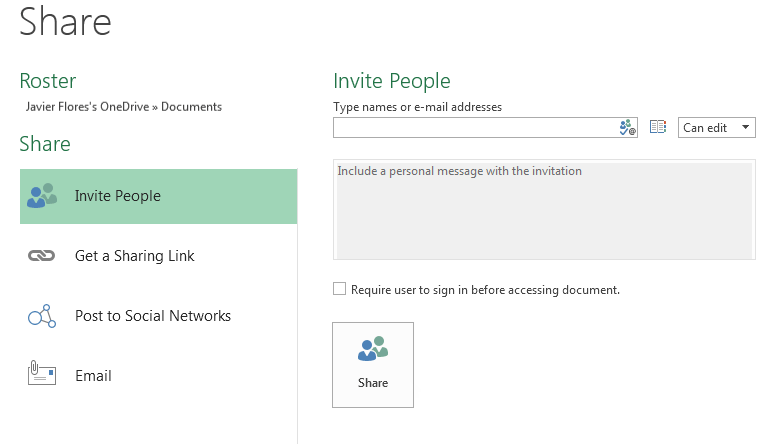
 - The Share pane will appear.
Click the buttons in the interactive below to learn more about different ways to share a workbook.

From here, you can share your workbook directly through Microsoft Outlook 2013.

Post to Social Networks
From here, you can post a link to your workbook on any social network that you've connected with your Microsoft account, such as Facebook or LinkedIn. You'll also have the option to include a personal message and set editing permissions.

Get a Sharing Link
From here, you can obtain a link that you can use to share your workbook. For example, you could post the link on your blog, or email it to a larger group of people. You'll decide if the link allows people to edit or just view the workbook.

Invite People
From here, you'll be able to invite others to view or edit the workbook. We recommend using this option most of the time, as it gives you the greatest level of control and privacy when sharing a workbook.
This option is selected by default whenever you access the Share pane.
Share Options
This pane will change depending on which sharing method you select. You'll be able to choose various options to control how you share your presentation.
For example, you can decide if the people you share with will have permissions to edit or just view the document.


