Word 2013
Mail Merge
Introduction
Mail Merge is a useful tool that allows you to produce multiple letters, labels, envelopes, name tags, and more using information stored in a list, database, or spreadsheet. When performing a Mail Merge, you will need a Word document (you can start with an existing one or create a new one) and a recipient list, which is typically an Excel workbook.
Optional: If you'd like to work along with the lesson, you can download the examples below:
- Lesson 31 Practice Document (Word document)
- Lesson 31 Recipient List (Excel workbook)
To use Mail Merge:
- Open an existing Word document, or create a new one.
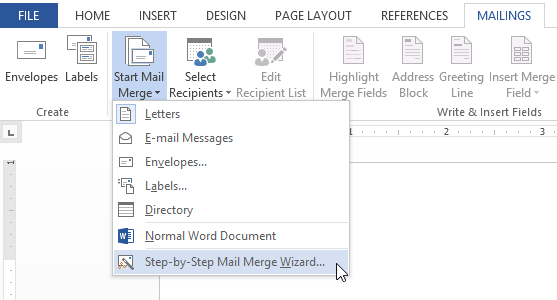
- From the Mailings tab, click the Start Mail Merge command and select Step by Step Mail Merge Wizard... from the drop-down menu.
 Opening the Mail Merge Wizard
The Mail Merge pane appears and will guide you through the six main steps to complete a merge. The following example demonstrates how to create a form letter and merge the letter with a recipient list.
Step 1:
- Choose the type of document you wish to create. In our example, we'll select Letters. Then click Next: Starting document to move to Step 2.
 Selecting Letters and clicking Next
Step 2:
- Select Use the current document, then click Next: Select recipients to move to Step 3.
 Selecting Use the current document and clicking Next


