Lesson 20: Print Management

/en/excelxp/defining-page-setup-options/content/

Introduction

By the end of this lesson, you should be able to:

  • Specify a print area
  • Preview a page
  • Insert and remove page breaks
  • Print a worksheet or workbook

Specify a print area

In Excel XP, you can print an entire workbook, a worksheet, a cell range, or a cell. Excel defaults to printing the entire worksheet. If you want to print only a certain area of a spreadsheet, you can define a print area.

To specify a print area:

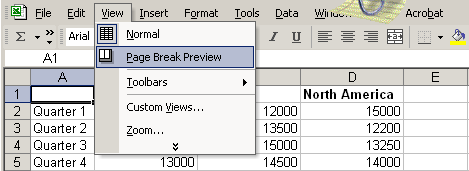
  • Choose ViewPage Break Preview from the menu bar.

    View and Page Break Preview Menu Selections
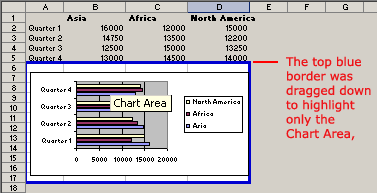
  • A reduced image of the chart is displayed on the screen.
  • Click one of four blue-colored borders, then drag to highlight and select the area to print.

    Print Range
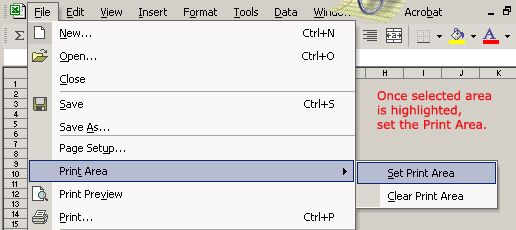
  • Choose FilePrint AreaSet Print Area on the menu bar.

    File and Print Area Menu Selections

Only the area you defined in the print range will print when the worksheet is submitted to the printer for printing.

Previewing a page before printing

Excel XP provides a Print Preview capability that shows a smaller picture of the printed page directly on your screen. Print Preview is a good way for you to review the formatting and make sure the columns, rows, and margins appear exactly as you want them.

To access Print Preview:

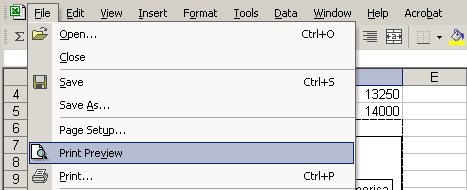
  • Choose FilePrint Preview on the menu bar

    OR
  • Click the Print Preview button on the standard toolbar.

    File and Print Preview Menu Selections
  • In the Print Preview window, the document is sized so the entire page is visible on the screen. Check the spreadsheet for overall formatting and layout.

    Print Preview Dialog Box

The Zoom button in Print Preview will enlarge the data so it can be read.

Inserting and removing a page break

There are two types of page breaks in Excel: soft page breaks and hard page breaks. A soft page break is automatically inserted into a spreadsheet when there's too much data to fit on one page. A hard page break is one that you can insert into a spreadhseet, wherever you want it to appear.

To insert a page break:

  • Move the cursor to the row where a page break should be inserted. This row will be the first row on the new page.
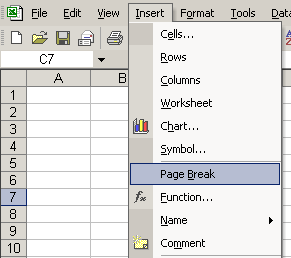
  • Choose InsertPage Break from the menu bar.

    Insert and Page Break Menu Options
  • A page break, indicated by a dashed line, is inserted into the worksheet.

To delete a page break:

  • Move the cursor to the row where a page break appears.
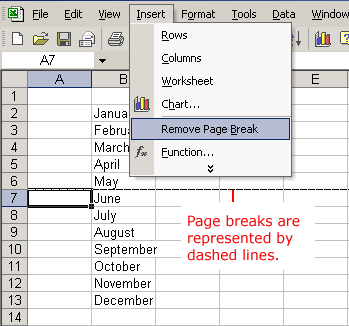
  • Choose InsertRemove Page Break from the menu bar.

    Insert and Remove Page Break Menu Options
  • The page break, represented by a dashed line, is removed from the page.

Printing worksheets and workbooks

Printing in Excel is similar to printing in other Office applications such as Microsoft Word. As previously mentioned, Excel defaults to printing the entire worksheet.

To print a worksheet:

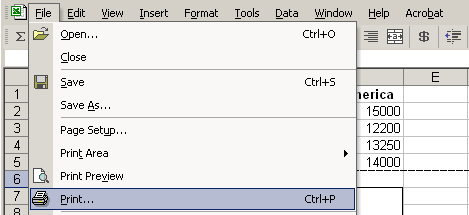
  • Choose FilePrint from the menu bar.

    File and Print Menu Selections
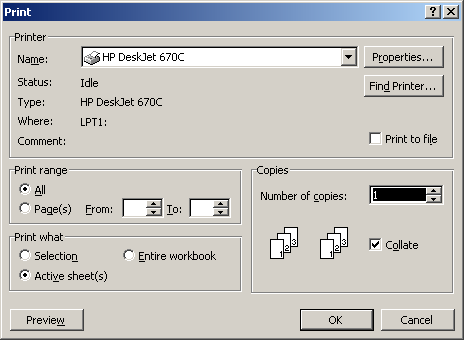
  • The Print dialog box opens.

    Print Dialog Box
  • Specify the printer name where the spreadsheet will print. If you only have one printer in your home or office, Excel will default to that printer.
  • In Print range, choose whether to print All or a certain range of pages (Pages From n to y, where n and y are the beginning and ending page numbers).
  • In Print what, choose whether to print a Selection, the Active sheet(s), or the Entire workbook (all worksheets in the workbook). Excel defaults to the active sheet.
  • Choose the Number of copies to print by clicking the up or down arrows.
  • Click OK to print the worksheet.

Don't print your Excel spreadsheet without checking spelling first! Excel includes two tools to help correct spelling errors: AutoCorrect and Spelling.

Challenge!

  • Type the following information in the worksheet:

    In cell A2, type January
    In cell A3, type February
    In cell A4, type March
    In cell B1, type Bill
    In cell B2, type 3542
    In cell B3, type 7184
    In cell B4, type 6531
    In cell C1, type Mary
    In cell C2, type 2943
    In cell C3, type 6542
    In cell C4, type 7137
    In cell D1, type Bob
    In cell D2, type 3403
    In cell D3, type 7314
    In cell D4, type 6942

  • Create an embedded area chart.
  • Define a print range that includes only the area chart and not the source data.
  • Use Print Preview to preview the chart prior to printing.
  • Reset the print range to include both the source data and the area chart.
  • Insert a page break between the source data and the embedded area chart.
  • Send two copies of the two-page worksheet to print at the default printer name.

/en/excelxp/whats-new-in-microsoft-excel-xp/content/