2 métodos:Paquete de regaloMensaje oculto
¿Alguna vez has querido enviarle una carta a alguien, un regalo pequeño o un mensaje oculto? Obviamente necesitas un sobre bonito donde meterlo. Para que el regalo sea más personal, puedes crear un sobre de origami. No solo son fáciles de hacer, si no que también estos lindos sobres te ayudarán a sacar tu lado creativo.
Anuncio
Pasos
Método 1 de 2: Paquete de regalo -
1
Toma una hoja de papel cuadrada con una esquina apuntando en tu dirección. Si quieres un sobre de colores, asegúrate de que el lado con color esté boca abajo.
http://pad2.whstatic.com/images/thumb/b/b6/Fold-an-Origami-Envelope-Step-1-preview-Version-3.jpg/550px-Fold-an-Origami-Envelope-Step-1-preview-Version-3.jpg
http://pad3.whstatic.com/images/thumb/b/b6/Fold-an-Origami-Envelope-Step-1-preview-Version-3.jpg/300px-Fold-an-Origami-Envelope-Step-1-preview-Version-3.jpg
//d5kh2btv85w9n.cloudfront.net/b/be/Fold an Origami Envelope Step 1 Version 3.360p.mp4
Anuncio
-
2
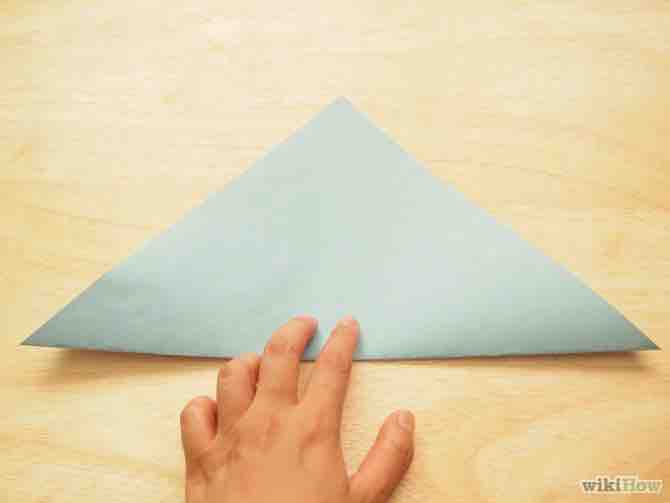
Dobla el papel a la mitad, de esquina a esquina. http://pad1.whstatic.com/images/thumb/8/86/Fold-an-Origami-Envelope-Step-2-preview-Version-3.jpg/550px-Fold-an-Origami-Envelope-Step-2-preview-Version-3.jpg
http://pad2.whstatic.com/images/thumb/8/86/Fold-an-Origami-Envelope-Step-2-preview-Version-3.jpg/300px-Fold-an-Origami-Envelope-Step-2-preview-Version-3.jpg
//d5kh2btv85w9n.cloudfront.net/5/53/Fold an Origami Envelope Step 2 Version 3.360p.mp4
-
3
Toma la esquina superior de la primera capa y dóblala hacia el borde inferior. http://pad2.whstatic.com/images/thumb/1/1c/Fold-an-Origami-Envelope-Step-3-preview-Version-3.jpg/550px-Fold-an-Origami-Envelope-Step-3-preview-Version-3.jpg
http://pad2.whstatic.com/images/thumb/1/1c/Fold-an-Origami-Envelope-Step-3-preview-Version-3.jpg/300px-Fold-an-Origami-Envelope-Step-3-preview-Version-3.jpg
//d5kh2btv85w9n.cloudfront.net/0/05/Fold an Origami Envelope Step 3 Version 3.360p.mp4
-
4
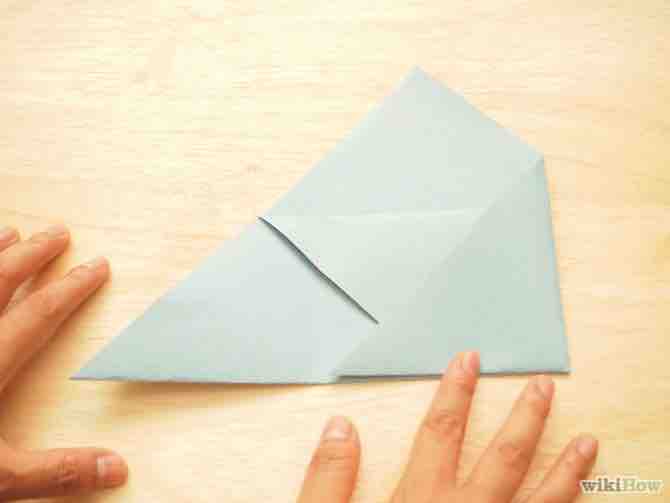
Dobla la esquina derecha un tercio hacia la izquierda. No tiene que ser exacto, solo intenta ser lo más preciso que puedas.
http://pad1.whstatic.com/images/thumb/4/40/Fold-an-Origami-Envelope-Step-4-preview-Version-3.jpg/550px-Fold-an-Origami-Envelope-Step-4-preview-Version-3.jpg
http://pad3.whstatic.com/images/thumb/4/40/Fold-an-Origami-Envelope-Step-4-preview-Version-3.jpg/300px-Fold-an-Origami-Envelope-Step-4-preview-Version-3.jpg
//d5kh2btv85w9n.cloudfront.net/0/0a/Fold an Origami Envelope Step 4 Version 3.360p.mp4
-
5
Toma la esquina izquierda y dóblala hacia el otro extremo. Ahora, la porción inferior debe tener una forma cuadrada.
http://pad1.whstatic.com/images/thumb/b/bf/Fold-an-Origami-Envelope-Step-5-preview-Version-3.jpg/550px-Fold-an-Origami-Envelope-Step-5-preview-Version-3.jpg
http://pad3.whstatic.com/images/thumb/b/bf/Fold-an-Origami-Envelope-Step-5-preview-Version-3.jpg/300px-Fold-an-Origami-Envelope-Step-5-preview-Version-3.jpg
//d5kh2btv85w9n.cloudfront.net/5/5b/Fold an Origami Envelope Step 5 Version 3.360p.mp4
-
6
Dobla la punta de la solapa sobre la otra solapa de regreso hacia el borde izquierdo del modelo. http://pad1.whstatic.com/images/thumb/4/43/Fold-an-Origami-Envelope-Step-6-preview-Version-3.jpg/550px-Fold-an-Origami-Envelope-Step-6-preview-Version-3.jpg
http://pad3.whstatic.com/images/thumb/4/43/Fold-an-Origami-Envelope-Step-6-preview-Version-3.jpg/300px-Fold-an-Origami-Envelope-Step-6-preview-Version-3.jpg
//d5kh2btv85w9n.cloudfront.net/7/7e/Fold an Origami Envelope Step 6 Version 3.360p.mp4
-
7
Dobla la punta de la solapa hacia la esquina superior de la solapa. Desdobla. Este doblez te ayudará como guía para el siguiente paso.
http://pad3.whstatic.com/images/thumb/f/fa/Fold-an-Origami-Envelope-Step-7-preview-Version-3.jpg/550px-Fold-an-Origami-Envelope-Step-7-preview-Version-3.jpg
http://pad3.whstatic.com/images/thumb/f/fa/Fold-an-Origami-Envelope-Step-7-preview-Version-3.jpg/300px-Fold-an-Origami-Envelope-Step-7-preview-Version-3.jpg
//d5kh2btv85w9n.cloudfront.net/8/81/Fold an Origami Envelope Step 7 Version 3.360p.mp4
-
8
Voltea el modelo 180 grados. El punto de vista en la imagen cambiará.
http://pad3.whstatic.com/images/thumb/d/d0/Fold-an-Origami-Envelope-Step-8-preview-Version-3.jpg/550px-Fold-an-Origami-Envelope-Step-8-preview-Version-3.jpg
http://pad1.whstatic.com/images/thumb/d/d0/Fold-an-Origami-Envelope-Step-8-preview-Version-3.jpg/300px-Fold-an-Origami-Envelope-Step-8-preview-Version-3.jpg
//d5kh2btv85w9n.cloudfront.net/c/c2/Fold an Origami Envelope Step 8 Version 3.360p.mp4
-
9
Abre la porción doblada de la solapa. http://pad3.whstatic.com/images/thumb/a/ad/Fold-an-Origami-Envelope-Step-9-preview-Version-3.jpg/550px-Fold-an-Origami-Envelope-Step-9-preview-Version-3.jpg
http://pad3.whstatic.com/images/thumb/a/ad/Fold-an-Origami-Envelope-Step-9-preview-Version-3.jpg/300px-Fold-an-Origami-Envelope-Step-9-preview-Version-3.jpg
//d5kh2btv85w9n.cloudfront.net/a/a5/Fold an Origami Envelope Step 9 Version 3.360p.mp4
-
10
Aplasta los dobleces de esta solapa. Asegúrate de que estén bien aplastados, ya que esto asegurará que el sobre se mantenga cerrado.
http://pad1.whstatic.com/images/thumb/6/6e/Fold-an-Origami-Envelope-Step-10-preview-Version-3.jpg/550px-Fold-an-Origami-Envelope-Step-10-preview-Version-3.jpg
http://pad1.whstatic.com/images/thumb/6/6e/Fold-an-Origami-Envelope-Step-10-preview-Version-3.jpg/300px-Fold-an-Origami-Envelope-Step-10-preview-Version-3.jpg
//d5kh2btv85w9n.cloudfront.net/7/77/Fold an Origami Envelope Step 10 Version 3.360p.mp4
-
11
Cambia la posición para que esté de nuevo hacia arriba. O vuélvelo a voltear 180 grados.
http://pad2.whstatic.com/images/thumb/7/78/Fold-an-Origami-Envelope-Step-11-preview-Version-3.jpg/550px-Fold-an-Origami-Envelope-Step-11-preview-Version-3.jpg
http://pad2.whstatic.com/images/thumb/7/78/Fold-an-Origami-Envelope-Step-11-preview-Version-3.jpg/300px-Fold-an-Origami-Envelope-Step-11-preview-Version-3.jpg
//d5kh2btv85w9n.cloudfront.net/0/0d/Fold an Origami Envelope Step 11 Version 3.360p.mp4
-
12
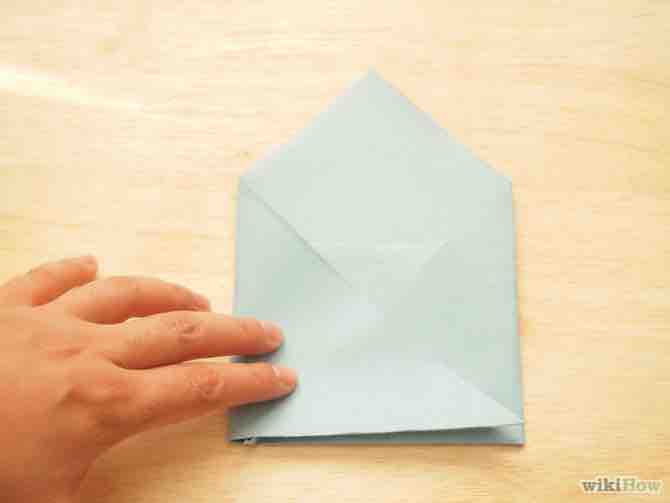
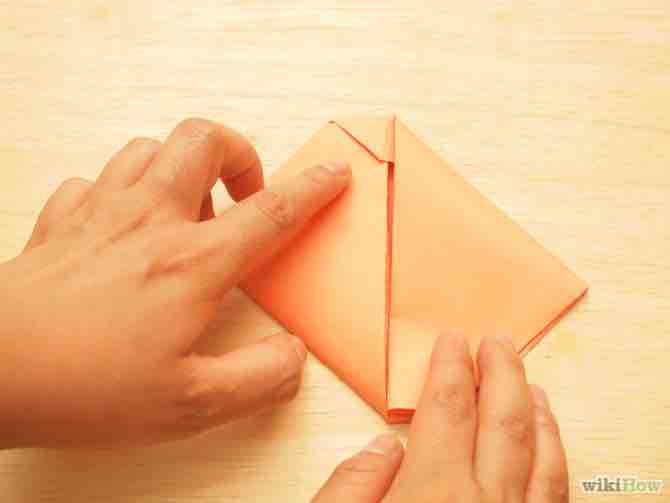
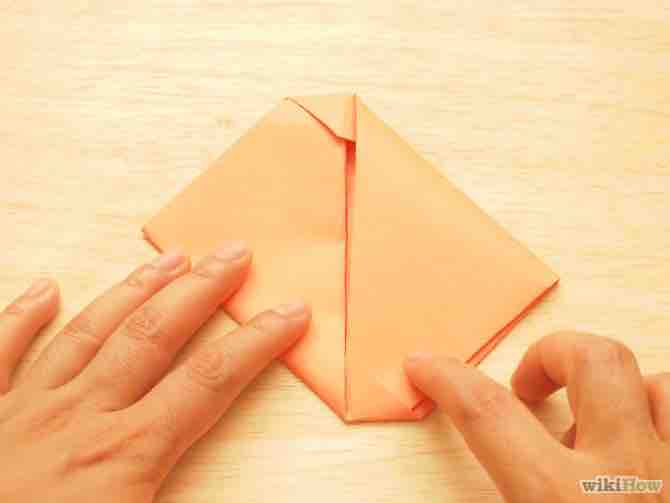
Dobla la punta de la parte superior hacia el borde inferior. El borde inferior del cuadrado que formaste al aplastar los dobleces de la solapa.
http://pad2.whstatic.com/images/thumb/4/4d/Fold-an-Origami-Envelope-Step-12-preview-Version-3.jpg/550px-Fold-an-Origami-Envelope-Step-12-preview-Version-3.jpg
http://pad1.whstatic.com/images/thumb/4/4d/Fold-an-Origami-Envelope-Step-12-preview-Version-3.jpg/300px-Fold-an-Origami-Envelope-Step-12-preview-Version-3.jpg
//d5kh2btv85w9n.cloudfront.net/c/c9/Fold an Origami Envelope Step 12 Version 3.360p.mp4
-
13
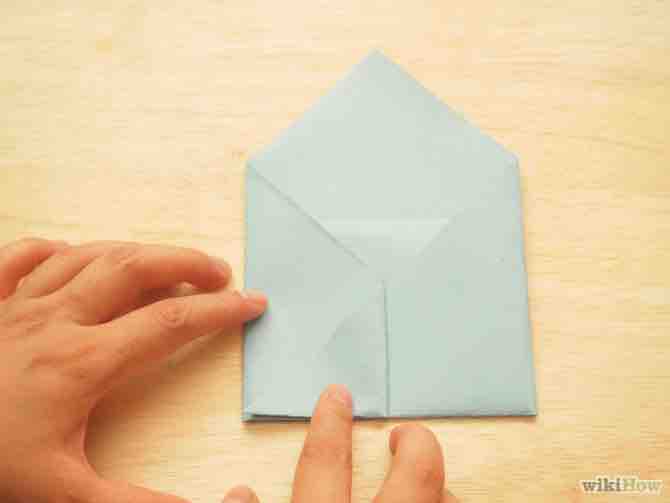
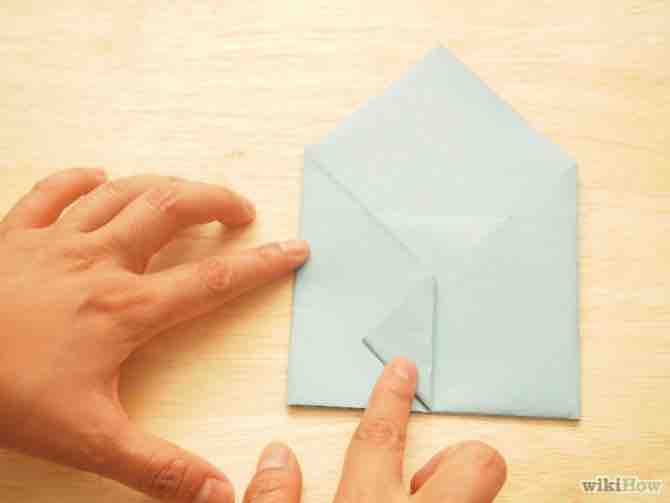
Mete la solapa superior (la porción que acabas de doblar hacia abajo) dentro del “bolsillo” que se formó al aplastar el doblez. http://pad3.whstatic.com/images/thumb/8/86/Fold-an-Origami-Envelope-Step-13-preview-Version-3.jpg/550px-Fold-an-Origami-Envelope-Step-13-preview-Version-3.jpg
http://pad2.whstatic.com/images/thumb/8/86/Fold-an-Origami-Envelope-Step-13-preview-Version-3.jpg/300px-Fold-an-Origami-Envelope-Step-13-preview-Version-3.jpg
//d5kh2btv85w9n.cloudfront.net/5/5d/Fold an Origami Envelope Step 13 Version 3.360p.mp4
-
14
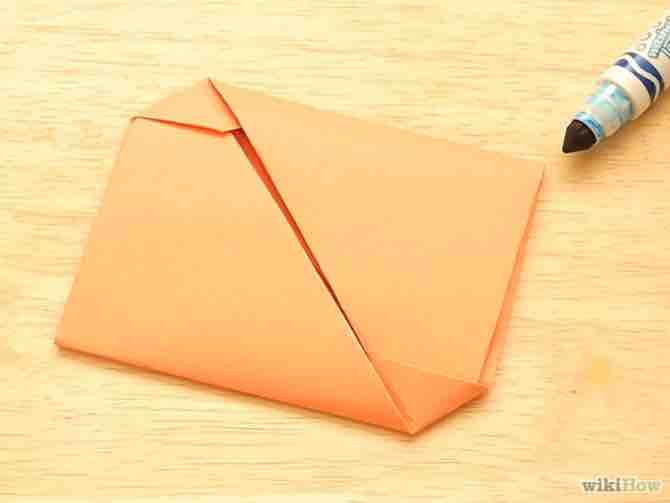
Aplasta el modelo. Asegúrate de que el modelo no se desdoble.
http://pad1.whstatic.com/images/thumb/a/aa/Fold-an-Origami-Envelope-Step-14-preview.jpg/550px-Fold-an-Origami-Envelope-Step-14-preview.jpg
http://pad3.whstatic.com/images/thumb/a/aa/Fold-an-Origami-Envelope-Step-14-preview.jpg/300px-Fold-an-Origami-Envelope-Step-14-preview.jpg
//d5kh2btv85w9n.cloudfront.net/2/28/Fold an Origami Envelope Step 14.360p.mp4
Anuncio
Método 2 de 2: Mensaje oculto -
1
Toma una hoja de papel y escribe o imprime tu mensaje. http://pad1.whstatic.com/images/thumb/9/9f/Fold-an-Origami-Envelope-Step-15-preview.jpg/550px-Fold-an-Origami-Envelope-Step-15-preview.jpg
http://pad3.whstatic.com/images/thumb/9/9f/Fold-an-Origami-Envelope-Step-15-preview.jpg/300px-Fold-an-Origami-Envelope-Step-15-preview.jpg
//d5kh2btv85w9n.cloudfront.net/a/aa/Fold an Origami Envelope Step 15.360p.mp4
-
2
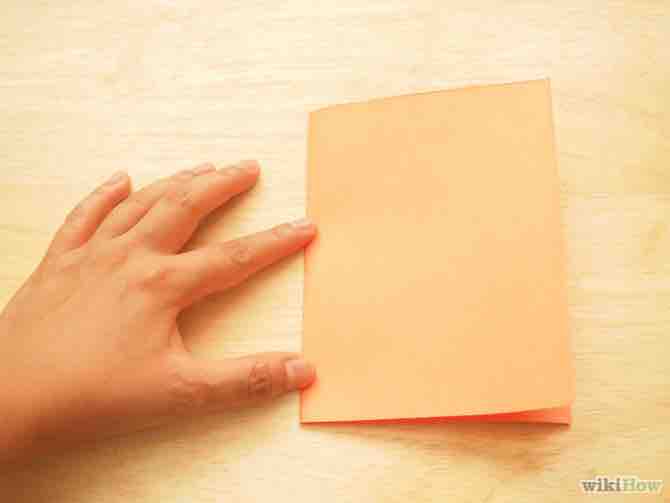
Dóblala a la mitad estilo hamburguesa para que luzca como la ilustración. Asegúrate de que el mensaje quede en el interior.
http://pad2.whstatic.com/images/thumb/a/aa/Fold-an-Origami-Envelope-Step-16-preview.jpg/550px-Fold-an-Origami-Envelope-Step-16-preview.jpg
http://pad3.whstatic.com/images/thumb/a/aa/Fold-an-Origami-Envelope-Step-16-preview.jpg/300px-Fold-an-Origami-Envelope-Step-16-preview.jpg
//d5kh2btv85w9n.cloudfront.net/e/ee/Fold an Origami Envelope Step 16.360p.mp4
-
3
Desdobla la hoja de papel. http://pad1.whstatic.com/images/thumb/d/dd/Fold-an-Origami-Envelope-Step-17-preview.jpg/550px-Fold-an-Origami-Envelope-Step-17-preview.jpg
http://pad1.whstatic.com/images/thumb/d/dd/Fold-an-Origami-Envelope-Step-17-preview.jpg/300px-Fold-an-Origami-Envelope-Step-17-preview.jpg
//d5kh2btv85w9n.cloudfront.net/b/b4/Fold an Origami Envelope Step 17.360p.mp4
-
4
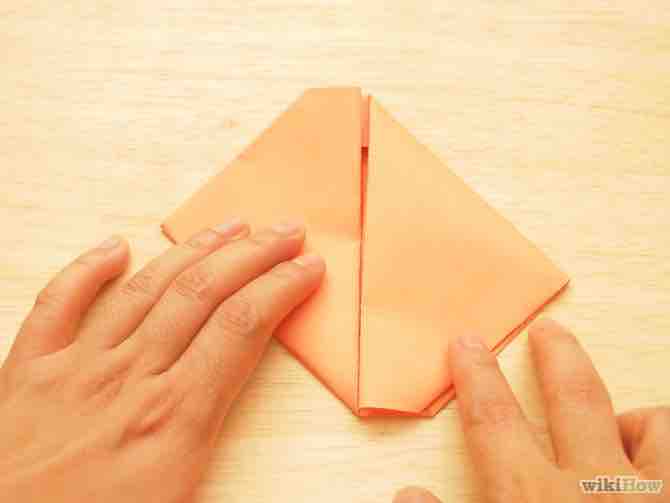
Con el escritor viendo hacia ti, toma un lado del papel y dóblalo en un ángulo recto para que el borde toque el primer doblez. http://pad1.whstatic.com/images/thumb/1/14/Fold-an-Origami-Envelope-Step-18-preview.jpg/550px-Fold-an-Origami-Envelope-Step-18-preview.jpg
http://pad2.whstatic.com/images/thumb/1/14/Fold-an-Origami-Envelope-Step-18-preview.jpg/300px-Fold-an-Origami-Envelope-Step-18-preview.jpg
//d5kh2btv85w9n.cloudfront.net/3/33/Fold an Origami Envelope Step 18.360p.mp4
-
5
Haz esto con el otro lado. http://pad1.whstatic.com/images/thumb/9/93/Fold-an-Origami-Envelope-Step-19-preview.jpg/550px-Fold-an-Origami-Envelope-Step-19-preview.jpg
http://pad1.whstatic.com/images/thumb/9/93/Fold-an-Origami-Envelope-Step-19-preview.jpg/300px-Fold-an-Origami-Envelope-Step-19-preview.jpg
//d5kh2btv85w9n.cloudfront.net/c/cc/Fold an Origami Envelope Step 19.360p.mp4
-
6
A cada lado de cada triángulo, habrá un espacio abierto. Con un lado, dobla ese espacio para que esté tocando el lado derecho del triángulo.
http://pad3.whstatic.com/images/thumb/6/6d/Fold-an-Origami-Envelope-Step-20-preview.jpg/550px-Fold-an-Origami-Envelope-Step-20-preview.jpg
http://pad1.whstatic.com/images/thumb/6/6d/Fold-an-Origami-Envelope-Step-20-preview.jpg/300px-Fold-an-Origami-Envelope-Step-20-preview.jpg
//d5kh2btv85w9n.cloudfront.net/5/5b/Fold an Origami Envelope Step 20.360p.mp4
-
7
Haz esto con el otro lado. http://pad1.whstatic.com/images/thumb/1/1a/Fold-an-Origami-Envelope-Step-21-preview.jpg/550px-Fold-an-Origami-Envelope-Step-21-preview.jpg
http://pad1.whstatic.com/images/thumb/1/1a/Fold-an-Origami-Envelope-Step-21-preview.jpg/300px-Fold-an-Origami-Envelope-Step-21-preview.jpg
//d5kh2btv85w9n.cloudfront.net/7/78/Fold an Origami Envelope Step 21.360p.mp4
-
8
Ahora toma un lado y dóblalo a un ángulo recto para que quede a lado del primer doblez. http://pad1.whstatic.com/images/thumb/f/fb/Fold-an-Origami-Envelope-Step-22-preview.jpg/550px-Fold-an-Origami-Envelope-Step-22-preview.jpg
http://pad2.whstatic.com/images/thumb/f/fb/Fold-an-Origami-Envelope-Step-22-preview.jpg/300px-Fold-an-Origami-Envelope-Step-22-preview.jpg
//d5kh2btv85w9n.cloudfront.net/1/15/Fold an Origami Envelope Step 22.360p.mp4
-
9
Haz esto con el otro lado para que luzca como la ilustración. http://pad1.whstatic.com/images/thumb/0/07/Fold-an-Origami-Envelope-Step-23-preview.jpg/550px-Fold-an-Origami-Envelope-Step-23-preview.jpg
http://pad2.whstatic.com/images/thumb/0/07/Fold-an-Origami-Envelope-Step-23-preview.jpg/300px-Fold-an-Origami-Envelope-Step-23-preview.jpg
//d5kh2btv85w9n.cloudfront.net/2/2d/Fold an Origami Envelope Step 23.360p.mp4
-
10
Ahora toma uno de estos últimos triángulos. Verás una pequeña solapa debajo de la punta. Desliza la punta debajo de esa pequeña solapa.
http://pad2.whstatic.com/images/thumb/f/f1/Fold-an-Origami-Envelope-Step-24-preview.jpg/550px-Fold-an-Origami-Envelope-Step-24-preview.jpg
http://pad3.whstatic.com/images/thumb/f/f1/Fold-an-Origami-Envelope-Step-24-preview.jpg/300px-Fold-an-Origami-Envelope-Step-24-preview.jpg
//d5kh2btv85w9n.cloudfront.net/c/c7/Fold an Origami Envelope Step 24.360p.mp4
-
11
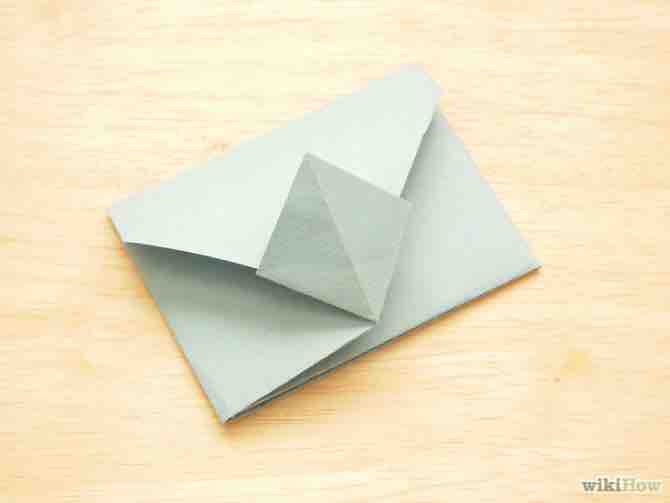
Desliza la punta del otro triángulo debajo de la solapa que se encuentra debajo. Listo. Debe lucir como la ilustración.
http://pad3.whstatic.com/images/thumb/4/49/Fold-an-Origami-Envelope-Step-25-preview.jpg/550px-Fold-an-Origami-Envelope-Step-25-preview.jpg
http://pad1.whstatic.com/images/thumb/4/49/Fold-an-Origami-Envelope-Step-25-preview.jpg/300px-Fold-an-Origami-Envelope-Step-25-preview.jpg
//d5kh2btv85w9n.cloudfront.net/2/2e/Fold an Origami Envelope Step 25.360p.mp4
-
12
Si planeas enviarlo por correo, puedes escribir la dirección en la parte trasera. http://pad1.whstatic.com/images/thumb/b/b6/Fold-an-Origami-Envelope-Step-26-preview.jpg/550px-Fold-an-Origami-Envelope-Step-26-preview.jpg
http://pad3.whstatic.com/images/thumb/b/b6/Fold-an-Origami-Envelope-Step-26-preview.jpg/300px-Fold-an-Origami-Envelope-Step-26-preview.jpg
//d5kh2btv85w9n.cloudfront.net/d/d8/Fold an Origami Envelope Step 26.360p.mp4
Anuncio
Consejos
- Usa hojas grandes para hacer sobres más grandes. Para hacer sobres más grandes puedes usar papel para envolver o cualquier otro tipo de papel, siempre y cuando sea fácil de doblar. Si la hoja original no es cuadrada, tendrás que cortarla primero en un cuadrado.
- Al doblar la solapa en el paso 4, también puedes usar una regla. Mide el largo del papel en el doblez más largo. Crea tres divisiones iguales y dóblalo. Puedes usar matemáticas para doblar bien la hoja.
- Marcar bien los pliegues hará que el sobre se vea mejor y quede más seguro. Para marcar bien el pliegue, pellízcalo con tus uñas y luego pásalas por todo el doblez.
- Escoge una hoja de papel que tenga un color en la parte frontal y otro en la parte trasera. Sobres grandes son geniales como tarjetas de cumpleaños.
- Si no puedes conseguir papel original de origami puedes hacer uno pintando un lado de la hoja de papel.
- Usa una carpeta para marcar los pliegues.
Anuncio
Cosas que necesitarás
- 1 hoja de papel cuadrada, el sobre será la mitad de ancho que la hoja original y un tercio de alto
- Regla (opcional)
- Para el método 2, una hoja de papel, de cualquier color


