This article was co-authored by Ryaan Tuttle and by wikiHow staff writer, Hannah Madden. Ryaan Tuttle is a Home Improvement Specialist and the CEO of Best Handyman, Inc. in Boston, Massachusetts. With over 17 years of experience, he specializes in building home service businesses, focusing on creating scalable and efficient brands. With the help of his global team, the companies have achieved over 10+ million in sales and received recognition through magazine features, and enjoy partnerships with wikiHow and Jobber field service software. Boston Magazine and LocalBest.com have named Best Handyman Boston the Best Handyman in Boston. Ryaan holds Construction Supervisor and Home Improvement Contractor Licenses.
There are 10 references cited in this article, which can be found at the bottom of the page.
This article has been viewed 2,164 times.
Peel and stick wallpaper is a great way to brighten up your living space. But, you might be wondering, is peel and stick wallpaper easy to install? It is, and you can also remove it really easily. This makes it great for renters and DIYers alike. In this article, we’ll walk you through the process of applying peel and stick wallpaper for an easy home upgrade you can do in a single afternoon.
Steps
Cleaning and Measuring the Walls
-
1Clean your walls with soapy water. Before applying peel and stick wallpaper, it’s very important that your walls are clean. Grab a cleaning rag and get it damp, then apply a few drops of dish soap to the rag. Gently wipe down your walls, focusing on any dirty or dusty areas, like the corners and the baseboards.
- Peel and stick wallpaper works best on drywall that is painted and completely smooth. If your wall has any texture to it, peel and stick wallpaper may not adhere well, and it could fall off quickly.
- If there are any holes or bumps in your wall, patch them with joint compound. Then, apply a primer to create a smooth surface for the wallpaper to stick to.
- You can use peel and stick wallpaper to cover an entire room, or you can use it to create a bright accent wall.
-
2Remove any electrical outlet covers and light switches. Grab a screwdriver and take off all of the outlet covers, light switch covers, and anything else in the area that might get in your way. Keep all of the covers and their screws in a safe spot so you can replace them once you’ve finished.[1]Advertisement
-
3Let the walls dry overnight. It’s super important that your walls are completely dry before you apply your wallpaper. After you’re done wiping them down, leave them to dry for at least 8 hours. You can speed the process up by pointing a fan at your walls and opening all your windows.[2]
- If your wall is still wet, the wallpaper may not adhere fully.
-
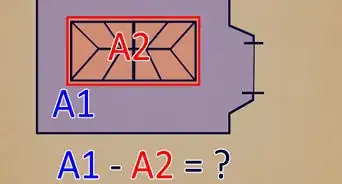
4Measure your space to calculate how much wallpaper to buy. Measure the length and width of each wall in feet or meters. Then, multiply those numbers together to find the surface area. After that, divide your number by the amount of usable wallpaper in a roll, and convert that number to square feet per yard. Then, divide the square feet of the room by the amount of wallpaper per linear yard, and add 10% to that number for a little extra wiggle room.
- For example, let’s say your room is 1500 sq ft., and your wallpaper is 54 in (140 cm) wide.
- 54 divided by 12 = 4.5 linear feet of wallpaper
- 4.5 multiplied by 3 to convert to sq ft. per yard = 13.5 square feet of wallpaper per linear yard
- 1500 divided by 13.5 = 111.11 yards
- 111.11 plus 10% for mistakes = 122.22 yards
- 1500 square feet of wall space would require 122 yards of wallpaper
- For example, let’s say your room is 1500 sq ft., and your wallpaper is 54 in (140 cm) wide.


Creating a Guide for the Wallpaper
-
1Measure the width of your wallpaper. You’ll use this measurement as a guide for applying your wallpaper strips. Grab a tape measure and quickly take your measurement, then write it down so you don’t forget it.[3]
-
2Mark the width of the wallpaper on the wall. Take your tape measure over to your wall and mark the width of the wallpaper at the edge of where your first strip will go. Use a pencil to make a faint mark that you can cover up later.[4]
-
3Use a straight edge to draw a line up and down the entire wall. Grab something long and straight, like a ruler or a level. Start at the top of your mark that you made and continue the line up and down the wall. Now you have a guide you can use to line up your first strip of wallpaper to make sure that it’s completely straight.[5]
- Using the ceilings to line up your wallpaper might sound like a good idea, but actually, the spot where the ceiling meets the wall is often not totally straight. It’s better to have a guide in place just to double check.


Applying the Wallpaper
-
1Cut a strip of wallpaper as tall as your wall. Use a measuring tape to measure from the top of the ceiling down to your baseboards. Use a box cutter to cut a strip of wallpaper 1 to 2 in (2.5 to 5.1 cm) longer than your measurement to give yourself some wiggle room.[6]
-
2Peel 3 in (7.6 cm) of the backing off your first piece. When you apply peel and stick wallpaper, it’s easier to work in small sections rather than removing the entire backing at once. Once you have your wallpaper strip, gently peel off a few inches from the top, but leave the rest of the backing on for now.[7]
-
3Secure the top of the piece to the top of the wall near the ceiling. Going from the top down will be much easier than going from the bottom up. Step onto a ladder or a step stool to reach the top of your wall, then gently secure the top 3 in (7.6 cm) of the wallpaper onto the wall. Gently smooth out any air bubbles with your hands for now, and make sure that the side of your wallpaper strip lines up with the guide you created earlier.[8]
- If your wallpaper doesn’t line up perfectly with the ceiling, that’s okay. Use your guide as a reference to keep it straight, and trim off any excess at the top with a box cutter.
-
4Peel the rest of the backing off slowly in 3 in (7.6 cm) sections. Continue to press the wallpaper onto the wall, smoothing with your hands from the center to the outside.[9] Make sure that the wallpaper lines up with your guide as you go down to ensure your strip is completely straight.
- Did you make a mistake and now you're wondering how to fix peel and stick wallpaper? No sweat! Simply peel back the corner until the sheet comes off, then realign it and smooth it down again.
-
5Smooth the wallpaper with a whiteboard eraser to remove bubbles. Wondering how to get bubbles out of peel and stick wallpaper? You're in luck—it's super easy to smooth them out with a whiteboard eraser. Traditional wallpaper smoothing tools are made of plastic, and they could tear or rip your wallpaper. Instead, use a whiteboard eraser to go over your entire wallpaper strip from the center to the outside.[10]
- Smooth your wallpaper in small, circular motions for best results.
- If you don’t have a whiteboard eraser, you can smooth with the flat of your palm instead.[11]
-
6Align the pattern on the next piece before repeating. If your wallpaper has a repeating pattern that you’d like to align, grab your roll of wallpaper and bring it over to the strip you just applied. Unroll the wallpaper and then line up the pattern with the pattern already on the wall. Then, cut the next strip to match the length of your wall.[12]
- If your wallpaper pattern is randomized or you don’t care about the pattern lining up, you can skip this step.
- Patterned wallpaper is a great choice for large rooms that need a bit more visual interest.
-
7Apply and smooth the next pieces of wallpaper to cover the whole wall. Repeat the process as many times as you need to cover the entire area. You can wallpaper an entire room, or you can just do an accent wall. Be sure to match the pattern of each new piece you cut to make your wallpaper look seamless.[13]
-
8Cut around outlets, switches, door frames, and windows. As you apply, you’ll eventually run into spaces in the wall that aren’t completely flat. When that happens, keep applying your wallpaper strip like normal until the entire strip is applied. Then, use a box cutter to cut the wallpaper off of any door frames, windows, electrical outlets, or light switches.[14]
- You can also cut off any excess wallpaper that’s hanging onto your baseboards at the same time.
-
9Poke air bubbles with a small pin to smooth them out. Some stubborn air bubbles won’t be smoothed by your eraser. If that’s the case, grab a small pin and carefully poke a hole into the center of the bubble. Then, use your fingers to smooth out the paper and flatten the air bubble inside.[15]
- Air bubbles not only look a little funny, but they can cause your wallpaper to peel up and off the wall over time.
-
10Reattach your electrical outlet and light switch covers. Once all your wallpaper is on the wall, it’s time for finishing touches! Grab your outlet and switch covers and reattach them with a screwdriver. Now you can bask in the glory of your beautiful, temporary wallpaper.[16]


Removing Peel and Stick Wallpaper
-
1Remove any outlet or light switch covers. Grab your screwdriver and take off any outlet or light switch covers that are on top of the wallpaper. Set your switches and screws aside so you can put them back on once you’re done with the removal process.[17]
- Because peel and stick wallpaper is removable, it’s a great way to temporarily apply wallpaper to your living space.
-
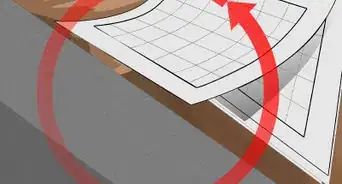
2Peel 1 corner of the wallpaper to start. Find the top of one strip of wallpaper and gently pry your finger underneath a corner. Lift up the wallpaper and gently peel it away from the wall to start removing it.[18]
- Peel and stick wallpaper is usually gentle enough that it won’t chip the paint on your walls underneath it.
-
3Keep peeling slowly and evenly to remove your wallpaper. Once you have a few inches of wallpaper up, grab the paper with both hands and pull down and away from the wall. Keep moving at a slow, even pace to make sure the wallpaper doesn’t rip.[19]
- Once you have one strip off, keep going to remove the rest of the wallpaper.
-
4Reuse the wallpaper by applying parchment paper to the backside. Want to save your wallpaper and use it later? Simply cover the back, sticky side in parchment paper, then roll it up. You can take it to a new spot and apply it the same way you did before for a fun, beautiful statement wall.[20]
- If you saved the plastic backing from your wallpaper application, you can use that to save it instead.


Things You’ll Need
Cleaning and Measuring the Walls
- Rag
- Dish soap
- Screwdriver
Creating a Guide for the Wallpaper
- Measuring tape
- Pencil
- Ruler or level
Applying the Wallpaper
- Box cutter
- Ladder or step stool
Removing Peel and Stick Wallpaper
- Screwdriver
- Wax paper (optional)
References
- ↑ https://www.youtube.com/watch?t=118&v=purhmplm6GA&feature=youtu.be
- ↑ https://www.southernliving.com/home/remodel/how-to-apply-peel-and-stick-wallpaper
- ↑ https://www.southernliving.com/home/remodel/how-to-apply-peel-and-stick-wallpaper
- ↑ https://www.southernliving.com/home/remodel/how-to-apply-peel-and-stick-wallpaper
- ↑ https://www.southernliving.com/home/remodel/how-to-apply-peel-and-stick-wallpaper
- ↑ https://www.youtube.com/watch?t=125&v=purhmplm6GA&feature=youtu.be
- ↑ https://www.today.com/home/peel-stick-wallpaper-tips-shopping-t125815
- ↑ https://www.southernliving.com/home/remodel/how-to-apply-peel-and-stick-wallpaper
- ↑ https://www.youtube.com/watch?t=491&v=I1uqy39EUSc&feature=youtu.be
- ↑ https://www.youtube.com/watch?t=341&v=I1uqy39EUSc&feature=youtu.be
- ↑ https://www.today.com/home/peel-stick-wallpaper-tips-shopping-t125815
- ↑ https://www.youtube.com/watch?t=146&v=purhmplm6GA&feature=youtu.be
- ↑ https://www.southernliving.com/home/remodel/how-to-apply-peel-and-stick-wallpaper
- ↑ https://www.youtube.com/watch?t=282&v=purhmplm6GA&feature=youtu.be
- ↑ https://www.southernliving.com/home/remodel/how-to-apply-peel-and-stick-wallpaper
- ↑ https://www.southernliving.com/home/remodel/how-to-apply-peel-and-stick-wallpaper
- ↑ https://www.youtube.com/watch?t=102&v=hjn_2TUic7w&feature=youtu.be
- ↑ https://www.youtube.com/watch?v=hjn_2TUic7w&t=107s
- ↑ https://www.southernliving.com/home/remodel/how-to-apply-peel-and-stick-wallpaper
- ↑ https://www.southernliving.com/home/remodel/how-to-apply-peel-and-stick-wallpaper
About This Article