X
wikiHow is a “wiki,” similar to Wikipedia, which means that many of our articles are co-written by multiple authors. To create this article, volunteer authors worked to edit and improve it over time.
This article has been viewed 1,873 times.
Learn more...
Windows 11 allows you to turn your computer into a Wi-Fi hotspot. With this, you can broadcast your Wi-Fi, Ethernet, or cellular data connection to allow other devices to connect to it.[1] If you would like to do this, then follow the steps in this wikiHow article to learn how!
Steps
Part 1
Part 1 of 2:
Turning on Mobile the Hotspot
-
1Open the Start Menu, and then open settings.
-
2Select "Network & Internet" in the left panel.Advertisement
-
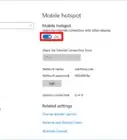
3Click or touch the toggle switch in the box that says, "Mobile hotspot". This will enable the mobile hotspot.
-
4Click or touch the box that says "Mobile hotspot".
-
5Select "Properties" to expand the network information. This will show the network name and password, which you will need to connect to the network.
.jpg)


Advertisement
Part 2
Part 2 of 2:
Configure the Mobile Hotspot
-
1Open the Start Menu, and then open settings.
-
2Select "Network & Internet" in the left panel.
-
3Click or touch the box that says "Mobile hotspot".
-
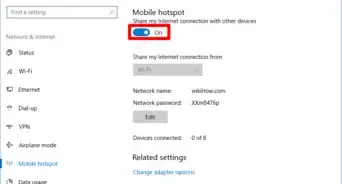
4Know that you can change two main properties of how the connection is shared:
- You can select the "Share my internet connection from" dropdown box to change if the connection is shared via Ethernet (wired internet), Wi-Fi, or a cellular connection. The dropdown box will only show the connections that you have available.
- You can select the "Share over" dropdown box to decide how you want to share the internet connection. You can share the connection over Wi-Fi, or over Bluetooth. The dropdown box will only show the options that are available.[2]
-
5Decide if you want power saving on. Power saving will automatically turn off the mobile hotspot if it detects that no devices are connected to it for a while. This can help save power on your PC to conserve battery power.
- Note: If the power saver turns off the mobile hotspot, then it will not turn back on if you try to connect a device to it. You will have to go back into settings and turn it on manually.
-
6Select "Properties" to expand the network information.
-
7Click or touch Edit. This will bring up a dialog box that lets you edit the network name, password, and band. Change the text or options in the appropriate boxes to change that setting.
- The network password must be at least eight characters long. You cannot have an open network (no password).
- For the network band, 2.4 GHz is slower, but can go further. 5 GHz is faster, but cannot go as far, and older devices may not be able to connect to it. If you decide to choose a band, keep this in mind.[3]
-
8Click Save once you have configured the network settings.


Advertisement
Warnings
- Your PCs Wi-Fi card likely does not have the same power output as a router does, so the signal will not travel as far.⧼thumbs_response⧽
- This is not a complete replacement for a normal Wi-Fi router, as it can only accept eight devices. Don't use it as your day-to-day Wi-Fi router.⧼thumbs_response⧽
Advertisement


References
- ↑ https://support.microsoft.com/en-us/windows/use-your-windows-pc-as-a-mobile-hotspot-c89b0fad-72d5-41e8-f7ea-406ad9036b85#WindowsVersion=Windows_11
- ↑ https://support.microsoft.com/en-us/windows/use-your-windows-pc-as-a-mobile-hotspot-c89b0fad-72d5-41e8-f7ea-406ad9036b85#WindowsVersion=Windows_11
- ↑ https://kb.netgear.com/29396/What-is-the-difference-between-2-4-GHz-5-GHz-and-6-GHz-wireless-frequencies
About This Article
Advertisement