wikiHow is a “wiki,” similar to Wikipedia, which means that many of our articles are co-written by multiple authors. To create this article, 10 people, some anonymous, worked to edit and improve it over time.
This article has been viewed 89,734 times.
Learn more...
Bleach is common household cleaning agent that can be used in a variety of different ways. However, one of its most common uses is on clothing. Bleach is used to both whiten clothes and alter the colors of clothes that are not white. There are a handful of different methods for sprucing up a shirt by whitening it, by brightening it, or by giving it a “makeover” with bleach.
Steps
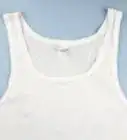
Brightening a Shirt
-
1Gather the laundry that needs to be washed and bleached, including your shirt. Check the shirt's label for bleaching instructions, looking carefully for “non-chlorine bleach only.”
- When an shirt requires non-chlorine bleach, you must use oxygen bleach or hydrogen peroxide to whiten it.[1]
- Note if the shirt has a label indicating that it should not be bleached. In this case, you should choose a different shirt that can be bleached.
-
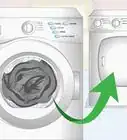
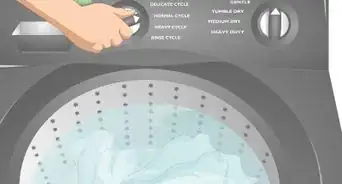
2Set your washer to the correct wash cycle and temperature and turn it on. Depending on the clothing you are washing, you want to be sure to choose the correct settings so as not to shrink or otherwise ruin the clothing.Advertisement
-
3Add laundry detergent to the water. As your washer fills with water, add the appropriate amount of detergent for the size of the load. The water will begin to bubble when the detergent is added.
-
4Measure ½ cup of bleach and either pour it directly into the bubbly water or into the bleach dispenser on your washer. Be sure to do this before you add the clothes, because pouring it in after you add the clothes could cause bleach spots in clothing that is not white.
- It is recommended that the wash cycle run for five minutes before adding bleach for best results.
- Use a dedicated measuring cup if your washer does not have a bleach dispenser. Do not use this measuring cup for any other purpose.
-
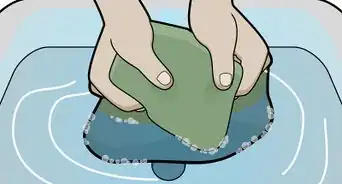
5Put your shirt and other laundry in the wash and close the washer lid. It is now time to let the washer run its cycle with the clothing in it, including your shirt.
-
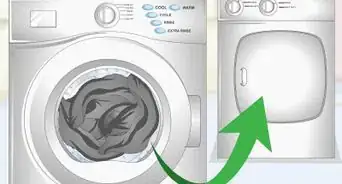
6Pull your shirt from the washer at the end of the cycle and examine it. If the shirt is whitened or brightened to your satisfaction, dry it according to the label (i.e. tumble dry, hang dry, et cetera). If the shirt is not yet as white or bright as you would like it to be, then it is recommended that you put it through another cycle with bleach.


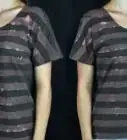
Bleaching Out Color
-
1Collect the materials you need for this process. Aside from the appropriate clothing, there are only a few other materials that you need.
- The shirt you want to bleach
- Two buckets
- Bleach
- Hydrogen peroxide or bleach-neutralizing solution
- A long wooden spoon
- Rubber gloves
-
2Dress in old clothes and put on the rubber gloves. As you are working with bleach, it will ruin the clothing you are wearing if an accident happens. Rubber gloves are also necessary to protect the bleach from directly touching your skin.
- Wear a long-sleeved shirt and long pants, if possible, to take extra steps to prevent the bleach from touching your skin.
-
3Fill two buckets with solutions. Set them to the side when you are done, and be sure to leave your sink clear for rinsing the shirt later. Make enough of each solution so that the shirt can be submerged in them.
- One bucket needs to be filled with one part bleach to five parts cold water.
- The other bucket needs to be filled with one part hydrogen peroxide to one part water. You can also mix a bleach-neutralizing solution according to the manufacturer's instructions.
-
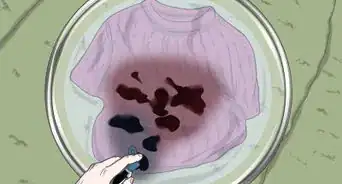
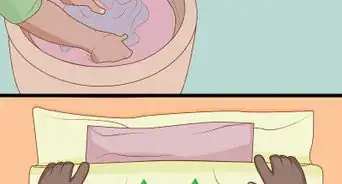
4Put the shirt into the bucket containing the bleach solution. Fully submerge the shirt in the solution, and stir it around using a long wooden spoon that is no longer used for cooking.
- Gently swirl the shirt around in the solution to assist it in becoming fully saturated.
- Take care not to splash the bleach solution while you do this.
-
5Allow the shirt to soak for anywhere from 10 minutes to one hour. The soak time will vary depending on how much color you want to bleach out of the shirt and how strong the solution is.
- Bleaching the shirt all the way to white will take close to an hour or longer, especially if the shirt is originally a dark color.
- You can pull the shirt from the bleach solution before it reaches white if you find that you like a lighter shade that it has become in the bleaching process.
-
6Remove the shirt from the bleach solution and squeeze excess solution out of it over the bucket. Save this step until you are pleased with the color of the shirt. If it is not yet completely white or not to a color that you like, then keep it in the bleach solution until it is satisfactory.
-
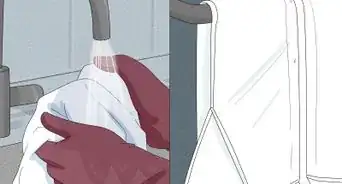
7Rinse the shirt under cold water in the sink. Thoroughly rinse all areas of the shirt, being sure to lift any folds or creases and running cold water over those areas.
-
8Submerge the shirt in the bucket of hydrogen peroxide or bleach-neutralizing solution. Ensure that the entire shirt has been submerged into the solution so that it is saturated.
-
9Leave the shirt to soak for 15 minutes. This is an important step because this neutralizes the bleach, meaning that it makes it so that the bleach can no longer damage the fibers of the fabric.
-
10Rinse the shirt again under cold water in the sink. Lift all folds and creases again to make sure you rinse out all of the bleach-neutralizing solution.
-
11Launder the shirt as usual, either by hand or in the washing machine. After laundering the shirt, dry it according to the instructions on the label. It should be ready to wear after this last step.


Making a Bleach Spray Shirt
-
1Gather the materials you need for the project. [2] This is a quick and easy DIY project that only requires a few materials.
- A shirt
- Bleach
- A stencil (pre-made or homemade)
- Spray adhesive
- Spray bottle
- A paper towel
-
2Lay your shirt flat on a table or the floor. Make sure that it is clean and without wrinkles so that the bleach spraying comes out correctly.[3]
- It is recommended to lay down a tarp, an old bed sheet, or some other protector if you are working on carpet.
-
3Slide a piece of cardboard inside the shirt to protect the back from being bleached. Make sure that the piece of cardboard that you choose is large enough to cover the width and height of the shirt.[4]
- The cardboard should be visible in the neck of the shirt and should extend all the way to the bottom hem of the shirt. It should also cover as much of the width of the shirt as possible.
- Again flatten the shirt to remove wrinkles once you have slid the cardboard inside.
-
4Attach your stencil to the shirt. There are a couple of different ways to do this, depending on the type of stencil you are using.[5]
- If it is a pre-made stencil, you can attach it by lightly spraying spray adhesive onto the back of it. Then, set it on the shirt and firmly press down around all of the edges.
- If you make your own stencil, you want to be sure to cut it out of adhesive vinyl. Then, again, you can set it on the shirt and press down firmly.
- Transfer your stencil to transfer paper if it has loose pieces (such as eyes, dots, et cetera) by pressing the transfer paper on top of your stencil. Then, carefully remove the stencil from the paper backing. After that, press the stencil on your shirt, firmly press down around the edges, and gently peel up the transfer paper.
-
5Pour ¼ cup of bleach into a spray bottle. Then, set the spray bottle to a super fine mist. You do not want it on a larger mist or spray because it will make a mess and reach areas of the shirt that you do not want bleached.[6]
- Diluting the bleach is not necessary.
- Examine how big your mist is by testing the spray on a spare piece of cardboard. Spray the cardboard, with the spray bottle held about 6-8 inches away, and determine if the mist is appropriate.
-
6Spray a light coat of bleach onto your shirt all around the stencil. Remember you are only trying to mist the shirt and not soak it, so just a few sprays all around the area of the stencil will suffice.[7]
- Hold the spray bottle about 6-8 inches away from the shirt.
-
7Blot the area with a paper towel. If you do have any large drops of bleach, quickly blot the whole sprayed area with a paper towel to clean them up to avoid large bleach spots.[8]
-
8Give the bleach up to two minutes to pull out the color. During this time, the sprayed areas may change to another color before lightening to a lighter shade of the shirt's color. This is just the bleach working through pulling out the color.[9]
- Do not spray more bleach until you are sure that the color is done changing.
-
9Repeat lightly spraying the shirt, blotting up excess bleach, and waiting if the sprayed areas do not lighten enough for your liking. Be sure to give the two minutes of wait time before doing this.
- Generally speaking, you do not want to completely bleach the area to white. You are just aiming for a lighter shade of the shirt's color (e.g. for a red shirt, the spots will fade to pink).
-
10Peel up the stencil once the shirt is exactly how you want it to be.[10] Make sure to pick up any loose pieces of your stencil, as well.
-
11Hang the shirt to dry and check for crystallized bleach. The bleach will crystallize on the shirt if you were a little too heavy with the bleach spray. You will notice it as a fine powder on the shirt.[11]
- Put the shirt through a cycle in the dryer for about 30 minutes if you notice crystallized bleach. Do not wash it, as the water will cause the bleach to reactivate and further bleach your shirt.
-
12Rinse the shirt in cold water once it is completely dry and free of crystallized bleach. Then, you can hang it to dry. Finally, you will be able launder the shirt as usual without fear of ruining your design.[12]


Bleaching a Design Into a Shirt
-
1Bring all necessary materials to your work area. A few items are required for safely bleaching designs into cotton t-shirts.[13]
- A shirt in a dark or bright color
- Bleach
- Rags or cardboard
- An object to block the bleach, such as duct tape or adhesive vinyl
- Rubber gloves
-
2Lay the shirt flat on the floor or another surface. Protect the surface with a tarp, old bed sheet, or other protector, if necessary.
-
3Slide the rags or cardboard into the shirt to protect the back from being bleached.[14] Again smooth wrinkles out of the shirt to make it flat again after doing this.
- Make sure that the rags or cardboard cover the inside of the shirt all the way up to the neck and all the way down to the bottom hem of the shirt. They should also cover the shirt's width.
-
4Choose the design that you want to bleach into the shirt. You can create a design by cutting shapes or a stencil out of the adhesive vinyl, or you can create a pattern with duct tape. Here are some ideas:
- A name or title
- A geometric shape
- A piece of fruit, vegetable, or other food item
- A criss-cross pattern
- A zig-zag pattern
-
5Apply the design to the shirt. Locate where on the shirt you want the design to sit (i.e. the middle, the top left, et cetera).
- Gently lay the design on the shirt where you want it. Press firmly down on all of the edges to secure the duct tape or adhesive vinyl.
- Consider transferring your stencil, if that is what you used, to transfer paper if it has loose pieces (such as eyes, dots, et cetera) by pressing the transfer paper on top of your stencil. Then, carefully remove the stencil from the paper backing. After that, press the stencil on your shirt, firmly press down around the edges, and gently peel up the transfer paper.
-
6Pour bleach into a glass container or measuring cup. Pour as much as you think you will need. You can add more later, if you find that you need to do so.
-
7Dip a folded-up rag or sponge into the bleach. Each will create a slightly different look, depending on what you want the design to look like.[15]
- The rag will make clean edges around the design, while the sponge will make fuzzy edges.
- Be sure to put on your rubber gloves before starting to handle the bleach for this step.
-
8Blot the shirt all around the design. Use the rag or sponge to gently blot the bleach all around the design, so that the areas behind the design stay colored and everything else becomes bleached.
- If bleach bleeds into the area behind the design, you can touch it up later with a fabric-marker in the correct color.[16]
-
9Wait for the bleach to take effect. It may take up to a few minutes for the bleach to pull out all of the color.
- If the fading is not to your liking, you can blot around the design with bleach again to make it even lighter. Keep in mind that it will take longer to bleach the shirt lighter, so be sure you are prepared with enough time.
-
10Peel the stencil or design off of the shirt. When the design has been bleached to your satisfaction, gently peel up the design from the shirt.
- Drying your rubber gloves on old clothing or fabric before touching the shirt again will be helpful to avoid accidental bleach spots from any bleach that got on your gloves.
-
11Remove the rags or cardboard and rinse the shirt in cold water. Carefully pull out the rags or cardboard from in between the layers of the shirt. Immediately move the shirt to a sink to rinse it under cold water.
- Rinsing the shirt stops the bleaching process.
-
12Dry the shirt accordingly. You can either put it in the dryer or hang it to dry, depending your preferences or the shirt's instructions.
- You can launder it as usual after this, if you would like.
- The shirt will now be ready to wear.


Warnings
- Always ventilate your home when doing bleach projects, like in Methods 2-4 above. Open windows and turn on a fan to air out the fumes.⧼thumbs_response⧽
- Handle bleach carefully by protective gear and taking care not to splash or spill it.⧼thumbs_response⧽
- Do not combine bleach with vinegar, ammonia, or other household chemicals, as it will produce harmful fumes.[17]⧼thumbs_response⧽
References
- ↑ http://www.bhg.com/homekeeping/laundry-linens/products/whiten-brighten-laundry/
- ↑ http://www.practicallyfunctional.com/diy-bleach-spray-shirt/
- ↑ http://www.practicallyfunctional.com/diy-bleach-spray-shirt/
- ↑ http://www.practicallyfunctional.com/diy-bleach-spray-shirt/
- ↑ http://www.practicallyfunctional.com/diy-bleach-spray-shirt/
- ↑ http://www.practicallyfunctional.com/diy-bleach-spray-shirt/
- ↑ http://www.practicallyfunctional.com/diy-bleach-spray-shirt/
- ↑ http://www.practicallyfunctional.com/diy-bleach-spray-shirt/
- ↑ http://www.practicallyfunctional.com/diy-bleach-spray-shirt/
- ↑ http://www.practicallyfunctional.com/diy-bleach-spray-shirt/
- ↑ http://www.practicallyfunctional.com/diy-bleach-spray-shirt/
- ↑ http://www.practicallyfunctional.com/diy-bleach-spray-shirt/
- ↑ http://www.designmom.com/2010/12/diy-bleached-out-tees/
- ↑ http://www.designmom.com/2010/12/diy-bleached-out-tees/
- ↑ http://www.designmom.com/2010/12/diy-bleached-out-tees/
- ↑ http://www.designmom.com/2010/12/diy-bleached-out-tees/
- ↑ http://www.bhg.com/homekeeping/laundry-linens/products/whiten-brighten-laundry/
About This Article
To bleach out the color in a shirt, start by filling a bucket with 1 part bleach and 5 parts water and a second bucket with equal parts water and hydrogen peroxide. Then, submerge your shirt in the bleach solution, and let it soak for 10 minutes to 1 hour. Next, take your shirt out of the bucket and rinse it off using cold water. Finally, submerge your shirt in the hydrogen peroxide solution for 15 minutes, and then rinse it off with cold water again. To learn how to brighten a dirty shirt by bleaching it, read on!