wikiHow is a “wiki,” similar to Wikipedia, which means that many of our articles are co-written by multiple authors. To create this article, 23 people, some anonymous, worked to edit and improve it over time.
This article has been viewed 56,907 times.
Learn more...
A rabbit condo refers to a space efficient indoor enclosure that people keep in their homes for pet rabbits. The somewhat modular design allows you to tailor the condo perfectly for your space, and many people build rabbit condos that are two or even three levels high for their rabbits to enjoy. With a bit of time and effort, you can easily build a rabbit condo for much less money than a prebuilt enclosure of similar dimensions.
Steps
Building the Walls of the Condo
-
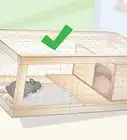
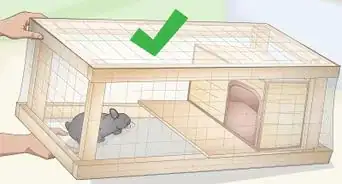
1Plan a design. Purchase two boxes of wire storage cubes. Once you remove all of the wire mesh grids from the boxes of storage cubes, you'll know how many you have to use. Each grid square will likely be 13”x13” or 14”x14” depending on the brand you buy.
- A common design may consist of front and back walls that are both three grids high and three grids long with side walls three grids high and two grids deep.[1]
- This design gives you space to build two or three levels up for your rabbit without commandeering a large portion of any room.
-
2Zip tie the individual walls together. This is the most time consuming portion of the whole project. Build one wall at a time by setting the grids together in your decided formation and zip tie the ends tightly together.[2]
- Place a zip tie at each end where the two grids come together.
- This means that a 2x2 set of grids will have four zip ties in the middle where all four squares come together.[3]
- Don't forget to build one for the roof of the condo as well.
- Make sure each zip tie is tight. Use a pair of pliers for more leverage if you need to.
Advertisement -
3Trim the excess length off each zip tie. You don't want to leave your rabbit anything hazardous to chew, so you should cut the excess length off each zip tie as closely as possible without breaking the tie.
-
4Zip tie the constructed walls together. Once you have each individual wall built, use the same process with the zip ties but at 90-degree angles to connect the walls and form the entire structure.
- You may find it easier to start with the roof on the floor and turn the structure over once all the walls and roof are attached.
-
5Make a door. Once you have all of the walls connected, you will need to snip a few ties to make a door for getting your rabbit in and out of the condo. If you clip the ties in an upside-down L going up two grids and across one from the bottom center of the condo, then you'll easily be able to swing this section open for letting your rabbit out and also getting in to clean the condo.[4]
- To prevent your rabbit from pushing the door open once you've completed the project, use three small spring clamps to hold the door shut.[5]
- For an even more cost effective option, you can even use something as simple as 1 1/4” binder clips to hold the door shut.


Making Levels for the Condo
-
1Make a floor for the condo. You most likely do not want to set the condo on top of your carpet in a room since rabbits tend to be messy. Instead, take the floor measurement of your completed design and purchase a piece of plywood that you can set the condo perfectly on top of.
- If you tack short pieces of plywood around 6” high to the outside of the flooring base, the condo will fit inside this lip.
- Creating a lip gives the structure more stability and keeps hay (and anything else inside the condo) off the surrounding flooring.
- If you don't have tools for cutting the plywood, take the measurements to the home improvement store where you purchase the material. They'll cut it for you.
-
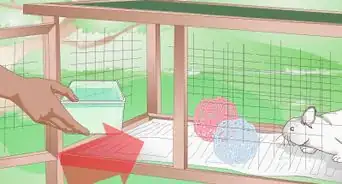
2Add a floor covering. Since rabbits may try to gnaw at the wood or, at the very least, soil it, you want to cover the plywood with something a bit more rabbit friendly. A cheap and simple solution is a roll of vinyl shelf liner that will be both easy to install and clean.
-
3Insert the wooden dowel rods. The 1” wooden dowel rods will make a foundation for the upper levels of the condo. You can easily slide the rods in the spaces between the mesh before cutting them to size.
- If you plan to make a level that is only one or two grids wide, use two rods (one in front and one in back).
- If you plan on making a larger level, insert additional support rods.
- Use 1” rods or supports because they're sturdy enough and anything larger might not fit through the mesh in the grids.
-
4Place a piece of plywood on top of the dowels to make the level. You'll probably want to cover this piece of plywood with something easily cleaned such as the vinyl shelf liner as well. However, you can always put a towel or something more comfortable for your rabbit on top of the liner.
- If you build the second level higher up, use another board as a ramp for your rabbit, though your rabbit can usually just hop up.


Finishing the Condo
-
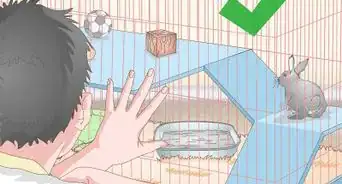
1Place in a rabbit-proofed spot. Never place your new rabbit condo in a spot that isn't rabbit proofed. A corner close to electrical cords, for instance, can still lead to your rabbit chewing on something it shouldn't.
-
2Place small pieces of plywood around the base of the flooring either inside or outside. If you didn't add pieces of wood to the flooring base, you can simply place short (maybe 6”) pieces of plywood around the base of the condo at this point to keep hay and other objects inside.
-
3Screw casters to the bottom of the flooring. If you want your new rabbit condo to be mobile so you can move it between rooms (or even just move it to clean behind it), then you can easily screw castors to the bottom of the piece of flooring plywood.[6] This will make it very easy to roll the condo around.
- Make sure there's a lip around the base to hold the condo in place as you push. Otherwise, you'll just push the structure off the base.
- Ensure that none of the screws penetrate all the way through the floor of the condo since the sharp edges can hurt your rabbit.
-
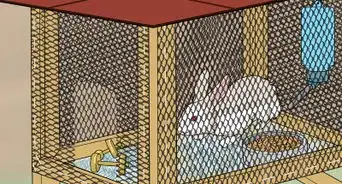
4Furnish your rabbit's new condo with rabbit-friendly accessories. Remember that rabbits will chew just about anything they can reach, so keep the condo free of anything that could be potentially hazardous.


Community Q&A
-
QuestionWhat if I can't use wood or any dangerous tools?
 WikiHowUser20180422035353Community AnswerThere aren't many kid-friendly materials that could make a safe, sturdy rabbit condo, but you could try using cardboard to make a castle or maze for your rabbits. They will have a great time chewing it. DO NOT use glue, tape, markers or anything that can poison them - they will chew EVERYTHING. Cut notches into the cardboard that you can slide other pieces of cardboard into to hold it together.
 -
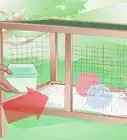
QuestionWhat are the toys in the last step? I would like to put them in my bunny home.WikiHowUser20180422035353Community AnswerThe red one is a ball of yarn, but this is not a suitable toy for rabbits, as they can get tangled in it, strangle themselves, or can chew it, ingest the wool and get sick. The second toy is a fuzzy bridge for small animals to hide under, and you can buy it in a pet shop. However, it's much better to simply give them a cardboard box - they can hide in it, they will have lots of fun chewing it, and it won't cost you anything. Just make sure it has't been treated with anything that can make your rabbit sick.
-
QuestionFrom where do I get these wires?WikiHowUser20180422035353Community AnswerYou can get them from your local hardware store, such as The Home Depot if you are American, B&Q if you are British, or Bunnings if you are Australian. If you live in a very isolated area, you can order them online.
Things You'll Need
- 2 boxes of wire storage cubes (the sort available at Walmart, Target, Bed Bath & Beyond, etc.)
- 2 packs of 100 zip ties
- Plywood
- 1” wooden dowel rods or supports
- Small spring clamps
- Roll of vinyl shelf liner


References
About This Article
To build a rabbit condo, start by zip tying wire mesh grids together to make the 4 walls. When you're finished, cut the zip ties on one side of one of the grids so it opens like a door. Then, set the walls on top of a square piece of plywood, which will be the floor, and cover the plywood with some vinyl shelf liner or other fabric so it's comfortable for your rabbit. If you want your rabbit condo to have multiple levels, slide 2 wooden dowels through the wire mesh grids, one on each side, and rest another piece of plywood on them. Finish by filling your rabbit condo with fun toys and accessories for your furry friend to play with. To learn how to add wheels to your rabbit condo so you can easily move it around, scroll down!