This article was co-authored by James Sears and by wikiHow staff writer, Hunter Rising. James Sears leads the customer happiness team at Neatly, a group of cleaning gurus based in Los Angeles and Orange County, California. James is an expert in all things clean and provides transformative experiences by reducing clutter and renewing your home environment. James is a current Trustee Scholar at the University of Southern California.
There are 13 references cited in this article, which can be found at the bottom of the page.
This article has been viewed 213,112 times.
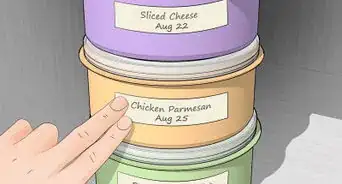
The drip pan in your refrigerator captures defrosted ice from your freezer so it doesn’t leak in your kitchen. While commonly overlooked, you should clean your drip pan every 3 months to prevent any mold or odors from forming. The drip pan may be located in the front or rear of your fridge, and it may be removable depending on your fridge’s model. After you give it a thorough cleaning, your fridge will smell better and stay clean for another few months!
Steps
Accessing the Drip Pan
-
1Check the refrigerator’s manual to find where the drip pan is located. Drip pans are usually located in the front or rear of your fridge, but it may vary depending on the model you have. Look at the diagrams for your fridge inside the manual to find the drip pan. The manual may also list if you can remove the drip pan or if you need to clean it while it’s still in your fridge.[1]
- If you can’t find the owner’s manual for your fridge at home, look online since the manufacturer may have it available to download from their website.
-
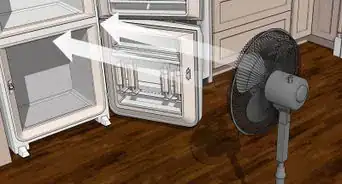
2Disconnect the water and power supply if you need to access the back panel. If your fridge’s drip pan is in the rear, then pull your fridge out from the wall so you can access it. Find the water supply control if your fridge has one and turn it to the off position so it doesn’t leak. Then unplug your fridge so you don’t accidentally shock yourself while working on the interior components.[2]
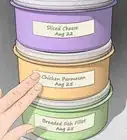
- The food in your fridge will stay cold for a short time if you’re only cleaning the drip pan. If you’re deep-cleaning your fridge, then move your food into an insulated storage container or another refrigerator.
EXPERT TIPJames Sears leads the customer happiness team at Neatly, a group of cleaning gurus based in Los Angeles and Orange County, California. James is an expert in all things clean and provides transformative experiences by reducing clutter and renewing your home environment. James is a current Trustee Scholar at the University of Southern California.Professional Cleaner James Sears
Professional CleanerWhile your fridge is away from the wall, clean the floor underneath. Once you have pulled the fridge away from the wall to reach the drip pan, you can vacuum and Swiffer the floor underneath. Make sure the floor is completely dry before placing back the fridge.
Advertisement -
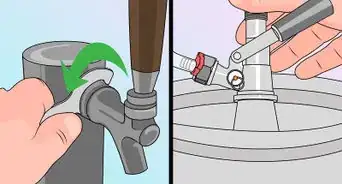
3Unscrew the back panel if the drip pan is in the rear. Locate the screws or hex bolts that hold the back panel on the bottom of your fridge in place. Use a screwdriver or a hex wrench to rotate the screws counterclockwise to loosen them. Once you remove all of the screws, carefully pull the back panel off the fridge and set it aside.[3]
- Keep the screws in a small bowl or container so you don’t lose them.
- Many drip pans located in the rear of the fridge cannot be removed easily, so you need to clean it without taking it out.
-
4Pop off the kick panel at the bottom of the fridge if the drip pan is in the front. Open the doors on your fridges so you can access the top of the kick panel, which is the slotted grate on the bottom of the fridge. Slide a putty knife between your fridge and the kick panel to pop it off. Once you pop one side of the kick panel out, pull it completely off of the fridge and set it aside.[4]
- You do not need to remove the water filter on the bottom of your fridge if it has one.
-
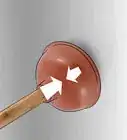
5Pull on the drip panel to see if comes out of the fridge. Look inside the back panel or kick panel to find the drip pan, which should look like a small rectangular tray. Grab the drip pan with both hands and try pulling it out without tipping it over. If your drip pan can be removed, then it will come out of the fridge easily. Otherwise, it cannot be removed.[5]
- You can wear cleaning gloves if you want to, but it’s not required.
Tip: If your drip pan has heating coils on top of it, then it is non-removable and you must clean it while it’s still inside your fridge.


Cleaning a Removable Drip Pan
-
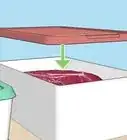
1Empty the pan if it’s full of water. While the heat from inside your fridge should cause the water in the drip pan to evaporate, there still may be standing water inside it. Pour the water down your sink drain to get rid of it. After emptying the drip pan, set it in your sink so you can start cleaning.[6]
- You can also remove standing water by using a wet/dry vacuum.
-
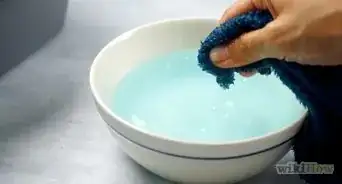
2Wipe the drip pan clean with a bleach solution. Mix 1 part bleach with 2 parts warm water in a clean spray bottle and shake it up so it’s thoroughly mixed. Spray the drip pan so it’s completely wet and let the bleach solution sit on the surface for 2-3 minutes. Spray extra cleaner on any mold or mildew you see building up on the drip pan to help loosen it and disinfect the area.[7]
- The bleach may change the color of your drip pan if it’s not originally white.
Tip: If you don’t want to use a harsh cleaner like bleach, you can substitute white vinegar instead.[8]
-
3Scrub the pan with a cleaning rag to remove any buildup or mold. After a few minutes pass, wipe the inside of the drip pan with a cleaning rag to remove the cleaner. Work from one side of the drip pan to the other so you don’t spread any mold around. Apply a firm amount of pressure while you scrub the drip pan to break apart any built-up residue.[9]
- You can also use paper towels if you don’t want to get any mold on fabric cleaning rags.
-
4Rinse the drip pan under warm water to remove any cleaner. Hold the drip pan under your faucet and let warm water run over it. Rinse the entire drip pan so there isn’t any cleaner left on the surface. Use another rag or sponge to wipe it off if there’s still any residue still on it.[10]
-
5Dry the drip pan before reinstalling it. Use a cleaning towel or paper towels to wipe the pan dry. Make sure there aren’t any water droplets on the pan or else it could develop mold again when you reinstall it. Once the drip pan is dry to the touch, slide it back into your fridge and replace the panels so you can use it again.[11]
- You can also let the drip pan air-dry for 30 minutes instead.


Sanitizing a Non-Removable Drip Pan
-
1Wrap a cleaning wet wipe around the end of a flexible claw grabber. Use wet wipes that have multipurpose cleaner or bleach on them to help get rid of any odors or mold. Hold the button on the end of a flexible claw grabber to open it and place a wet wipe inside the claw. Let go of the button so the claw holds tightly onto the cloth.[12]
- You can buy a flexible claw grabber from your local hardware store or online.
- If you don’t have a flexible claw grabber, then you can unbend a wire hanger and wrap the wet wipe around one end of it.
-
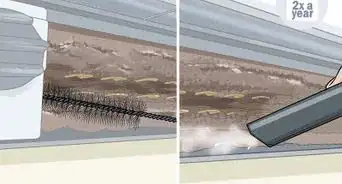
2Push the end of the claw grabber with the wet wipe into the drip pan. Feed the end of the claw grabber into the drip pan while it’s still in your fridge. Carefully move the wet wipe around the edges of the drip pan to scrub it clean and remove any buildup. Work from multiple sides of the drip pan so you can remove as much of the mold or buildup that’s inside as you can.[13]
- Don’t apply a lot of force to the claw grabber since you could also damage internal components in your fridge.
-
3Change the wet wipe when it gets dirty. After 1-2 minutes, pull the end of the claw grabber out from the drip pan and inspect the wet wipe. If it looks dirty or has buildup on it, throw it away and place a new one in the claw. Continue checking the wet wipe every few minutes until it comes out of your drip pan clean.[14]
-
4Pour a bleach and water solution into the drip pan to prevent buildup. Once you’ve scrubbed the drip pan as best as you can, mix together 1 part bleach with 1 part warm water and slowly pour it into the pan. The bleach solution will help prevent more mold from growing inside the drip pan so it doesn’t develop any odors. When you’re finished, you can reattach any panels you needed to remove to access the pan.[15]
- Use white vinegar if you want to use a natural cleaner.
Tip: Try mixing in a few drops of scented essential oil into the solution to make your kitchen smell better.


Community Q&A
Did you know you can get answers researched by wikiHow Staff?
Unlock staff-researched answers by supporting wikiHow
-
QuestionWhat causes a refrigerator drip pan to overflow?
 wikiHow Staff EditorThis answer was written by one of our trained team of researchers who validated it for accuracy and comprehensiveness.
Staff AnswerwikiHow Staff EditorStaff AnswerIt’s possible that there’s a frozen or clogged drain line in your freezer or fridge, or that the condenser fan has burned out. If there’s a crack in your drip pan, water can flow out onto the floor.
Support wikiHow by unlocking this staff-researched answer.
-
QuestionWhy do I have water in the bottom of my fridge?wikiHow Staff EditorThis answer was written by one of our trained team of researchers who validated it for accuracy and comprehensiveness.
Staff AnswerwikiHow Staff EditorStaff AnswerThere are a few possible causes for this. One is a clogged or frozen drainpipe. This can also happen if there’s a leak in the water tank assembly, water inlet valve, or water filter assembly.Support wikiHow by unlocking this staff-researched answer.
-
QuestionHow much water should be in a refrigerator drip pan?wikiHow Staff EditorThis answer was written by one of our trained team of researchers who validated it for accuracy and comprehensiveness.
Staff AnswerwikiHow Staff EditorStaff AnswerIt depends on the design of the drip pan and drain, how humid the conditions are, and a variety of other factors. If everything is functioning properly, there should never be enough water in the drip pan to leak out or overflow.Support wikiHow by unlocking this staff-researched answer.
Warnings
- If your drip pan is leaking, then you need to replace it completely.⧼thumbs_response⧽
Things You’ll Need
Accessing the Drip Pan
- Screwdriver or hex wrench
- Putty knife
Cleaning a Removable Drip Pan
- Bleach
- Spray bottle
- Cleaning rags
- Sink
- Towel
Sanitizing a Non-Removable Drip Pan
- Cleaning wet wipes
- Flexible claw grabber
- Bleach


References
- ↑ https://www.cnet.com/how-to/leftovers-arent-making-your-fridge-stink-its-the-fridge-itself/
- ↑ https://youtu.be/2o7SK-9x57M?t=16
- ↑ https://youtu.be/WTLPS-an9mQ?t=114
- ↑ https://youtu.be/2o7SK-9x57M?t=46
- ↑ https://www.youtube.com/watch?v=I9YP0iH_zho&feature=youtu.be&t=63
- ↑ http://www.today.com/home/how-often-you-should-clean-your-refrigerator-right-way-do-t103284
- ↑ http://www.housecleaningcentral.com/en/cleaning-tips/kitchen/deep-refrigerator-cleaning.html
- ↑ http://www.howtocleananything.com/general-cleaning-tips/refrigerator-drip-pan/
- ↑ http://www.housecleaningcentral.com/en/cleaning-tips/kitchen/deep-refrigerator-cleaning.html
- ↑ http://www.housecleaningcentral.com/en/cleaning-tips/kitchen/deep-refrigerator-cleaning.html
- ↑ https://youtu.be/RTWWn8ocHW0?t=43
- ↑ https://youtu.be/WTLPS-an9mQ?t=231
- ↑ https://youtu.be/WTLPS-an9mQ?t=255
- ↑ https://youtu.be/WTLPS-an9mQ?t=312
- ↑ https://diy.stackexchange.com/questions/163751/removing-drip-pan-on-a-frigidaire-fftr1821qs
About This Article
To clean your refrigerator drip pan, start by turning the water supply control to the off position so it doesn’t leak. You should also unplug your fridge so you don’t shock yourself. Once you’ve disconnected your fridge, unscrew the lower back panel, pop it off with a putty knife or screwdriver, and slide the drip pan out. If there’s any water in your drip pan, empty it down the sink or a drain. Then, spray the pan with a solution of 1-part bleach and 2-parts warm water and let it sit. After 2-3 minutes, scrub the pan with a cleaning rag to get rid of any dirt. When it’s clean, rinse out the pan to remove any leftover cleaner and dry it before returning it to your refrigerator. For more tips, including how to sanitize a non-removable refrigerator drip pan, read on!