This article was co-authored by Tiffany Carnevale-Russo. Tiffany Carnevale-Russo is a Licensed Cosmetologist and Salon Manager at Jaxson Maximus, a men’s salon and custom clothiers based in southern Florida. With over 19 years of beauty industry experience, she specializes in haircuts and hairstyling for men and building salon brands. Tiffany received her Cosmetology License from Paul Mitchell the School Rhode Island.
There are 10 references cited in this article, which can be found at the bottom of the page.
This article has been viewed 18,365 times.
Electric razors take much of the time and difficulty out of shaving, but once you’re done touching up there’s still the matter of cleaning the razor itself. If not properly maintained, hair clippings and particles of skin can become clogged in the blades, interfering with the action of the razor and causing bacteria to build up that can then be transferred to your vulnerable skin. Fortunately, cleaning most types of electric razors and trimmers is a cinch. Simply use a brush to remove any loose debris, then disassemble the razor and give it a quick wipe down with soap and warm water.
Steps
Brushing Off an Electric Razor
-
1Make sure the razor is turned off. Before you start cleaning, you’ll want to make sure that there’s no power going to the razor. Slide or press the power button to the “off” position and look for the power indicator display to go dark.[1]
- It may be a good idea to unplug the razor entirely. You don’t want to accidentally switch it on while you’re trying to clean it!
-
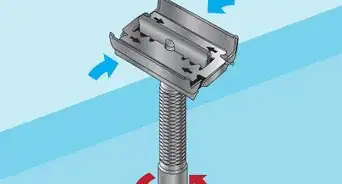
2Remove the cutting head. The cutting head is the part of the razor that comes into contact with your face while shaving. This can usually be detached by simply pulling it straight off the frame, or by pressing a small latch on the front or back of the head.[2] You’ll likely notice a lot of hair, skin particles and dust built up on both the inside and outside of the cutting head.[3]
- Give the detached cutting head a light tap against the edge of your sink to remove hair clippings that have compacted inside. Just be careful not to damage the delicate blades or cutting foils, as these can easily be warped out of shape.[4]
Advertisement -
3Brush away all traces of hair and other debris. Use a stiff-bristled brush to remove whatever loose matter is clinging to the cutting head.[5] Most electric razors include a small brush specifically designed for light cleaning. If your razor didn’t come with such a brush, a cheap nail brush from your local pharmacy will also do the trick.[6]
- Use smooth sweeping motions to dislodge debris without applying too much force to the cutting surface.[7]
- If the cutting head of your razor is washable, run it under the faucet and dry it gently with a towel.
-
4Replace the cutting head. Once you’ve brushed off as much debris as you can, snap the cutting head back into place on the end of the razor’s frame.[8] Listen for it to click so you’ll know it’s secure. You can now return to using the razor as normal.
- Make an effort to brush your razor’s cutting head clean each and every time you shave.[9]

Using an Automatic Cleaning and Charging Dock
-
1Power up the cleaning dock. Plug the exterior power cord into a wall outlet and wait for the unit’s power indicator light to come on. If your razor’s dock has a separate power switch, make sure to flip it into the “on” position.[10]
- Many newer electric razors come equipped with a separate docking base that cleans and charges the razor automatically. This is the easiest way to keep your shaver cleaned and maintained.
- Keep your razor’s dock at a safe distance from the sink or shower to prevent it from getting wet.[11]
-
2Insert the razor into the dock head-first. Fit the head of the razor carefully into the base of the dock. You’ll most likely hear a click or see a separate light that will let you know the razor has been attached successfully. With the razor in place, the dock can clean, polish, oil and dry the cutting head in just minutes with the push of a button.[12]
- If your razor has a protective cap over the cutting head, be sure to remove it prior to docking.
- Follow the instructions specified in the user’s manual if you’re unsure how to proceed.[13]
-
3Activate the cleaning cycle. To begin, locate and push the button on the base that indicates the dock’s cleaning function. More advanced units may have several different cleaning options. In this case, you should select your preferred option.[14]
- The different cleaning options will likely include a quick, normal and intensive setting. Each subsequent setting will offer a more thorough clean, but will also take longer to complete.[15]
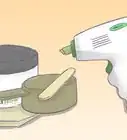
- In addition to cleaning the blades or foils, the dock will also typically apply a fresh coat of lubricating oil and rapidly dry the razor using an internal heat source.
-
4Remove and store the razor. Wait for the dock to finish cleaning the razor. Then, take it out of the base and use your stiff-bristled brush to clear away any hairs or debris remaining on the outside of the razor. Replace the protective cap, if your model has one, and leave the razor in a clean, dry place until your next shave.
- Your razor will be ready for use as soon as the automated cleaning cycle is complete.
- Invest in an inexpensive storage bag or hard-shelled case for your razor to keep it from being exposed to moisture and other elements that could speed its deterioration.


Deep Cleaning an Electric Razor with Soap and Water
-
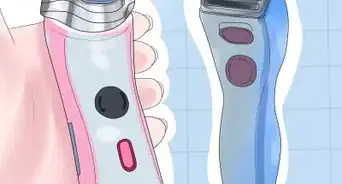
1Disassemble the razor. Switch the razor to the “off” position and disconnect the power cord from the wall outlet. Remove the protective cap, snap off the cutting head and disconnect any other removable parts, such as an additional lubricating strip or length guard.[16]
- Assuming you don’t own a self-cleaning model and it’s been awhile since the last time you gave your razor a thorough cleaning, your best bet will be to break the razor down and manually clean every accessible part.
-
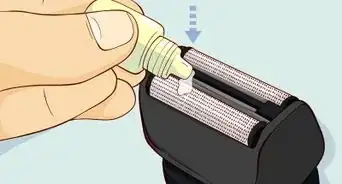
2Rinse the individual components with hot, soapy water. Add a few drops of mild liquid soap to a sinkful of hot water. Take a brush to the cutting head and other removable parts of the razor, then swish them through the soap solution to fully clean them. Afterwards, run each piece under a stream of hot water to rinse them.[17]
- Cleaning the blades with soap will help cut through the congealed oil and skin residue that has a tendency to accumulate inside the cutting mechanisms.
- Avoid getting any pieces that are directly connected to the battery or electrical input wet.
-
3Wipe down the outside of the razor. Wet a washcloth with warm water and wring out the excess. Go over any parts of the razor that aren’t directly washable but might contain traces of hair and debris, like the edges of the frame and the collar that holds the cutting head in place. Immediately dry any standing moisture with a towel.[18]
- Use a corner of the washcloth to scrub the edges of the frame beneath the cutting head.
- Remove as much debris as possible. Any particles left behind could be pulled back into the blades once the cutting head is reattached.
-
4Allow the razor to dry before using it again. Pat each piece gently with a towel, then set them aside to finish air drying. This should only take about half an hour or so. You should not attempt to reassemble or turn on your razor until it has dried completely.[19]
- Avoid using a hair dryer or any other artificial means to speed up the drying process. This may result in irreparable damage to your razor.

Expert Q&A
-
QuestionHow do I disinfect my electric razor head?Tiffany Carnevale-RussoTiffany Carnevale-Russo is a Licensed Cosmetologist and Salon Manager at Jaxson Maximus, a men’s salon and custom clothiers based in southern Florida. With over 19 years of beauty industry experience, she specializes in haircuts and hairstyling for men and building salon brands. Tiffany received her Cosmetology License from Paul Mitchell the School Rhode Island.
Licensed CosmetologistSpray your electric razor head with barbicide to give it a really thorough cleaning.
Warnings
- Failure to clean your electric razor regularly can result in hair, skin particles and other debris becoming lodged in the cutting mechanisms, dulling them and interfering with their ability to provide a smooth shave.⧼thumbs_response⧽
- Never submerge or run water over the frame of your electric razor. This may cause it to rust or short circuit, even on water-safe models. Likewise, you shouldn’t attempt to bring your razor into the shower with you.⧼thumbs_response⧽
Things You'll Need
- Electric razor
- Razor brush or other similar implement (i.e. a nail brush)
- Mild liquid soap
- Washcloth
- Clean, dry towel
- Automatic cleaning/charging dock
-Step-14.webp)


-Step-10-Version-2.webp)


References
- ↑ http://groomandstyle.com/clean-electric-shaver/
- ↑ Tiffany Carnevale-Russo. Licensed Cosmetologist. Expert Interview. 14 September 2021.
- ↑ https://www.shavers.co.uk/blog/keep-your-shaver-in-tip-top-condition/
- ↑ https://www.shavers.co.uk/blog/keep-your-shaver-in-tip-top-condition/
- ↑ Tiffany Carnevale-Russo. Licensed Cosmetologist. Expert Interview. 14 September 2021.
- ↑ http://www.menshealth.co.uk/style/grooming/rules-of-electric-shaving
- ↑ https://www.youtube.com/watch?v=1n88EJjV2w0
- ↑ Tiffany Carnevale-Russo. Licensed Cosmetologist. Expert Interview. 14 September 2021.
- ↑ http://www.askmen.com/grooming/appearance/electric-razor-maintenance-tips.html
- ↑ http://www.shaverlist.com/how-to-properly-clean-and-maintain-electric-shavers/
- ↑ http://www.askmen.com/grooming/appearance/electric-razor-maintenance-tips-2.html
- ↑ https://www.youtube.com/watch?v=QIntYiz59Nw
- ↑ http://www.askmen.com/grooming/appearance/electric-razor-maintenance-tips.html
- ↑ http://www.shaverlist.com/how-to-properly-clean-and-maintain-electric-shavers/
- ↑ http://us.braun.com/en-us/male-grooming/shavers-replacement-parts/clean-charge-station
- ↑ http://www.shaverlist.com/how-to-properly-clean-and-maintain-electric-shavers/
- ↑ http://groomandstyle.com/clean-electric-shaver/
- ↑ https://www.shavers.co.uk/blog/keep-your-shaver-in-tip-top-condition/
- ↑ http://groomandstyle.com/clean-electric-shaver/


-Step-14.webp)