This article was co-authored by wikiHow staff writer, Amber Crain. Amber Crain has been a member of wikiHow’s writing staff for the last six years. She graduated from the University of Houston where she majored in Classical Studies and minored in Painting. Before coming to wikiHow, she worked in a variety of industries including marketing, education, and music journalism. She's been a radio DJ for 10+ years and currently DJs a biweekly music program on the award-winning internet radio station DKFM. Her work at wikiHow supports her lifelong passion for learning and her belief that knowledge belongs to anyone who desires to seek it.
There are 23 references cited in this article, which can be found at the bottom of the page.
This article has been viewed 7,312 times.
Learn more...
Just because you have short hair doesn't mean you can't create classic pin up hairstyles! In this article, we'll walk you through how to create two of the most popular pin up looks: an adorable pompadour twist for pixie cuts and the famous victory roll style for bobs. Grab plenty of hair pins and a can of extra-hold hair spray and let's get started!
Steps
Pompadour Twist (Pixie Cuts)
-
1Spray heat protectant on damp hair and run a comb through it. Start by towel-drying freshly washed hair until it’s damp (or spritz dry hair with plain water to dampen it). Then, spritz heat protectant all over your hair to protect it from heat damage and comb through the lengths to get rid of any tangles.[1]
-
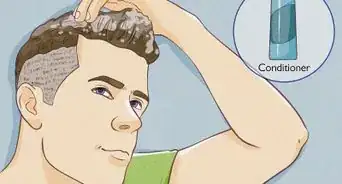
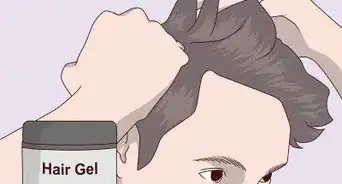
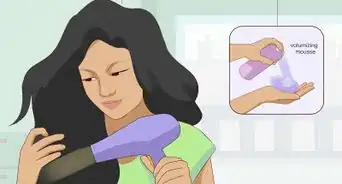
2Apply volumizing mousse and work it in with your fingers. This hairstyle looks best (and most authentic) when you have lots of height and volume on top. To achieve this, apply a quarter-sized amount of volumizing mousse from root to tip. Massage the mousse into your hair gently with your fingertips.[2]Advertisement
-
3Blow dry your bangs at the roots to create lift and volume. Aim your blow dryer at your roots on top of your head (essentially, your bangs and crown area). Brush your bangs over in the direction you want your twist, lift the hair up a bit, and blast the roots directly using low heat until the hair dries.[3]
- This starts you off with plenty of volume which is exactly what you want!
-
4Use a comb to section off your bangs and sweep them over to the side. Your bangs actually create the pompadour twist, so use a comb to gently isolate the top part of your hair from the back and sides. Then, comb the sectioned hair back and slightly over to the side to start the twist.[4]
- You don’t have to create super perfect lines when you section the hair off.
-
5Twist the isolated top section over to the side to create a swooping curl. Gather your sectioned off bangs at your crown. Then, twist the section over to the side (it doesn't matter which side) and tuck the ends underneath the twist to create a loop (basically, a large pin curl).[5]
- At this point, your bangs are swooping back and over to the side in a single curl.
-
6Secure the ends underneath the curl with bobby pins or hair clips. With this look, you're creating the illusion of one large, perfect curl. Once you tuck the ends underneath the curl to hide them, use a couple of bobby pins or small, flat hair clips to secure the ends in place against your scalp.[6]
-
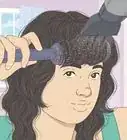
7Use a round brush to dry the back of your hair. Scoop the hair at your crown (right behind your sectioned bangs) under the round brush and aim the blow dryer at the brush. Using low heat, lift and roll the hair back with the round brush as you dry the back section of your hair. Continue to scoop, lift, and roll the hair with the round brush until it’s totally dry.[7]
-
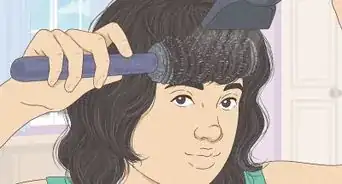
8Use a paddle brush to dry the sides of your hair. To create this look, you want the sides to be brushed back and fairly smooth. For sleek results, brush your hair with a large paddle brush as you blow dry it.[8]
-
9Remove the pins and roll the round brush under the twist to dry it. Now that the rest of your hair is dry, it’s time to finish your twist! Remove the clips or pins, place the round brush against your scalp right next to the loop, and scoop the round brush under the curl. Blow dry the hair in the direction you chose for your twist, lifting and rolling with the round brush to create plenty of volume.[9]
- Keep drying the hair until your twist is totally dry.
-
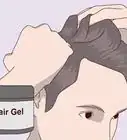
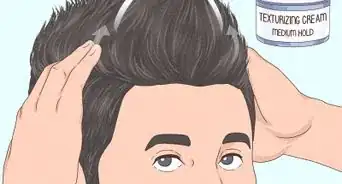
10Use pomade or wax to smooth flyaways and finish shaping the twist. At this point, your twist is almost there! Rub a small amount of pomade or styling wax between both of your palms, then run your palms over your twist to smooth out any stray hairs. If the twist isn’t exactly where you’d like it, use your palms to shift and mold the twist until you’re happy with the shape and volume.[10]
- All you need is a tiny dot of pomade for this. A little goes a long way!
- Use the pomade to tame any flyaways on the sides for a sleek look.
-
11Mist your hair with extra-hold hair spray to set the style. If your twist won’t stay in place by itself, you can use a couple of bobby pins to tuck the ends under the curl (just like you did at the beginning) and secure the hair.[11] If the pomade is providing enough hold, you can skip the pins. Finish with a generous misting of hairspray and you're all set![12]
- To add another vintage touch, position a wide cloth headband on your head (right behind the twist) at the crown.


Rockabilly Victory Rolls (Bobs)
-
1Use a comb to create a deep side part in your hair. Start with dry hair and brush it out to get rid of any tangles. Then, use the end of rat tail comb to create a deep side part and comb out the hair to smooth it.[13]
- You can do a center part for this look if you’d like, but the victory rolls will be a bit harder to create. Most influencers suggest side parting for beginners.
-
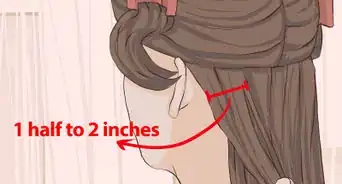
2Section off the first victory roll with a rat tail comb. Place the end of a rat tail comb at the base of your earlobe. Then, drag the comb up and back toward your crown until your reach your side part. Grab the isolated section of hair, twist it loosely, and pin it out of the way for now.[14]
- You’ll create the victory rolls later. For now, just section and clip the hair back.
-
3Repeat the process on the other side to section off the second roll. Place the end of the rat tail comb at the base of the other ear lobe. Drag the comb up and back toward your crown to section of the hair, then clip the hair out of the way for now.[15]
- At this point, you have your 2 victory rolls sectioned off with hair clips. The rest of your hair should be hanging down freely.
-
4Use a 1 in (2.5 cm) barrel curling iron to curl the rest of your hair. Work in 1 in (2.5 cm) sections to create big, soft curls. Hold the barrel parallel to the ground, clamp the first 1 in (2.5 cm) section of hair at about mid-shaft in the barrel, and rotate your hand forward to roll the hair under. Then, keep rotating in the same direction until you reach the tips of your hair. Release and gather the curl in your palm. Tuck the ends underneath the curl you just created and secure them in place with bobby pins. Essentially, you've just created a large, soft pin curl.[16]
- Repeat this same process for each 1 in (2.5 cm) section until all of your hair is curled and pinned.
- Leave the curls pinned so they can cool while you style the victory rolls.
-
5Unclip the first victory roll and comb out the hair. It doesn’t matter which side of your head you start with! Just unclip one of the victory roll sections that you created at the very beginning. Then, run a comb through the hair to smooth it out and remove any knots.[17]
-
6Place the iron at mid-shaft and roll up in the direction of your scalp. Clamp the section of hair in the middle and rotate your wrist back to create the victory roll. Don’t worry about making the curl look perfect at this point; you’re just curling up the ends to get them started in the right direction.[18]
-
7Tease the section of hair at the roots with your rat tail comb. As you tease at the roots, lift the hair up and back in the same direction you just curled the hair. It doesn’t have to be perfect at this point! You’re still just molding the victory roll in the right direction.[19]
- Keep teasing with the comb until you’re happy with the volume.
- If you're having trouble envisioning the finished look, this might help: the 2 front sections of hair create the 2 victory rolls. Each victory roll swoops up and is pinned in place on top of your head on either side of your part (basically, the same placement as horns or antlers if you were cosplaying).
-
8Smooth the teased hair with a pomade or styling wax and a brush. Rub a small amount of styling wax between your fingertips and smooth out the first victory roll. Then, run a smoothing brush through the hair, moving up toward your scalp in the direction of the victory roll, to tame any remaining flyaways.[20]
-
9Roll the hair around 2 fingers and wind it down to your scalp. Pull the section of hair straight up, and then loop it around 2 fingers (working in the direction of your part) once to create one big, soft curl. Once you’ve got this initial loop started, remove your fingers from the center and use your fingers to roll the loop down to your scalp (imagine you're rolling up a sleeping bag). Then, pin the curl at the base, right next to your part.[21]
- Be sure to place the bobby pins flat against your scalp so you can’t see them![22]
-
10Repeat steps 5 through 9 to create the second victory roll. Unclip the other section of hair, comb it out, and place the curling iron at mid-shaft. Rotate your wrist back so the curl goes up in the direction of your scalp. Keep rotating until you reach the ends of your hair. Tease at the roots, smooth it with product, and use 2 fingers to create the curl. Wind the hair down to your scalp create the second victory roll and pin it in place.
-
11Unpin the curls in the back and run your fingers through them. Once your victory rolls are in place, unpin all of the other curls you created earlier. Run your fingers through the lengths of your hair to loosen the hair and smooth it. Let these curls hang loose and free. You're all set![25]
- Feel free to give your hair a final misting of hairspray for more hold.


Things You’ll Need
Pompadour Twist (Pixie Cuts)
- Comb
- Bobby pins
- Round brush
- Blow dryer
- Hair clips
- Volumizing mousse
- Pomade or styling wax
- Extra-hold hairspray
- Wide fabric head band (optional)
Rockabilly Victory Rolls (Bobs)
- Rat tail comb
- Hair clips
- Bobby pins
- 1 in (2.5 cm) barrel curling iron
- Styling wax or pomade
- Smoothing brush
- Hairspray

-Step-15.webp)
References
- ↑ https://www.youtube.com/watch?v=B-9xkQqG7Kw&t=10s
- ↑ https://www.youtube.com/watch?v=B-9xkQqG7Kw&t=16s
- ↑ https://www.youtube.com/watch?v=B-9xkQqG7Kw&t=22s
- ↑ https://www.youtube.com/watch?v=BCj1SHxTrd0&t=42s
- ↑ https://www.youtube.com/watch?v=BCj1SHxTrd0&t=42s
- ↑ https://www.youtube.com/watch?v=BCj1SHxTrd0&t=49s
- ↑ https://www.youtube.com/watch?v=B-9xkQqG7Kw&t=32s
- ↑ https://www.youtube.com/watch?v=BCj1SHxTrd0&t=60s
- ↑ https://www.youtube.com/watch?v=BCj1SHxTrd0&t=79s
- ↑ https://www.youtube.com/watch?v=BCj1SHxTrd0&t=93s
- ↑ https://www.youtube.com/watch?v=B-9xkQqG7Kw&t=62s
- ↑ https://www.youtube.com/watch?v=BCj1SHxTrd0&t=101s
- ↑ https://www.youtube.com/watch?v=-Z7V-AqJ-Qo&t=103s
- ↑ https://www.youtube.com/watch?v=JB2HOl_RKsM&t=50s
- ↑ https://www.youtube.com/watch?v=JB2HOl_RKsM&t=62s
- ↑ https://www.youtube.com/watch?v=JB2HOl_RKsM&t=71s
- ↑ https://www.youtube.com/watch?v=JB2HOl_RKsM&t=98s
- ↑ https://www.youtube.com/watch?v=JB2HOl_RKsM&t=102s
- ↑ https://www.youtube.com/watch?v=-Z7V-AqJ-Qo&t=179s
- ↑ https://www.youtube.com/watch?v=JB2HOl_RKsM&t=124s
- ↑ https://www.youtube.com/watch?v=JB2HOl_RKsM&t=145s
- ↑ https://www.youtube.com/watch?v=-Z7V-AqJ-Qo&t=231s
- ↑ https://www.youtube.com/watch?v=JB2HOl_RKsM&t=166s
- ↑ https://www.youtube.com/watch?v=-Z7V-AqJ-Qo&t=231s
- ↑ https://www.youtube.com/watch?v=JB2HOl_RKsM&t=270s
About This Article