This article was co-authored by Christine George. Christine George is a Master Hairstylist, Colorist, and Owner of Luxe Parlour, a premier boutique salon based in the Los Angeles, California area. Christine has over 23 years of hair styling and coloring experience. She specializes in customized haircuts, premium color services, balayage expertise, classic highlights, and color correction. She received her cosmetology degree from the Newberry School of Beauty.
There are 17 references cited in this article, which can be found at the bottom of the page.
This article has been viewed 5,262,063 times.
There are some days where you may be running too late to do a complicated hairstyle. Other days, you may just want to mix up your look with a simple change. Luckily there are many cute hairstyles that are easy to learn and just take a few minutes to do.
Steps
Making Ponytails
-
1Decide where you want your ponytail to sit. Ponytails are incredibly versatile. Your ponytail's placement can dramatically affect your look.
- High ponytails sit on the crown of your head so that the ponytail is visible from the front. These are very dramatic and fashionable.[1]
- Tying your hair just a few inches lower gives a more sporty look.
- Low ponytails at the nape of your neck can make you look down-to-earth.
- Another less common type of ponytail is 1 tied to the side of the head instead of the back. Side ponytails can make you seem quirky and fun.
-
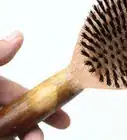
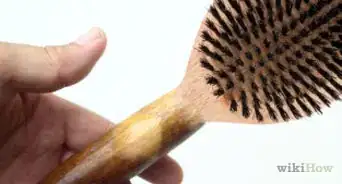
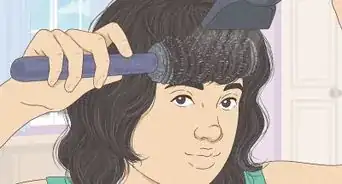
2Tease your hair slightly at your crown. Teasing, also known as backcombing, adds subtle, flattering volume that may also help to keep your ponytail in place. Take a section of hair from the back of your head where it starts to curve downward. Gently backcomb the bottom part of this section with 2 or 3 passes.[2]
- To backcomb, grip the section of hair and hold it vertically away from your scalp. Run a comb from the middle of the back of your hair towards the roots, stroking downward. Repeat this until the gathered strands have created a cushion on your crown.
- If you are doing a side ponytail, tease a small section of hair right above where you plan on placing the hair tie.
- If your hair is curly, you can skip this step.
Advertisement -
3Gather your hair back. Use both hands to sweep the majority of your hair backward and hold it in place with 1 hand. For a sleek and practical ponytail to keep hair out of your face, gather all of your hair, including your bangs. For a more laid-back look, leave your bangs loose (if you have bangs) or pull a few wisps of hair out around your face.
- For a side ponytail, gather your hair to the side instead.
-
4Smooth out any bumps with a flat brush. Gather your hair into the crook of your index finger and thumb and then use the other hand to smooth back your hair. Smooth down the hair with your fingers first, and then run the brush over the hair to get it nice and neat. Keep holding onto the hair with your other hand while you do this.
- Loosen and tighten your grip on the hair as needed to smooth it.
- Switch hands as needed to smooth out both sides of the ponytail.
-
5Secure your ponytail in place. Take a hair tie and pull it over your ponytail from the back. Once the elastic reaches the base of your ponytail, twist it into a figure 8. Pull your ponytail back through this new opening. Repeat this until the hair tie no longer has slack and your ponytail isn't budging from its desired position.
- For extra style, you can use a colorful scrunchy.[3] You could even create your own unique ponytail by adding braids or twists wherever you want. For a simpler look, use a plain elastic.
-
6Consider doing a double ponytail. One easy secret to creating a longer-looking ponytail is to stack 2 ponytails on top of each other. Instead of tying all of your hair back at once, separate it into top and bottom halves. Tie each half back as its own ponytail. Position the top ponytail at the crown of your head and the other pony tail a few inches below it. Comb the ends of the 2 ponytails together so they blend together as a single, very long ponytail.

Doing a Quick Sock Bun
-
1Get a hair donut.[4] The most important thing you'll need to make a sock bun is a spongy donut-shaped item to wrap it around. Hair donuts are what give the sock bun its perfect shape. You can either buy a hair donut or make 1 for yourself by cutting the toe off of a tube sock.[5] Discard the toe. The remaining sock tube will be your donut. You don't have to shape the tube; it will take on a donut shape further on.
- If you are using a sock, take 1 edge of the sock and roll it up into itself until it takes on a solid donut shape.
-
2Put your hair into a ponytail. Use the techniques discussed elsewhere in this article. Place the base of your ponytail wherever you want your bun to sit. The most popular position for a sock bun is on the crown of your head starting from a high ponytail. It's better to use a thin hair tie rather than a bulky scrunchie, as a scrunchie may cause bumps in your bun.
-
3Pull your ponytail through the center of your sock bun. If you're using a hair donut, just put it on just as you would a scrunchie. If you're using a sock, pull it down to the base of your ponytail.[6]
-
4Roll your hair onto the donut. Bring the donut up to the tip of your ponytail. Spread the ends of your hair evenly around the donut. Then slowly roll the donut down towards the base of your ponytail, wrapping your hair with it.
-
5Roll the hair donut down around the base of your ponytail. Tuck any loose strands into the donut. If you can see the donut through gaps in your hair, gently spread your hair out a bit to cover them. Depending on how tight you've rolled your bun and how thick your hair is, you may not need to secure it any further. If your hair is very fine or you've rolled it loosely, secure your bun with a few bobby pins.[7]

Styling a Simple Bun
-
1Use a comb to give yourself a middle part and gather all of your hair back. Make sure you have 2 large and 4 small bobby pins on hand if you decide to go with this style.
-
2Twist your hair. Take your gathered up hair with 1 hand and twist it in a clockwise direction by rolling your wrist. Be gentle to avoid hair breakage or hurting your scalp. Keep twisting until all of your hair from the nape of your neck to the tips is a tight spiral.[8]
-
3Coil your hair into a bun. Hold your hair with 1 hand, maintaining its twisted spiral. With that same hand, begin to wrap the whole strand in a clockwise circle around its base. Place your index finger of your other hand in the center of the base to keep the bun in shape. Once you've gotten down to the end of your hair, wrap the tips underneath the rest of the bun.[9]
- You can also do a counterclockwise bun. If you choose this option, start by twisting your hair counterclockwise instead.
-
4Secure your wrapped hair. Use large bobby pins on either side to hold your bun securely. Make any minor changes to your bun's shape you'd like by gently pulling edges loose with your fingers. Once you have the desired shape, pin it in place with the 4 smaller bobby pins.
- You may choose to put the finishing touches on your bun by adding a little volume to your hairdo. Use the tail of a comb and gently slide it under the hair at your crown. Gently pull the hair slightly up and out of the bun. You can use the same technique on the outer portion of the bun.[10]
Styling a Simple Chignon
-
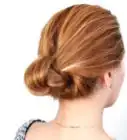
1Use a comb to gather all of your hair into a ponytail. A chignon is a classic hairstyle that is worn low on the back of your head, near the nape of your neck. You will need to start with a sleek ponytail, so gather your hair, smooth it out, and secure it with an elastic band at the back of your head.[11]
-
2Secure the ponytail halfway to the ends with another elastic band. Brush out the ponytail well to ensure that it is smooth. Then, secure the ponytail with an elastic band near the center.[12]
-
3Slide a bobby pin over the elastic band and fold over the ponytail. Slide the bobby pin onto the elastic band going towards the base of the ponytail. Then, fold the ponytail up towards the base so that the 2 elastic bands are right next to each other and insert the bobby pin through the base of the ponytail.[13]
- You can position the hair however you want, but the classic way is to fold it straight up and secure the bobby pin through the top center of the ponytail holder.[14]
-
4Wrap the remaining hair around the base of the ponytail. Take the ends of your ponytail and wrap them around the base of the chignon to hide the elastics. Then, insert bobby pins on either side to hold the hair wrapped around your chignon securely.[15]
- Spray on some hairspray for a stronger hold.
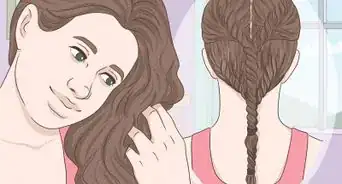
Doing a Simple Braid
-
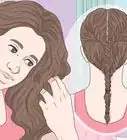
1Create a pony tail where you would like the braid. Brush your hair out and secure it with an elastic at the back of your head. If desired, you can also skip the ponytail and just divide your hair into 3 sections to start.
-
2Take your ponytail and separate it into 3 equal sections. Label these sections A, B, and C respectively.
-
3Create your first twist in your braid by taking and crossing it over B. The order should now be B, A, C.
-
4Next you should take C and cross it over A. Now the order should be B, C, A. This creates your first twist in the braid.
-
5Repeat steps 2-4 until you get to the end of your braid, secure with an elastic and enjoy your new look!

Doing a Headband Tuck
-
1Slide a stretchy headband over the crown of your head. Position the front of the headband so that it either rests on the top of your forehead or an inch or 2 back on top of your hair. Move the back portion of the headband wherever you want your tuck to be. A popular position is the nape of the neck.[16]
-
2Make sure your headband fits correctly. It must be both tight enough to stay in place all day and loose enough for hair to be tucked into. Your headband should not slide around at all on your head. You should be able to slide 2 to 3 fingers comfortably underneath the headband. Don't wear a headband that feels like it's pinching your head.
-
3Tuck your hair into the headband. Begin from the front and work in sections. Take a strand of hair into your hand and bring it up and over the headband. Tuck the ends in so that the hair forms a loop. For best results, start in the front of your hair and work towards the center back on the sides. Then combine the ends into the middle section and fold them together.
- If your hairdo is looking too flat, add some volume. Take a styling comb and gently insert it under the hair at your crown and/or tucked into the headband. Carefully lift the comb to pull the hair out slightly. Re-tuck any strands that you may have accidentally loosened out of the headband completely.[17]


Expert Q&A
Did you know you can get expert answers for this article?
Unlock expert answers by supporting wikiHow
-
QuestionHow do you keep a ponytail in place?
 Christine GeorgeChristine George is a Master Hairstylist, Colorist, and Owner of Luxe Parlour, a premier boutique salon based in the Los Angeles, California area. Christine has over 23 years of hair styling and coloring experience. She specializes in customized haircuts, premium color services, balayage expertise, classic highlights, and color correction. She received her cosmetology degree from the Newberry School of Beauty.
Master Hair Stylist & ColoristUse 2 elastics for added security so your hairstyle stays in place all day.
Support wikiHow by unlocking this expert answer.
-
QuestionIs it bad to wear a ponytail every day?Christine GeorgeChristine George is a Master Hairstylist, Colorist, and Owner of Luxe Parlour, a premier boutique salon based in the Los Angeles, California area. Christine has over 23 years of hair styling and coloring experience. She specializes in customized haircuts, premium color services, balayage expertise, classic highlights, and color correction. She received her cosmetology degree from the Newberry School of Beauty.
Master Hair Stylist & ColoristWearing a tight ponytail every day can put a lot of strain on your scalp.Support wikiHow by unlocking this expert answer.
-
QuestionWhat do you tease your hair with?
 Laura MartinLaura Martin is a Licensed Cosmetologist in Georgia. She has been a hair stylist since 2007 and a cosmetology teacher since 2013.
Licensed CosmetologistYou can use a teasing brush, a flat brush, or a comb to tease hair. Brush teasing is softer while backcombing produces a tighter, more compact effect.Support wikiHow by unlocking this expert answer.

References
- ↑ http://stylecaster.com/beauty-high/high-ponytail-how-to
- ↑ http://www.oprah.com/style/How-to-Make-a-Perfect-Chic-Ponytail-Ponytail-Hairstyle_1/4
- ↑ Christine George. Master Hair Stylist & Colorist. Expert Interview. 10 January 2020.
- ↑ Christine George. Master Hair Stylist & Colorist. Expert Interview. 10 January 2020.
- ↑ http://www.beautylish.com/a/vcvzi/how-to-do-a-sock-bun
- ↑ http://www.beautylish.com/a/vcvzi/how-to-do-a-sock-bun
- ↑ http://www.beautylish.com/a/vcvzi/how-to-do-a-sock-bun
- ↑ http://www.elle.com/beauty/hair/tips/g8557/chignon-how-to/?slide=3
- ↑ http://www.elle.com/beauty/hair/tips/g8557/chignon-how-to/?slide=4
- ↑ http://www.elle.com/beauty/hair/tips/g8557/chignon-how-to/?slide=6
- ↑ https://www.youtube.com/watch?v=cw4agKB2zNQ&feature=youtu.be&t=32s
- ↑ https://www.youtube.com/watch?v=cw4agKB2zNQ&feature=youtu.be&t=1m21s
- ↑ https://www.youtube.com/watch?v=cw4agKB2zNQ&feature=youtu.be&t=1m52s
- ↑ https://www.youtube.com/watch?v=cw4agKB2zNQ&feature=youtu.be&t=2m8s
- ↑ https://www.youtube.com/watch?v=cw4agKB2zNQ&feature=youtu.be&t=3m58s
- ↑ http://treasuresandtravelsblog.com/blog/2014/4/9/hair-tutorial-headband-tuck
- ↑ http://www.freckled-fox.com/2012/08/hair-tutorial-easy-headband-tuck.html
- ↑ http://www.totalbeauty.com/content/gallery/wet-hairstyles/p133352/page4
- ↑ http://www.oprah.com/style/How-to-Make-a-Perfect-Chic-Ponytail-Ponytail-Hairstyle_1/3
- ↑ http://stylecaster.com/beauty-high/high-ponytail-how-to
- ↑ http://stylecaster.com/beauty-high/how-to-tease-hair
About This Article

For a simple DIY hairstyle at home, start with a ponytail and build up to more styles. To make a ponytail, tease the crown of your hair with a comb, pull the hair back and secure it with an elastic. If you want to make your ponytail look longer, separate your hair into top and bottom halves and make a ponytail for each one so that the one on the bottom rests under the one on top. From there, you can make a simple bun by twisting the hair that hangs from your ponytail, coiling it up on your head, and securing with pins. For more hairstyling tips from our Cosmetic reviewer, like how to style a chignon, read on!