This article was co-authored by Jeanine Hattas Wilson and by wikiHow staff writer, Dan Hickey. Jeanine Hattas Wilson is a Professional Painter and the President of Hattas Public Murals, Inc. With nearly 20 years of experience, Jeanine specializes in creating, overseeing, designing, and painting murals. Jeanine holds a BA in Advertising from Marquette University and a Studio Painting Minor from The Milwaukee Institute of Art & Design. She has studied at The Atelier Artien in Paris, France, Los Angeles Academy of Figurative Art, and under renowned artists such as Robert Liberace, Michael Siegel, and William Cochran. To date, Hattas Public Murals has painted nearly 5,000 commissioned works of art in homes and commercial and public spaces.
There are 48 references cited in this article, which can be found at the bottom of the page.
This article has been viewed 2,546,135 times.
Whether you want to decorate a notebook or create a heartfelt card from scratch, a hand drawn flower is an eye catching and impressive touch. They sure can be tricky to draw for the first time, though! Thankfully, by using some basic shapes and putting in a little bit of practice, you can draw any kind of flower in nature in just a few steps. In this article, we’ll show you step-by-step how to draw 10 popular and beautiful flowers so you’ve got an illustration for any occasion. All you need to get started is a pencil and some paper!
Things You Should Know
- Use a sharp pencil on white sketch paper for the best results. Keep a fresh eraser on hand to clean up guiding lines and mistakes.
- Use a black pen or marker to trace over your drawing once you’re finished if you want to make darker, clearer lines.
- Use colored pencils for detailed shading, crayons or markers for simple coloring, or leave your drawings in black and white. It’s up to you!
Steps
Sunflower
-
1Draw a medium circle, then draw a large circle around it. Sketch your circles so they have the same center point (these are called concentric circles). Place them above the center of your paper, since these will become the center of your flower.[1]
- Sketch these circles lightly since they’re going to be used as guides (and not part of the final drawing).
- It’s OK if your circles aren’t perfect—nothing in nature is perfect, and tiny imperfections are what make your drawing unique!
- The medium circle is the outline of the center of the flower, and the larger circle will be a guide to help you draw your petals.
-
2Draw a stem coming down from the outer circle, then add leaves. Create a thick stem that goes most of the way down the page—just draw 2 wavy, parallel lines and connect them at the bottom. To make leaves, sketch some curved diamond shapes coming off the stem.[2]
- If you’re a more advanced drawer, try adding some smaller stems that connect your leaves to the main stem.
- Add some bends and curls to your leaves to make them look more real.
- Draw some small, medium, and large leaves to add variety to the stem.
Advertisement -
3Sketch a thin, long heart shape with a pointed tip for the first petal. Have the base begin around your small circle and the tip end somewhere close to your bigger circle (it doesn’t have to line up exactly).[3]
-
4Keep adding petals until there’s no more room on the inner circle. Draw petals of slightly different sizes and shapes, and don’t worry about spacing them out equally all around the circle. Some variety and imperfections will bring your flower to life![4]
-
5Layer more petals in the background to make the flower look fuller. Add some pointed tips in the “windows” between petals to look like another row of petals. Fill in the spaces all the way around the circle for a uniform look, or leave some gaps for a more realistic feel.[5]
-
6Add 2 more concentric circles in the center of the flower. These circles add depth to the center part and will help you sketch in all of the tiny seeds that make up the heart of a sunflower. After you add the circles, the center will look like 3 concentric circles.[6]
-
7Draw tiny, packed circles inside the center circle to make seeds. Make sure the tip of your pencil is sharp (or use a very thin-tipped pen). Fill the center circle completely—it’s OK if the seeds are different sizes or if they go outside the line of the circle.[7]
-
8Sketch slightly larger circles in the middle ring of the center. Repeat the same seed-drawing process you did in the innermost circle, but this time, make the seeds larger to give the illusion of a less tightly-packed ring of seeds.[8]
-
9Fill in the outer circle with tiny, packed seeds (like the center). Draw tiny seeds again in the last circle (using a thicker pen or pencil if you have one to add some more dimension). The different sized seeds in each ring make each of the rings stand out from each other and make the center of the flower look more interesting.[9]
-
10Add details to the leaves and stem, then erase the outer guide circle. Draw creases in the center of each leaf to add veins and dimension, or try adding tiny hairs all over the stem. If you like, try adding centerlines to the petals to give them depth and movement.[10]
- Erase the outermost circle you drew in the very beginning, near the tips of all your petals. Be careful not to erase your petals, though!
-
11Go over the drawing in ink and add color. Grab your favorite drawing pen and go over your pencil lines to make them permanent. Work slowly and carefully, since pen marks can’t be erased. When you’re done, leave it as a black and white drawing or fill it in with colored pencils to complete your drawing.[11]


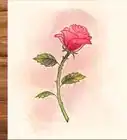
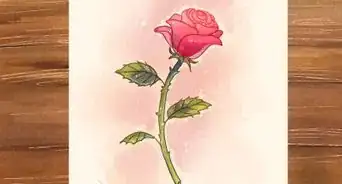
Rose with Stem
-
1Draw a light oval with a line coming down to guide the bulb and stem. Taper the oval a little bit at the top, and try to place it above the center of your paper so you have room to draw a nice, long stem.[12]
-
2Add your first side petal with smooth, rounded lines. Start in the lower left curve of your oval and draw a long, slightly curvy line that ends at the upper right curve (this line marks one side of your petal). Then, go back to the first line’s starting point and sketch the other side of the petal with a bigger, curvier line.[13]
- Draw the second line so that it curves lower than the first line. Let it swoop outside the oval and then curve back around to end on the upper right curve.
-
3Add another petal to the left side of the oval. Start this petal from where the top line of your first petal passes near the center of the oval. Draw the same shaped lines as the first petal, but mirrored in the opposite direction.[14]
- The first line curves from the center of the oval to the upper left curve.
- The second line curves underneath the top line, swoops outside the oval, then curves and connects to the upper left curve.
-
4Flesh out the inside of the bud with curved lines. Add a smooth, rounded line (like an arch) above the top of your oval. Then, draw a spiral right in the upper middle of the oval with a curvy line that connects to the left petal.[15]
-
5Draw 2 leaves underneath the oval at the top of the stem. Sketch long, thin, curvy diamond shapes to make leaves (one in each direction). It’s OK if they’re not exactly symmetrical—some differences make them look more realistic![16]
- The leaves underneath the bud are called sepals.
-
6Thicken your stem and add leaves. Add a second line that runs parallel to the stem guide you drew in the beginning.[17] Then, draw wide, curved diamond shapes that branch off of the stem to make leaves. Add a faint line going down the middle of the leaves to add some shape.[18]
- Place your leaves at different heights on the stem so they aren’t budding out from the same spot.
- If you want to add thorns, draw several sharp, pointed angles coming off of the stem in both directions.
- The stem doesn’t have to be perfectly straight, and it’s OK if it looks slightly thinner or thicker in some parts.
-
7Erase the oval guidelines and color your rose. Carefully erase the parts of the oval that pass through your petals and the top curve of the oval that arches over the inner spiral you drew earlier.[19] Then, color in the stem, leaves, and sepals with shades of green, and choose a couple shades of reds or pinks to color in the bulb and petals for a traditional rose.[20]
- Use a small, fresh eraser for the cleanest, best results.
- Feel free to choose whichever colors you like—this is your creation!
- If you want to make your lines darker or clearer, trace over them in ink before you add color.

Rose without Stem
-
1Draw a small, wobbly oval in the center of your paper. Make the oval horizontal so the narrower ends are pointing to the left and right of your paper. This will be the center of your rose.[21]
-
2Sketch 2 more ovals outside of the center oval. First, draw a slightly larger oval that shares its bottom curve with the smaller, center oval. Then, draw a third, even larger oval that surrounds both of the inner ovals.[22]
- Leave a small amount of space between the bottom curves of the third oval and the smaller, inner ovals.
-
3Add your first petal radiating from the center. Choose any point along the edge of the outer oval to start your petal. Draw a long, wavy line that curves about halfway around the oval, then reconnects to the oval’s edge.[23]
-
4Keep adding petals to fill out your rose. Draw more petals with long, wavy, curved lines (just like the first one) until the center oval is full. Then, start adding bigger petal lines outside the first row of petals to make the rose look larger and fuller. Add about 3-5 petals per layer.[24]
- As you get closer to the out edge of the rose, leave more space between the lines to make the petals look bigger and more open than at the center.
- Try to keep the rose petals balanced all the way around the rose.
-
5Add some sepal leaves branching out from the edge of your rose. Once you’re done drawing petals, draw some curved diamond shapes that sprout from the edges. Place one leaf on each side, 2 leaves on one side, or several leaves all the way around—it’s up to you![25]
- For a more realistic look, try drawing small zig-zags on the sides of the leaves to make their edges look rougher.
-
6Add color to bring your rose to life. Color your leaves green, then choose your favorite rose color to fill in the petals. Roses can be red, pink, white, yellow, or even lavender. Pick whichever one you like the best![26]
Daffodil
-
1Draw a vertical oval to the center left of your paper. Sketch the oval lightly with your pencil. If you want your daffodil to face to the right instead, draw the oval to the center right of the paper and flip the directions of the rest of the instructions.[27]
-
2Draw 2 parallel lines to the right of the oval, then connect them. Start the top line slightly lower than the top tip of the oval, and the bottom line slightly higher than the bottom tip. Then, connect the ends of the lines with a gently curved line. Your flower looks like a bell or a horn at this point.[28]
-
3Sketch a light, large oval behind the bell shape and divide it into 6 parts. Draw a big, vertical oval slightly to the right of the oval from Step 1. Place it so the center of the oval is about where the curved line connecting the parallel lines from Step 2 is. Then, draw faint, straight lines that split the oval into 6 equal parts.[29]
- Draw the first line going straight up and down through the middle of the oval.
- Draw 2 more angled lines that make a large “X” shape through the oval to complete the 6 sections.
- Erase the parts of the lines that cut through the bell shape from Step 2.
-
4“Crinkle” the outline of the small oval from Step 1. Draw over the oval again, but this time, use a tightly crinkled line instead of a smooth, curving line. Then, draw a second crinkled line inside the right edge of the crinkled oval. Make it long enough to go a little more than halfway around the oval.[30]
- Curve the inside crinkled line around the top and bottom tips of the oval, but leave it disconnected on the other side.
-
5Center your first petal on the vertical line above the bell shape. Draw a wide, curved diamond shaped petal with a rounded point. Start your petal just above the bell shape (not connected to it). Draw it so the point of the petal is lined up with the vertical line you drew in Step 3.[31]
- Each line segment will become the center of a petal (all daffodils have 6 petals).
-
6Fill in the remaining 5 petals along the lines inside the large oval. First, draw 2 more petals centered on the bottom right and bottom left diagonal lines to complete the top layer of petals. Then, draw the last 3 petals to fill in the windows between the top layer so they look like they’re farther back.[32]
- Afterward, carefully erase the large guiding oval and the interior dividing lines you used to place your leaves.
-
7Draw a long, curvy line to form the daffodil’s stem. Start the line from the edge of one of the right petals. Go straight to the right and then curve the line down toward the bottom of your paper (it’ll look like a bendy straw or the number 7). Then draw another parallel line to make the stem look thicker.[33]
- Have the ends of the stem lines meet in a sharp point toward the bottom of your paper.
-
8Add leaves to the stems. Draw a curved, diamond shape with a sharp point branching off of the stem on the right side, then add a second leaf on the left side. Place the leaves at different heights along the stem for a natural look. Draw a curved line down the center of each leaf to make the leaf’s central vein.[34]
-
9Flesh out the details of the daffodil’s petals and center. Make short, quick strokes off of the inside crinkled line to add more detail to the flower’s center. Then, draw similar strokes going from the outside crinkled line toward the petals. Sketch a few lines inside of the petals to add dimension and shape.[35]
-
10Color in your dreamy daffodil. Make the stem and leaves green, and the petals a light yellow. Daffodils also come in orange, red, white, or pink varieties, and the center bell shape can be a different color than the petals. Use whichever colors speak to you the most![36]

Cosmos Flower
-
1Draw 2 light, concentric circles. First, draw a small circle in the center or upper center of your paper. Then, draw a second, larger circle around the first one. Try to place it so both circles have the same center point (it’s OK if they’re slightly off, though).[37]
-
2Add symmetrical, even-sized petals all the way around the outer circle. Make long, elongated petal shapes that end in a soft point. Try to space them evenly around the circle and make them about the same length, since cosmos flowers are fairly symmetrical.[38]
- Don’t worry if your petals aren’t exactly even. Flowers in nature aren’t 100% perfect!
-
3Draw a back row of petals in the “windows” of the front petals. Add angled, soft points in the spaces between the top layer of petals to create depth. The tips of the back row of petals should be about even with the tips of the top layer.[39]
-
4Sketch 2 parallel, vertical lines underneath the flower for the stem. Start the stem in the center of the underside of the flower. Draw a straight line or one that curves slightly—it’s up to you and how you want your stem to look! Then, add another parallel line to make the stem look thicker.[40]
- Connect the lines at the bottom, or have them end at the bottom of the page to make it look like the stem goes on beyond the paper.[41]
-
5Draw over the inner circle with a crinkled line. Draw a darker, squiggly line over the inner circle to represent the seeds and texture of the center of the flower. If you want a clear, symmetrical shape all the way around, try drawing tiny semi-circles instead of random squiggles.[42]
- After you outline the circle, add a smaller, squiggly-lined circle inside of it to add more definition to the center of the cosmos flower.
-
6Add lines inside the petals to make them look more life-like. Sketch long, slightly curved lines that span most of the length of the petal to add definition. Add 2-3 lines per petal. Make some of the lines slightly shorter or longer to add variety and dimension.[43]
-
7Color in the flower. The centers of cosmos flowers are usually a deep yellow or orange color. The petals are frequently pink or lavender, but can be orange, red, yellow, white, or maroon as well. Choose your favorite colors and go to town![44]


Tulip
-
1Start with a big “U” shape. Draw a large letter “U” in the upper center of your paper. This will be the basic outline of the bulb of the tulip.[45]
-
2Draw 2 curved lines across the U to outline the petal shapes. First, make one line that curves from the upper left end of the “U” down to the bottom of the “U.” Then, draw a second curved line that starts at the upper right end of the “U” and ends just above the center of the first line you drew.[46]
-
3Create the third petal with an upside down “U” shape on top of the bulb. Draw an arched line, like a narrow “U” turned upside down, that connects the 2 curved lines you drew in Step 2. Now you have the basic outline of your tulip![47]
- For a fuller looking flower, add 2 more small, upside down “U” shapes in the windows between the petals.
-
4Draw 2 parallel lines under the bulb to make the stem. Add a slight curve to the stem to make it look more natural and realistic. It’s OK if the lines aren’t exactly parallel all the way down. Some variation in the thickness adds visual interest to the stem.[48]
-
5Add long, slender, curved leaves to the stem. Draw 2 long, curved lines that meet in a neat point to create a single leaf. Add additional leaves for a fuller looking stem—draw one leaf on each side, or 2 leaves on the same side (whichever you like best). Place the leaves at different heights for variety.[49]
- Tulip leaves are long, narrow, and tend to point upward rather than out to the sides.
-
6Sketch curved lines inside the leaves and petals for texture. Make 2-3 short, slightly curved lines of different lengths inside each leaf on the stem. For the petals on the bulb, add 3-4 lines that follow the curves of the outer edges of the petals to give them some dimension.[50]
-
7Darken your drawing lines and color in your tulip. If you want darker, clearer lines, go over your pencil marks in ink. Then, add color. Choose greens for the stem and leaves, and your favorite tulip color for the petals. Tulips are often pink or red, but can also be white, green, orange, purple, or even black.[51]
- Some tulips even have stripes or other patterns! Look up some tulip pictures online for design inspiration.


Daisy
-
1Draw a small, light circle in the upper center of your paper. This will become the center of your daisy. If you want a guide to help you make your petals the same length, draw a larger, fainter circle outside of the center circle.[52]
-
2Draw your first petal coming off of the small circle. Draw a long, somewhat narrow petal pointing up from the center. Make the tip rounded (not very pointy) to look like a real daisy petal.[53]
- If you added a larger guiding circle, extend your petal so the tip meets the outer circle.
-
3Rotate your paper and continue drawing petals that point straight up. To help make your petals look even and uniform, turn your paper slightly to the left or right (either way works) so the top of the circle is empty. Then draw a new petal (pointing straight up) right next to the first one.[54]
- Keep rotating your paper and adding new petals until the circle is filled.
- Aim to have about 8 petals in this first row.
-
4Add a second row of petals to fill out the head of the flower. Draw the rounded tips of more daisy petals in the windows between the first layer of petals. Start in a gap near the top of the flower, then rotate your paper and fill in the remaining spaces.[55]
- If you added a large guiding circle to help draw your petals, carefully erase it once you’re done adding the second layer.
-
5Add texture to the center of the flower with a wavy line. Draw over your center circle again with a squiggly line. This mimics the bumpiness of the seeds and makes the daisy look more natural.[56]
-
6Add a stem to fill out the rest of your paper. Draw 2 parallel lines going down from the bottom of your daisy. The lines can be straight or slightly curved. Draw the lines all the way to the bottom of the page, or connect them if you want the stem to end sooner.[57]
-
7Color in your daisy. Make the center of the daisy yellow, and shade the bottom half of the center circle with some orange to add some realism. Add a touch of gray shading to the base of each petal to create slight shadows and make the flower look more 3-dimensional. Color the stem green.[58]
- Daisy petals are usually white, but can be pink, red, or blue, too!


Basic Flower
-
1Start with a circle in the upper center of your paper. This circle will be the center of your flower. Since you’re not drawing a specific type of flower, make the circle as big or small as you like![59]
- If you want your flower’s petals to be the same length, draw a larger, light circle around the first circle to use as a guide.
-
2Draw a big, rounded petal on top of the circle. Start your line on the circle, then draw a long, narrow oval shape to form the petal. Try to recreate the length and width you see in your head to make your flower unique.[60]
- If you drew a guide circle, place the tip of your petal right on the guide circle line.
-
3Continue drawing petals all the way around the circle. Rotate the paper so you’re always drawing petals on top of the circle (like when you’re drawing a daisy), or keep the paper still and draw the petals underneath and to the sides of the circle. Leave as much space between the petals as you like.[61]
-
4Add rounded tips between the petals for a fuller looking flower. If you want to add lots of petals, draw some more petal tips in the windows between your first row of petals. If you like how your flower looks with just 1 row of petals, leave it how it is. The choice is up to you![62]
- Remember, since you’re not copying a specific kind of flower, you can draw the petals or center however you like.
-
5Draw a stem coming down from the flower, then add 1 or 2 leaves. Draw 2 parallel lines pointing straight down from the bottom of the flower to form the stem. Make the stem as thin, thick, curved, or straight as you like.[63] Then, use 2 curved lines sprouting from the stem that meet at a point to make a leaf.[64]
- Draw a short line longways through the center of the leaf to add some detail and texture.
- If you want, add another leaf on the other side of the stem at the same height or at a different height.
-
6Color your flower however you like! Since this is your unique creation, choose your favorite flower colors for the stem, leaves, petals, and center. Most flowers have green stems and leaves, a yellow center, and a bright color like red, pink, yellow, orange, or purple on the petals.[65]
- If you want to get really creative, try making the petals different colors, or even drawing a smiley face in the center of the flower for a friendly, cartoon look.


Lotus
-
1Draw 2 long, pointed petals that are pointing away from each other. First, draw a wide, shallow “U” shape to form the bottom of the lotus bulb. Then, draw a curved line from the upper right end of the “U” down toward the center of the “U.” Make a second curved line that goes from the upper left end of the “U” and ends near the middle of the first curved line.[66]
- This shape is a lot like the beginning shape of drawing a tulip, except squashed so it’s lower and wider.
-
2Make 3 cone shapes above the first layer of petals. First draw a rounded cone shape (like an upside down “U”) right on top of the first 2 petals from Step 1. Then, draw smaller cones to the left and right to look like more petals in the back of the flower.[67]
-
3Draw 2-4 thin, long petals at the base of the lotus bulb. Make at least 2 curved, diamond shaped petals—one going to the left, and one going to the right. Add a long, curved line down the length of each petal to add texture and details.[68]
- Try adding additional leaves in front of the flower. Make your rounded diamond shapes shorter and slightly wider to make them look like they’re pointing toward you.
-
4Add a lily pad underneath the lotus. Draw a long, horizontal oval for the pad. To make the lotus look like it’s sitting on the oval, “hide” the top curve of the oval behind the flower. Add several lines radiating from the lotus to the edge of the lily pad oval to add detail.[69]
-
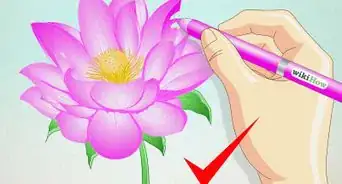
5Color in your finished lotus. Fill in the lily pad with a shade of green, then color in the petals pink or white for a traditional lotus look. Some lotus types are blue, purple, or yellow—choose whichever color you like best![70]
- To get extra creative, color in a blue background to make your lily pad and lotus look like they’re floating on water.
Hibiscus
-
1Start with 2 curved, parallel lines to form the tube of the hibiscus. Draw one slightly diagonal line that curves from down from left to right. Then, draw a second line parallel to the first. Make the base of the tube slightly wider than the tip to look realistic.[71]
- Connect the bottom of the 2 lines with a short, rounded line.
-
2Draw a wobbly-lined oval on top of the tube. Using a squiggly line, make a vertical oval that’s wider than the tip of the tube. Add some short strokes inside the line to add detail and texture to the oval.[72] Then, draw 3 short, straight lines coming out of the top of the oval with tiny circles on top of each line.[73]
- This structure at the end of the tube is called the stigma.
-
3Draw your first petal to the right of the tube. Start just above the base of the tube on the right side. Draw a curved line that stretches up and to the right, away from the tube. Then, curve it around and add 1 or 2 light squiggles to define the edge of the petal. Bring your curved line back toward the base of the tube to finish the petal.[74]
-
4Use wavy lines to draw 4 more petals around the tube. Hibiscus flowers usually have 5 petals total, so add more curved, wavy lines to flesh out the rest. Try to keep the shape and size similar to your first petal (it’s OK if they’re not all exactly the same, though!). When you’re done, you’ll have 5 petals surrounding your tube.[75]
-
5Draw 2-3 pointed leaves on each side of the hibiscus. Draw curved-edged diamond shapes that end in a neat point to form the leaves. For a natural and slightly asymmetrical look, try drawing 3 on the right side and 2 on the left (or vice versa).[76]
-
6Add line details in the leaves and petals for texture. Draw a single, slightly curved line down the middle of each leaf to make a lifelike central vein. Then, add 3-4 shorter curved lines inside each petal to make them look like they’re opening up toward you.[77]
-
7Color in your hibiscus to finish it up. Fill in the leaves with shades of green, then color the tube in the center a shade of yellow or light orange. The petals can be orange, yellow, red, pink, purple, or even a combination of colors! For an eye catching flower, try making the base of the petals a different color than the tip and edges.[78]
- To paint realistic flowers make the edge thin and the petals translucent.
- Try not to use white and black. They tend to make things look exaggerated or cartoon-like.
- If you are painting a flower, paint the shape of the flower in one color. Then add the detail on top of that base color. For example, you can color the shape pink. Then draw the petals and add the highlights, shadows, and details.
Community Q&A
-
QuestionAre there any tips to help me draw easier besides practicing?
 Community AnswerYou can make drawing easier by using basic shapes and then adding details. To draw a flower, all you need are some circles and ovals, then you just add the details. Of course, practice is always recommended too.
 -
QuestionHow can I make my flower look realistic?
 Community AnswerUse different shades and colors. Try to use inspiration from the flowers you see around you, and don't forget to draw in and color a background.
 -
QuestionHow do you draw and color with shades?Community AnswerShading is just adding a darker color to the parts of the object light does not reach, and adding a lighter color to the areas that the light shines on directly.
Things You'll Need
- Pencil
- Eraser
- Sketchbook or sketch paper (or any plain, white paper)
- Colored pencils, markers, or crayons (optional)
- Black pen or marker (optional)

References
- ↑ https://youtu.be/IVpn1qsrRP0?t=39
- ↑ https://mymodernmet.com/how-to-draw-a-sunflower/
- ↑ https://youtu.be/IVpn1qsrRP0?t=112
- ↑ https://youtu.be/IVpn1qsrRP0?t=121
- ↑ https://mymodernmet.com/how-to-draw-a-sunflower/
- ↑ https://mymodernmet.com/how-to-draw-a-sunflower/
- ↑ https://youtu.be/IVpn1qsrRP0?t=182
- ↑ https://youtu.be/IVpn1qsrRP0?t=208
- ↑ https://youtu.be/IVpn1qsrRP0?t=235
- ↑ https://mymodernmet.com/how-to-draw-a-sunflower/
- ↑ https://mymodernmet.com/how-to-draw-a-sunflower/
- ↑ https://www.drawingforall.net/how-to-draw-a-rose/
- ↑ https://howtodrawforkids.com/how-to-draw-a-rose-on-a-stem/
- ↑ https://howtodrawforkids.com/how-to-draw-a-rose-on-a-stem/
- ↑ https://howtodrawforkids.com/how-to-draw-a-rose-on-a-stem/
- ↑ https://www.drawingforall.net/how-to-draw-a-rose/
- ↑ https://www.drawingforall.net/how-to-draw-a-rose/
- ↑ https://howtodrawforkids.com/how-to-draw-a-rose-on-a-stem/
- ↑ https://www.drawingforall.net/how-to-draw-a-rose/
- ↑ https://howtodrawforkids.com/how-to-draw-a-rose-on-a-stem/
- ↑ https://youtu.be/kS80xQbLoH0?t=10
- ↑ https://youtu.be/kS80xQbLoH0?t=22
- ↑ https://www.happyfamilyart.com/art-lessons/learn-to-draw/how-to-draw-roses/
- ↑ https://www.happyfamilyart.com/art-lessons/learn-to-draw/how-to-draw-roses/
- ↑ https://youtu.be/kS80xQbLoH0?t=335
- ↑ https://youtu.be/kS80xQbLoH0?t=373
- ↑ https://youtu.be/A3FydEEiyFA?t=4
- ↑ https://youtu.be/A3FydEEiyFA?t=6
- ↑ https://youtu.be/A3FydEEiyFA?t=11
- ↑ https://easydrawingguides.com/how-to-draw-a-daffodil/
- ↑ https://youtu.be/A3FydEEiyFA?t=69
- ↑ https://youtu.be/A3FydEEiyFA?t=81
- ↑ https://easydrawingguides.com/how-to-draw-a-daffodil/
- ↑ https://easydrawingguides.com/how-to-draw-a-daffodil/
- ↑ https://youtu.be/A3FydEEiyFA?t=48
- ↑ https://easydrawingguides.com/how-to-draw-a-daffodil/
- ↑ https://youtu.be/Wjqwyvv0xPw?t=11
- ↑ https://youtu.be/Qf6NeHYDeLc?t=2
- ↑ https://youtu.be/Wjqwyvv0xPw?t=138
- ↑ https://youtu.be/Wjqwyvv0xPw?t=157
- ↑ https://youtu.be/Wjqwyvv0xPw?t=356
- ↑ https://youtu.be/Wjqwyvv0xPw?t=173
- ↑ https://youtu.be/Qf6NeHYDeLc?t=107
- ↑ https://youtu.be/Qf6NeHYDeLc?t=23
- ↑ https://www.easypeasyandfun.com/how-to-draw-a-tulip/
- ↑ https://www.easypeasyandfun.com/how-to-draw-a-tulip/
- ↑ https://easydrawingguides.com/how-to-draw-a-tulip-really-easy-drawing-tutorial/
- ↑ https://www.easypeasyandfun.com/how-to-draw-a-tulip/
- ↑ https://easydrawingguides.com/how-to-draw-a-tulip-really-easy-drawing-tutorial/
- ↑ https://easydrawingguides.com/how-to-draw-a-tulip-really-easy-drawing-tutorial/
- ↑ https://easydrawingguides.com/how-to-draw-a-tulip-really-easy-drawing-tutorial/
- ↑ https://easydrawingguides.com/how-to-draw-a-daisy-flower/
- ↑ https://youtu.be/TMYhplLC9oo?t=62
- ↑ https://youtu.be/TMYhplLC9oo?t=89
- ↑ https://easydrawingguides.com/how-to-draw-a-daisy-flower/
- ↑ https://easydrawingguides.com/how-to-draw-a-daisy-flower/
- ↑ https://easydrawingguides.com/how-to-draw-a-daisy-flower/
- ↑ https://youtu.be/TMYhplLC9oo?t=261
- ↑ https://otoons.net/how-to-draw-a-cartoon-flower/
- ↑ https://youtu.be/FgrgxfOxKDc?t=10
- ↑ https://youtu.be/FgrgxfOxKDc?t=20
- ↑ https://easydrawingguides.com/how-to-draw-a-daisy-flower/
- ↑ https://otoons.net/how-to-draw-a-cartoon-flower/
- ↑ https://youtu.be/FgrgxfOxKDc?t=82
- ↑ https://youtu.be/FgrgxfOxKDc?t=56
- ↑ https://dragoart.com/tut/how-to-draw-a-lotus-for-kids-11604
- ↑ https://dragoart.com/tut/how-to-draw-a-lotus-for-kids-11604
- ↑ https://howtodrawforkids.com/how-to-draw-a-lotus-flower/
- ↑ https://dragoart.com/tut/how-to-draw-a-lotus-for-kids-11604
- ↑ https://dragoart.com/tut/how-to-draw-a-lotus-for-kids-11604
- ↑ https://youtu.be/vW7iy_ylHFM?t=14
- ↑ https://youtu.be/vW7iy_ylHFM?t=36
- ↑ https://youtu.be/vW7iy_ylHFM?t=76
- ↑ https://howtodrawforkids.com/how-to-draw-a-hibiscus/
- ↑ https://youtu.be/vW7iy_ylHFM?t=138
- ↑ https://howtodrawforkids.com/how-to-draw-a-hibiscus/
- ↑ https://howtodrawforkids.com/how-to-draw-a-hibiscus/
- ↑ https://youtu.be/vW7iy_ylHFM?t=295
About This Article

To draw a basic flower, start by sketching a small circle in the middle of the page to represent the center of the flower. Next, draw a larger circle around the smaller one. Use the bigger circle as a guide to sketch in some petals around the central circle. Depending on what kind of flower you’re trying to make, you can make the petals narrow or wide, or experiment with different shapes. To make the flower look more realistic, vary the lengths of the petals a little bit, and make some of them overlap with each other. Next, draw a stem descending from behind the circle, starting at the small, central circle. Sketch in a couple of leaves branching out from the bottom of the stem. To finish up your drawing, add some realistic details, like veins in the leaves and the fluffy texture of the pistils and stamens at the center of the flower. Go over the outlines of your drawing in ink, and erase any unnecessary lines, like the original outer circle that you used as a guide for drawing the petals. If you want, you can color in your flower or add shading when you’re done. Once you’re comfortable drawing a simple flower, experiment with other types, such as daffodils, roses, or tulips. To learn how to draw sunflowers, roses, and tulips, read the article!