X
wikiHow is a “wiki,” similar to Wikipedia, which means that many of our articles are co-written by multiple authors. To create this article, volunteer authors worked to edit and improve it over time.
This article has been viewed 38,032 times.
Learn more...
Bone is a natural material and its fibers can be dyed, but most all-purpose dyes won't work well. Many natural dyes, acid dyes, and fiber reactive dyes will produce much better results.
Steps
Method 1
Method 1 of 3:
Natural Black Dye
-
1Grind the acorns into powder. Pop the caps off 15 acorns and toss the nuts into a powerful electric blender. Blend on high to pulverize the acorns into powder.[1]
- You could use two large oak galls instead of acorns if desired.
- Instead of a blender, you could also grind the nuts into powder using a stone mortar and pestle.
-
2Combine the acorn powder with water. Place the powdered nuts in a small to medium non-reactive bowl. Add 1 cup (250 ml) of room temperature water to the powder. Mix to combine using a plastic spoon.
- Note that the level of the water will need to be high enough to cover the bone you plan to dye. If you need to create more dye, you will need to add six more powdered acorns or one more powdered oak gall for each 1/2 cup (125 ml) of water.
Advertisement -
3Prepare an iron salt solution. Place one steel wool pad in a separate non-reactive bowl and add 1 cup (250 ml) of lemon juice or vinegar.
- Note that 2 Tbsp (30 ml) of powdered rust could be used instead of a steel wool pad if desired.
- You may want to choose a container with a lid since this solution will sit out overnight without being used. It must be prepared now, however, and not immediately before use.
-
4Soak the bone in the acorn dye overnight. Place the bone in the bowl holding the acorn solution. Set the container aside and allow the bone to soak overnight, or 8 to 12 hours.
- Make sure that the bone is completely submerged in the acorn dye.
- A longer soak time will lead to a darker dye. If you only want a light brownish-gray color, you can cut this amount of time down by about half.
-
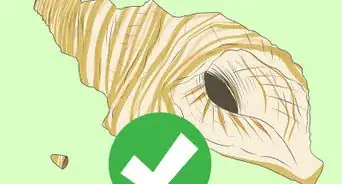
5Remove the bone. When the bone has had enough time to soak, remove it from the acorn dye. Hold the bone over the container for a minute so that any excess solution can drip off.
- Do not worry if the dye is not quite the right color when you remove it from the acorn dye. The chemical reaction that the dye undergoes when immersed in the iron salt solution will alter the color and set the dye.
- You may want to wear rubber or plastic gloves when removing the bone to prevent your fingers from getting dyed, as well.
-
6Soak the bone in the iron salt solution. Place the bone in the iron salt solution and allow it to soak overnight, or for 8 to 12 hours.
- The bone must be completely submerged this time, as well.
- As before, a longer soak time will produce a deeper tone.
-
7Let the bone dry. Remove the bone when it has soaked long enough in the iron salt solution. Allow any excess to drip off, then set it aside for several hours until it feels dry to the touch.
- Wear rubber or plastic gloves when removing the bone.
- Note that the final color will be slightly lighter than the current color.
- Lay the bone out on a piece of wax paper as it dries. Keep paper towels handy to clean up any stray dye.
-
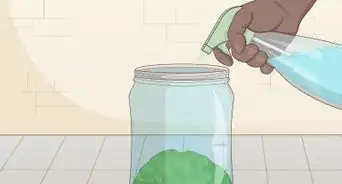
8Wash the bone. When the bone feels dry to the touch, wash it using cool water and a mild soap.
- Washing the bone will help remove the pungent vinegar or lemon juice odor.
- When you rinse the bone, continue rinsing it until no more dye can be washed away and the water is clear.[2]
-
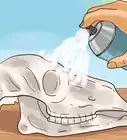
9Dry completely. Place the bone in a sunny spot and allow it to dry completely before you use it.
- The completion of this step completes the process.


Advertisement
Method 2
Method 2 of 3:
Acid Dye
-
1Soak the bone. Place the bone in a small to medium bowl and cover it with room temperature water. Allow the bone to soak for an hour or two.
- As with fabric fibers, the bone fibers pick up dye more readily when wet.
- You only need enough water to keep the bone submerged.
-
2Fill a small saucepan with water. When you're ready to start dyeing the bone, fill a saucepan with 1 to 2 cups (250 to 500 ml) of warm to hot water. Set it on your stove and switch on the heat to medium.
- You only need enough water to keep the bone submerged.
- Use a saucepan that will not react to the dye. One made of stainless steel or enamel works best.
-
3Stir in the dye powder. Sprinkle in 1/2 oz (14 g) of acid dye powder in any color. Mix with a non-reactive spoon until the powder is dissolved.[3]
- You need to add between 1/3 and 2/3 oz (9.5 and 19 g) dye powder for every 1 lb (450 g) of bone you plan to dye.
- On average, 1/2 oz (14 g) should work well for small batches of bone. Keep in mind that more dye powder will produce a darker color, while less will produce a lighter color.
- You may want to wear rubber gloves or plastic gloves to prevent your hands from accidentally coming into contact with the dye.
-
4Add the bone. Remove the bone from its soak and transfer it to the dye bath.
- Do not dry the bone at all before adding it to the dye bath.
-
5Raise the temperature of the dye bath. Increase the heat to medium-high or high. Continue heating the dye bath until it reaches a temperature between 185 and 200 degrees Fahrenheit (85 and 93 degrees Celsius).
- Stir the dye bath frequently as it heats up.
- Use a cooking thermometer to monitor the temperature of the dye bath.
-
6Mix in a little vinegar. Pour 1/4 cup (60 ml) of vinegar into the dye bath. Stir to combine.
- Acid dyes work best when combined with an acid, like vinegar.
- Note that you will need 1/4 cup (60 ml) vinegar per 1 lb (450 g) of bone.
- You could substitute the vinegar for 1 Tbsp (15 ml) citric acid per 1 lb (450 g) of bone if desired.
- Try to avoid pouring the vinegar directly on top of the bone as you add it.
-
7Dye the bone for 30 minutes. Keep the bone in the dye bath for an additional 30 minutes. The dye bath must remain at the same approximate temperature during this time.
- You may need to adjust the heat settings on your stove to maintain this temperature.
- Stir the dye bath frequently during this half hour.
- If you want a stronger color, you can leave the bone in the dye bath for a longer period of time.
-
8Wash in warm water. Remove the bone from the dye bath. Wash the bone with warm water and a mild liquid soap.
- Continue rinsing the bone under running water after removing the soap. Do not stop rinsing until the water runs clear and all excess dye has been washed away.
-
9Let dry. Place the dyed bone in a sunny location and allow it to dry completely.
- Once the bone is dry, the process is complete.


Advertisement
Method 3
Method 3 of 3:
Cool Water (Fiber Reactive) Dye
-
1Mix the dye. Dissolve 4 Tbsp (60 ml) of fiber reactive dye powder in 1 cup (250 ml) of lukewarm or cool water, mixing well with a plastic spoon.[4]
- Combine the dye in a small to medium bowl made from non-reactive material, like glass, plastic, or stainless steel.
- You will need enough dye to keep the bone submerged. If you need to add more water, you should also add 1 Tbsp (15 ml) of dye powder for every 1/4 cup (60 ml) of water.
- Note that black fiber reactive dyes or turquoise fiber reactive dyes containing MX-G require two to four times as much dye powder to produce a bright color.
-
2Prepare a soda ash solution. Combine 1/4 cup (60 ml) of soda ash to 1 qt (1 L) of room temperature water. Stir well until the soda ash is dissolved.
- Note that you should check the dye you're using before creating the soda ash solution. Some dyes may already contain soda ash, in which case, you do not need to prepare a separate solution.[5]
- Wear gloves as you handle the soda ash since it is slightly caustic. Wash your skin immediately if any of the solution splashes onto it.
-
3Soak the bone in the soda ash solution. Place the bone in the soda ash solution and allow it to soak for 15 to 60 minutes.
- This process prepares the bone fibers to pick up the dye particles. A longer soak can lead to a stronger color, but try not to exceed one hour.
-
4Transfer the bone to the dye bath. Remove the bone from the soda ash solution and transfer it to the dye bath. Position the bone so that it is completely submerged, then allow it to dye overnight.
- The bone must stay submerged in the dye bath for a minimum of two hours. Keeping it submerged for 8 to 24 hours is ideal, though, and will produce a stronger color.
- Let the dye bath sit out in a warm room. The temperature of the water should remain at 70 degrees Fahrenheit (21 degrees Celsius) or higher. If you need to keep the dye bath warmer and more humid, you may wish to cover the container with a sheet of plastic wrap as the bone sits.
-
5Wash and rinse the bone. Once the bone has finished soaking in the dye bath, remove it and clean it with warm to cool water and a mild liquid soap.
- Continue rinsing the bone even after the soap has been washed away. Don't stop until the water comes out clear, signifying that all excess dye has been rinsed off.
-
6Dry the dyed bone. Place the bone in a sunny area and allow it to dry completely before handling it.
- As soon as the dyed bone is dry, the process is complete.


Advertisement
Community Q&A
-
QuestionDoes the first step work for other types of natural dye, like berry dye?
 Community AnswerYes. It should work.
Advertisement
Things You'll Need
Natural Black Dye
- Bone
- 15 large acorns OR 2 large oak galls
- Electric blender OR mortar and pestle
- 1 cup (250 ml) room temperature water
- 1 cup (250 ml) lemon juice or vinegar
- 1 steel wool pad
- 2 non-reactive bowls
- Plastic spoons (for mixing)
- Paper towels
- Wax paper
- Rubber or plastic gloves
- Mild soap
Acid Dye
- Bone
- Small to medium bowl
- Small non-reactive saucepan
- Stove
- 1/2 oz (14 g) acid dye powder
- 1 to 2 cups (250 to 500 ml) hot water
- 1/4 cup (60 ml) vinegar OR 1 Tbsp (15 ml) citric acid
- Cooking thermometer
- Non-reactive mixing spoon
- Rubber or plastic gloves
- Mild soap
Cool Water (Fiber Reactive) Dye
- Bone
- Non-reactive container
- 4 Tbsp (60 ml) fiber reactive dye powder
- Soda ash (sodium carbonate)
- 1 cup (250 ml) water and 1 qt (1 L) water, divided
- 1/4 cup (60 ml) soda ash (sodium carbonate)
- Plastic or non-reactive mixing spoons
- Plastic wrap (optional)
- Rubber or plastic gloves
- Mild soap
-Step-11.webp)


References
About This Article
Advertisement


-Step-11.webp)