This article was co-authored by wikiHow Staff. Our trained team of editors and researchers validate articles for accuracy and comprehensiveness. wikiHow's Content Management Team carefully monitors the work from our editorial staff to ensure that each article is backed by trusted research and meets our high quality standards.
There are 9 references cited in this article, which can be found at the bottom of the page.
This article has been viewed 6,799 times.
Learn more...
Dyeing and decorating hard-boiled eggs is a classic Easter activity! It’s a fun, easy craft project to do with your kids, on your own, or with friends. Traditionally, easter eggs are dip dyed, but one of the easiest and most fun ways to dye them is to use shaving cream mixed with food coloring. This gives the eggs a super unique and pretty marbleized look.[1]
Steps
Buying Supplies and Boiling the Eggs
-
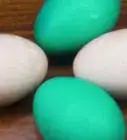
1Buy a dozen eggs and a can of shaving cream at your local store. You’ll want to use white eggs, as they will show the colors more vividly than brown eggs. You’ll also need to make sure the shaving cream is the foaming kind (not the gel kind) and is white in color.[2]
-
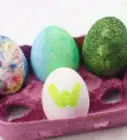
2Select the food coloring you want to use to dye the eggs. You can select any food coloring you wish. You may want to have a couple different packs available to give yourself options. Neon food coloring generally gives you the best, most vibrant results.[3]
- Make sure you choose colors that go well together. Colors that are similar (like red and orange) will give the eggs a softer look, while contrasting colors (like yellow and purple) result in more striking eggs.
Advertisement -
3Hard-boil the eggs in a large pot on the stove. Gently place the eggs in a single layer at the bottom of the pot. Pour water over the eggs until they're completely submerged and bring the water to a boil over high heat. Reduce the heat to medium-high and leave the eggs to cook, uncovered, for 10 minutes.
- When they’re done, pour out the hot water and run cold water over the eggs to stop them from continuing to cook. Leave the eggs to sit in cold water for at least 15 minutes before draining them.[4]
-
4Check each egg and throw out any that have cracked. You want the eggs to have a smooth, intact shell when you dye them. If any of the shells cracked during the boiling process, you’ll want to dispose of those ones before you begin the dyeing process.
- You can always save any cracked eggs for eating if you don’t want to throw them out.[5]
-
5Dry the eggs thoroughly with a paper towel or leave them to air dry. The eggs need to be completely dry before you begin the dyeing process so the color will soak into the shells evenly.[6]
-
6Lay newspaper over a table or other flat surface. Especially if you’re dyeing the eggs indoors or if you’ve got little ones helping out, you’ll want to protect your furniture from potential spills.[7]
- If you don’t have any newspaper handy, you can also use large plastic garbage bags.
-
7Set out the eggs, shaving cream, food coloring, and a muffin tin. Be careful when handling the eggs. Although they are hard-boiled and more sturdy than raw eggs, it's still possible to crack the shells.[8]
- You may want to put them back in their carton or in a bowl so they don’t roll away.


Part 2: Dyeing the Eggs
-
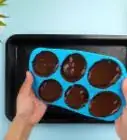
1Fill each cup in the muffin tin halfway with shaving cream. The exact amount of shaving cream you use isn’t super important. You just want to make sure you have enough to thoroughly coat each egg.[9]
-
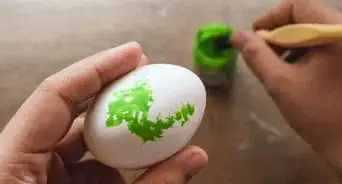
2Add several drops of food coloring to each cup. Mix and match the colors to your liking. Using a muffin tin rather than a cookie sheet allows you to experiment and try different combinations of colors in each cup.[10]
- For the best results, try using two contrasting colors (like red and blue) or three similar, but complementary colors (like yellow, orange, and red) in a cup.
-
3Use a toothpick or cotton swab to swirl the colors together. If you’re using different color combinations, make sure to use a fresh toothpick or cotton swab for each cup to avoid cross contaminating the colors.
- You don’t need to thoroughly mix it all together. Just gently swirl the colors around for a few seconds in each cup.[11]
-
4Place the eggs in the muffin tin cups and roll them until they're coated. Again, you don’t want to mix the shaving cream and food coloring together too thoroughly. Just roll each one 2-4 times to ensure the whole shell is saturated.[12]
-
5Leave the eggs to sit in the mixture for 20 minutes. This is enough time for the shells to thoroughly absorb the food coloring in the shaving cream.[13]
- You can use this time to clean up your dyeing station and put any eggs you didn’t dye in the fridge.
-
6Rinse each egg carefully under cold water. You want to make sure you get off all of the excess shaving cream/food coloring mixture, especially if you’re planning on displaying the eggs as decorations. Make sure you use cold water, as warm or hot water may remove some of the dye from the shells.[14]
-
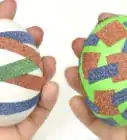
7Dry each egg with a paper towel and check out the results. Although the eggs have been rinsed, you’ll still want to use a fresh paper towel for each egg to prevent any lingering dye from transferring.[15]
- Depending on the colors you chose, you should be left with super pretty, vibrant, marbleized Easter eggs!


Warnings
- Since shaving cream is not edible, it's not a good idea to eat the eggs after dyeing them.[17]⧼thumbs_response⧽
Things You’ll Need
- A dozen large, white eggs
- White, foaming shaving cream
- Food coloring
- A pot to hard boil the eggs
- Paper towels
- A muffin tin
- Toothpicks or cotton swabs
References
- ↑ https://www.goodhousekeeping.com/holidays/easter-ideas/videos/a43272/how-to-make-marbled-easter-eggs/
- ↑ https://www.goodhousekeeping.com/holidays/easter-ideas/videos/a43272/how-to-make-marbled-easter-eggs/
- ↑ https://www.youtube.com/watch?v=cxDI3-yVlXs&feature=youtu.be&t=108
- ↑ https://www.epicurious.com/recipes/food/views/hard-boiled-eggs-236719
- ↑ https://www.epicurious.com/holidays-events/how-to-dye-easter-eggs-article
- ↑ https://www.epicurious.com/holidays-events/how-to-dye-easter-eggs-article
- ↑ https://www.epicurious.com/holidays-events/how-to-dye-easter-eggs-article
- ↑ https://www.epicurious.com/holidays-events/how-to-dye-easter-eggs-article
- ↑ https://www.youtube.com/watch?v=lUOVwQZdJGA&feature=youtu.be&t=14
- ↑ https://www.youtube.com/watch?v=lUOVwQZdJGA&feature=youtu.be&t=18
- ↑ https://www.spendwithpennies.com/whipped-cream-dyed-eggs-safer-alternative-shaving-cream-eggs/
- ↑ https://www.youtube.com/watch?v=lUOVwQZdJGA&feature=youtu.be&t=29
- ↑ https://www.goodhousekeeping.com/holidays/easter-ideas/videos/a43272/how-to-make-marbled-easter-eggs/
- ↑ https://www.youtube.com/watch?v=lUOVwQZdJGA&feature=youtu.be&t=35
- ↑ https://www.goodhousekeeping.com/holidays/easter-ideas/videos/a43272/how-to-make-marbled-easter-eggs/
- ↑ https://www.spendwithpennies.com/whipped-cream-dyed-eggs-safer-alternative-shaving-cream-eggs/
- ↑ https://www.spendwithpennies.com/whipped-cream-dyed-eggs-safer-alternative-shaving-cream-eggs/
About This Article