This article was co-authored by wikiHow Staff. Our trained team of editors and researchers validate articles for accuracy and comprehensiveness. wikiHow's Content Management Team carefully monitors the work from our editorial staff to ensure that each article is backed by trusted research and meets our high quality standards.
This article has been viewed 17,635 times.
Learn more...
Whether it's your first catch of the day or your first catch ever, one of the best things about fishing is being able to eat your catch. Preparing your freshly caught perch for your next meal is easier than it seems. You may not get it perfect on the first try, but by preparing your perch and making the proper cuts, you'll be able to cook up boneless fish fillets for your next meal.
Steps
Storing and Cleaning Your Perch
-
1Keep your perch in a cooler of ice water to keep it fresh. If it will be a couple of hours before you can prepare the perch, you can either keep it on the stringer in the water, then place it in a cooler filled with ice water or put it directly into the ice water.[1]
- You should always transport your fish in a cooler of ice water to prevent it from going bad before it is prepared.
-
2Use a scaling tool to scale your perch. Start by holding the head of your perch in one hand. Use your scaling tool to make short, raking motions lengthwise down your fish. Start at the tail of your perch and work your way back to the head. Repeat on all sides of the fish and around the fins and gills.[2]
- Be careful when scaling around the fins as they can have abrupt edges.[3]
- If you do not have a scaling tool available, you can use a dull knife or a spoon.
Advertisement -
3Rinse your perch with warm water. Once you have finished scaling the perch, rinse it thoroughly with warm water. This will help remove any residue from the scaling before you fillet your perch.[4]


Cutting the Fillets
-
1Place your perch on its side on top of a layer of paper towels. Make sure that the layer of paper towels you use is thick enough to prevent any discharge from reaching your counter. You can also use a thick layer of newspapers instead of paper towels.[5]
- Since this process can be messy, you can also grab a pair of gloves before cleaning the perch.
-
2Make an incision just behind the gills of your perch, using a fillet knife. The cut should run from the top of the backbone to the belly of the perch. You should only be cutting about halfway through your fish.[6]
-
3Use the tip of your knife to cut along the backbone. The cut will begin where you ended your last incision along the backbone. Your cut should only be about a .5 inches (1.3 cm) in diameter. Run your blade along the backbone, keeping the blade angled down slightly.[7]
-
4Cut your perch along the belly to the anal vent. Start this cut where you left off underneath the gills. Your blade should be angled somewhat downwards as you move from the belly to the anal vent.[8]
- The anal vent is located right before the anal fin. The anal fin will be on the bottom side of the perch between the pelvic fins and the tail fin.[9]
-
5Run your blade between the backbone and the spine of the perch. Insert your blade so that it is laying flat underneath the meat of the perch. Your blade should be resting against the spine of fish. Use the spine and backbone as a guide while you move the knife along the body of the perch and cleanly cut through the tail.[10]
- Make sure you are not cutting through the spine because you will end up getting more bones in the meat.
-
6Work the knife to remove the fillet from the bone. Start behind the head of the perch, where you made your first incision, and gently remove the meat. When you reach the rib cage of the fish, maneuver your blade to remove any meat. Make sure you do not cut through the rib cage. Once you have reached the belly of the perch, separate the meat from the body.[11]
- To make sure you are getting the most meat possible, without getting bones, do not rush this process.
-
7Put the fillet on a flat, sturdy surface with the skin facing down. Make a vertical incision into the fillet that is .25 inches (0.64 cm) from the tail. Once you reach the skin, position your blade parallel to the meat. Slide your blade down the full length of the meat to separate it from the skin.[12]
- Always cut away from your body when sliding the blade down the fillet.
-
8Remove the center layer of bones from your fillet. To locate the bones, run your fingers along the middle of the perch fillet. When you have found the beginning of the strip of bones, make a small incision on both the right and left sides. Use the blade to cut completely through the length of the bones.[13]
- This strip of bone can be discarded after it is removed from the fish.
-
9Repeat these steps on the other side of the fish. Once you have completed the first fillet, you can go ahead and flip your fish over so that the side still attached to the fish is facing up. Follow the previous steps exactly to produce the same cut as you did from the other side.
- Discard any remaining pieces of the fish such as the head.[14]
-
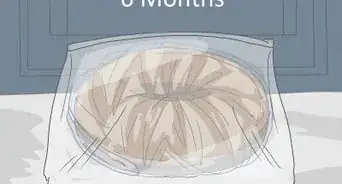
10Cover your fillet in cold water and store in a thick freezer bag. If you are not planning to cook your fillets right away, run them under cold water and place them in an air-tight, freezer bag. You can store them in the freezer for up to 6 months.[15]
- Adding water to your fillets before freezing will reduce the risk of the fillets getting freezer burn.


Things You'll Need
- A fillet knife or another small, sharp knife
- A scaling tool, a dull knife, or a spoon
- Thick, freezer bags
- Paper towels or newspaper
Warnings
- Always use a sharp knife to make your cuts. Dull knives can make the process more difficult and potentially dangerous.⧼thumbs_response⧽
- Make sure you are always cutting away from yourself.⧼thumbs_response⧽

References
- ↑ https://www.reserveamerica.com/outdoors/how-to-clean-a-fish.htm
- ↑ https://www.reserveamerica.com/outdoors/how-to-clean-a-fish.htm
- ↑ https://www.reserveamerica.com/outdoors/how-to-clean-a-fish.htm
- ↑ https://www.reserveamerica.com/outdoors/how-to-clean-a-fish.htm
- ↑ http://ontariofishing.net/news/june2006-3.html
- ↑ http://ontariofishing.net/news/june2006-3.html
- ↑ http://ontariofishing.net/news/june2006-3.html
- ↑ http://ontariofishing.net/news/june2006-3.html
- ↑ http://www.dnr.sc.gov/fish/anatomy.html
About This Article