This article was co-authored by Amy Guerrero. Amy Guerrero is an Arts and Crafts Specialist and the Owner of Sunshine Craft Co., a crafting studio based in Phoenix, Arizona. Amy specializes in macrame, DIY crafting, and teaching fiber arts. She offers monthly in-person and online workshops along with having developed a range of DIY craft kits for at-home projects. Amy holds a BS in Industrial Design from Philadelphia University. She worked as a graphic designer before starting her own business. Sunshine Craft Co. is a creative hub that offers a wide range of workshops, tools, and resources for any craft project to inspire creativity and community engagement.
wikiHow marks an article as reader-approved once it receives enough positive feedback. In this case, several readers have written to tell us that this article was helpful to them, earning it our reader-approved status.
This article has been viewed 26,706 times.
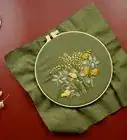
Machine embroidery may seem intimidating at first, but the process is fairly straightforward. If you use a special embroidery machine, you can set and create the design with the push of a few buttons. Using a standard sewing machine requires more skill, time, and precision, but the steps are still simple.
Steps
Part One: Preparing the Fabric
-
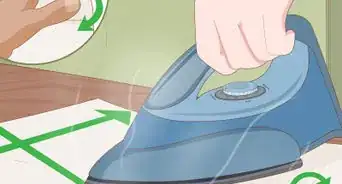
1Iron the fabric, if necessary. To create an even, tight design, you'll need to start with fabric that has no wrinkles or creases in it. Use an iron to rid the material of any wrinkles before you begin.
- If the fabric is dusty or stained, you should also wash it before use. Wait until the fabric is completely dry before embroidering it.
-
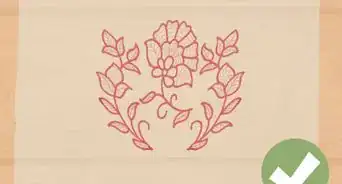
2Use a paper template to determine placement.[1] Draw or print a paper version of your desired embroidery design. Cut it out and move it around your material to visualize the best possible placement for your design.
- Once you've found that placement, temporarily pin the paper template in place.
Advertisement -
3Mark your desired placement. Use a washable fabric pencil to mark the top, bottom, right, and left sides of the design on your fabric. Mark the center of the design, as well.
- The center you mark should be centered in your embroidery hoop after you place it on.
- To find the center of your design, fold it in half crosswise and lengthwise. The point of intersection should be your center point. Poke through it and mark the point on your fabric.
- Remove the paper template after marking out its placement.
-
4Choose a stabilizer. Unless you're using a very heavy material, you'll need to apply a stabilizer to the back of the fabric before you embroider it. Choose a stabilizer based on the weight of the fabric and the design of your intended embroidery.
- For most fabrics, a cut-away stabilizer is best when you want to create a solid embroidery design only viewable from the front of the material. This type of stabilizer is permanent.
- When you want to create embroidery that can be viewed from the front and the back, use tear-away, wash-away, or heat sensitive stabilizer. All of these options can be removed at the end of the project.
- Most stabilizer choices are suitable for linen and cotton, but for knit and interlock fabrics, cut-away stabilizers should almost always be used.
- Mid-weight stabilizers work well enough for most fabrics. Delicate and stretchy fabrics might need heavy-weight removable stabilizers, while stiff materials might only need light-weight stabilizers.
-
5Adhere the stabilizer to the fabric.[2] If you use cut-away stabilizer, apply a thin, even coat of temporary spray adhesive to one side of it. Stick the stabilizer onto the wrong side of your fabric.
- Some stabilizers are self-adhesive. These do not need to be sprayed with a separate adhesive; simply stick the adhesive side of the stabilizer to the wrong side of the material.
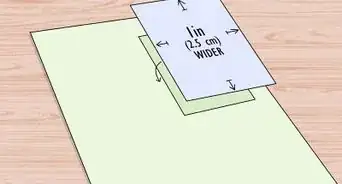
- Note that the piece of stabilizer you use should be slightly larger than the embroidery hoop you plan to use.
-
6Determine whether or not a topping is necessary. Most fabrics don't need a topping layer, but you should use one when you select a fluffy, loose pile fabric.
- Embroidery can sink into the fibers of the fabric when that fabric is fluffy. A topping helps to prevent that from happening.
- Toppings are actually just wash-away stabilizers. Instead of placing it on the wrong side of the fabric, though, you should set it on top of the right side.
-
7Hoop the fabric and stabilizer together. Close the pieces together in between the two halves of an embroidery hoop. The stabilizer should be on the bottom, followed by the fabric, followed by the topping (when applicable).
- Embroidery machines usually come with hoops designed for use with that machine.
- If you are using a sewing machine instead of an embroidery machine, use a standard 4-inch by 4-inch (10-cm by 10-cm) circular or rectangular hoop.
- Center all two or three layers over the outer hoop. Lay the inner loop on top and tighten it in place. If done properly, the design area should be centered in the hoop, taut, and smooth.


Part Two: Using an Embroidery Machine
-
1Use the right needle and the right thread. Most embroidery machines already come with an embroidery needle, but if yours does not have one, make sure that you fit it with an embroidery needle instead of a general sewing machine needle. You should also select an embroidery thread instead of all-purpose thread.
- The needle needs to be big enough the carry the thread into the fabric without causing any damage. A size 70 or 80 needle is usually a good choice for most fabrics.
- Use sharp embroidery needles for most fabrics, but switch to a ballpoint needle when working with stretchy knits.
- The top thread should be embroidery thread, but you should wind the bobbin with all-purpose thread. Embroidery thread is heavier and more durable than all-purpose thread, making it ideal for the top design. All-purpose thread is used in the bobbin to reduce the overall weight, though.
-
2Set up the machine. Turn the machine on and thread both the needle and the bobbin. As with a standard sewing machine, you'll need to draw the bobbin thread up through the bottom of the machine using your needle.
- Some embroidery machines also double as sewing machines. In this case, you'll need to remove the sewing machine section and attach the embroidery arm.
- Since each machine can differ, you should consult the instruction booklet to determine the proper way to thread yours.
-
3Plug the machine into a computer, if necessary. Many embroidery machines load designs via a separate computer. If yours is a machine like this, you'll need to attach the machine to your computer using a USB cord.
- These machines also come with an installation disc. Place this disc into your computer and load the appropriate software before using your embroidery machine.
- Other embroidery machines have a computer built into them. For these machines, all you need to do is turn the computer portion of the machine on. You should not need to load any software or connect to a computer.
-
4Lock the hoop in place. If you're using an embroidery hoop that came with the machine, there should be a way for you to snap the hoop in place.
- Check the machine's instructions if you do not know how to do this.
- The hoop will need to be loaded in so that the right side of the fabric faces up.
- If you use an embroidery hoop that didn't come with the machine, it may not snap into place. In this case, you might need to hold the hoop down with separate clips or small clamps to prevent it from moving during the embroidering process.
-
5Load your design.[3] Follow the on-screen instructions provided by the embroidering software to select and load a design into the machine. The exact procedure can vary greatly depending on manufacturer and model, so there is no single generic set of instructions to follow.
- Sort through the built-in library of designs provided by the software. Usually, you can also add new designs to this library from files previously saved to your computer.
- When embroidering letters, look through the different font options, as well.
-
6Initiate the embroidery process. The start mechanism can vary based on make and model, too, but there's almost always one button labeled along the lines of "start" or "send design." Press this button and allow the machine to take things from there.
- After you initiate the process, the machine will run on its own. You do not need to press on a power foot pedal or turn the material by hand as it works.
-
7Pause and clip the thread.[4] Watch the machine closely as it starts embroidering. After it creates approximately six stitches, press the "pause" button on your machine.
- Carefully reach in with a pair of scissors and cut the tail of thread at the start of your design.
- Doing this prevents the excess thread from getting tangled in the design as your machine works.
-
8Press the “start” button again. Press this button again to continue the embroidering process. Allow the machine to run automatically without any further interruption.
- Even though the process is automatic, it's always a good idea to keep an eye on your machine as it runs.
- Watch for any warnings or messages the software may flash as the machine runs.
- Note that the machine should stop on its own once it reaches the end of the design.
-
9Cut away any excess thread. When the machine finishes your design, switch it off and remove the material. Take a sharp pair of scissors and snip away any threads connecting separate parts of the design.
- For instance, there will often be small threads connecting the letters of a name or word. You can cut these threads off without unraveling the rest of the work.
- Take the fabric out of the embroidery hoop during this step, as well.
-
10Remove any excess stabilizer. If you used cut-away stabilizer, snip away any excess stabilizer from around the design using scissors. Leave the stabilizer stuck under the embroidered design in place.
- Tear-away stabilizer can be gently ripped away from beneath the threads. Wash-away stabilizer dissolves in a washing machine. Heat sensitive stabilizer can be loosened and removed by running an iron over the embroidered area.
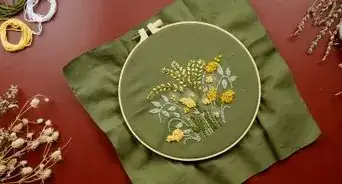
- If done correctly, the completion of this step completes the process.


Part Three: Using a Sewing Machine
-
1Sketch the design onto the fabric. Use a washable fabric pencil to lightly trace your design onto the right side of the fabric.
- If you marked out the position of your design earlier using a paper template, use these marks to guide you as you draw out the design.
- Note that it might be easier to sketch out the design before you hoop the fabric and stabilizer. After drawing the design, you should be able to hoop everything together as usual.
-
2Attach an embroidery foot and the correct needle to the machine. Attach a special embroidery foot to the sewing machine. You'll also need to swap out the standard needle for something a little sharper than normal.
- Follow the machine manufacturer's instructions regarding the proper way to change the presser foot and the needle.
- A needle specifically designed for use with embroidery thread is ideal. Sharp embroidery needles work well with most materials, but a ballpoint embroidery needle might be best when you are working with a stretchy knit.
-
3Lower the feed dogs. The material needs to be free to move around, so you should lower the feed dogs beneath the needle until they no longer rise out of the machine.
- Alternatively, you can place a metal plate over the feed dogs to prevent them from interfering with the fabric.
- The process can vary from machine to machine, so consult the machine's instruction booklet for advice.
-
4Set up the rest of the machine. Turn the machine on. Thread the machine as you usually would, but use embroidery thread instead of all-purpose thread for the needle.
- Thread both the top needle and the bobbin. Use embroidery thread for the needle but standard, all-purpose thread for the bobbin.
- Catch the bobbin thread with your needle and draw it up as you usually would.
- If you need help threading your machine, consult the instruction manual that comes with it. Each machine can vary.
-
5Set the stitch length and width to zero.[5] Find the controls for both stitch length and stitch width. Both settings should be switched to "0."
- Regarding stitch style, you should select a standard straight stitch.
-
6Lower the presser foot. Place the hooped fabric underneath the needle. Lower the presser foot onto the material using the machine's presser foot lever.
- Note that the material should be right side up.
-
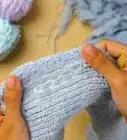
7Stitch around the outline. Gently tap on the foot control pedal and begin stitching with your machine. Start at one place on your outline, and gradually move the hoop around with your hands under the needle, following the pencil line you drew.
- Move the fabric very slowly and in small increments. The faster and further you move the fabric, the wider and looser the stitches will be. Ideally, you should aim to have small, tight stitches.
-
8Slowly fill in the outline. Once the entire outline is done, reposition the fabric underneath your needle and begin filling the outline in.
- As before, you should work slowly and in small increments to create tight stitches.
- This can be a time-consuming process depending on the size of your design. The rows of thread need to be side-by-side, almost overlapping. If you get too sloppy, gaps will start to appear.
- This step is only necessary if you have a solid fill embroidery design. You don't need to worry about it if your design is nothing more than light line-work.
-
9Remove excess stabilizer. Remove the fabric from the machine and from its hoop. If you used cut-off stabilizer, take a pair of scissors and trim away any excess stabilizer from around the design.
- If you used tear-away stabilizer, carefully rip it away from your stitches. Wash-away stabilizers can be removed by washing the project, and heat sensitive stabilizers can be removed by going over them with an iron.
- After you remove the stabilizer, the project should be complete.
- You need some yarn, needle, and the piece you want to embroider on.
- Make sure that your yarn can fit through the eye of the needle. You can put a knot at the end and come up through the back of your piece to hide the end of the yarn.
- Then send your needle down through your piece, making a small stitch where you want to put the eyes. Repeat this method coming up and going back down to create a few stitches. Repeat on the other side to create the other eye. After stitching, tie off your yarn and trim.


Community Q&A
-
QuestionHow do I pause and shut down a design which is midway through?
 T. ChinsenTop AnswererThe instruction booklet that came with your machine should have information to guide you through the steps. Look up the manufacturer online if you no longer have the instructions. Most manufacturers can help solve any problems if you contact them. Social media websites and forums can also get specifics for your particular machine.
Things You'll Need
- Fabric
- Embroidery thread
- All-purpose thread
- Embroidery machine OR sewing machine
- Embroidery machine needle, size 70 or 80
- Iron
- Stabilizer
- Temporary spray adhesive
- Paper
- Fabric pencil
- Embroidery hoop
- Computer
- USB cord
- Scissors


References
- ↑ http://www.embroiderthis.com/hofaformaemt.html#sthash.3fUjgs5R.0F4Ym4wk.dpbs
- ↑ http://www.urbanthreads.com/tutorials.aspx?t=Machine+Embroidery+Basics
- ↑ http://www.urbanthreads.com/tutorials.aspx?t=How+to+Use+an+Embroidery+Machine
- ↑ http://www.sewcando.com/2012/02/crafty-gear-411-learning-to-machine.html
- ↑ http://www.allaboutyou.com/craft/stitching/free-machine-embroidery-techniques
About This Article