Here is some advice to help beginners and advanced riders alike keep their mountain bike in peak condition - it is a good idea to try to follow these steps after every ride. The article covers the entire bike from saddle to brakes, to help you methodically follow through the checks. The whole process should take about 35 - 40 minutes, once you are familiar with it.

2

Turn the bike upside-down.

  1. To protect your grips and saddle, lay out an old towel or something similar on the ground (or fork out the hundred bucks or so for a repair stand). Standing beside your bike, lean over it and grip the frame with your hands - one hand on the down tube at the front and the other hand on the seat post at the rear of the frame. Then lift up the bike and turn it over.
    • Alternate method: Hang the bike from the saddle. To protect the underside of your saddle, pad the tree branch, rafter, etc. Hanging the bike right-side-up is a better method as the chain sits in a specific location due to gravity pulling it down.
    • Another Alternate Method: String it up. Hang the bike from a balcony by stringing rope around the handle bars, up to the balcony, and down around the seat stay.
4

Clean the drive system.

  1. Using the brush and some soapy water, start by cleaning the rear derailleur, working the brush into all the moving parts.[2]
    • Turn the pedals to move the chain round and, holding a wet soapy rag around the chain on the rear derailleur, give it a good wash down.
    • Use the brush with plenty of water to clean the chain ring (the front cog where the pedals attach). Then give it a wipe down with a dry cloth.
    • Taking a wet rag, wash the pedals and then wash the cranks (the bars that hold the pedals on).
    • Finally, clean the front gear mechanism, working the rag into all the moving parts to clean them thoroughly.
5

Wash the underside

  1. Start by washing the front forks with a rag and soapy water, wiping them dry with a cloth as you go. In the same way, clean the centre and rear of the frame.
    • Wash the handlebars with a soapy rag, paying particular attention to the brake lever and gear assembly.
    • Using a damp rag, wash the top tube or crossbar, making sure to clean under the brake and gear cables that run down its length.
    • Finally, clean the underside of the seat.
  2. Advertisement
6

Wash and remount the wheels.

  1. Take a wet rag and start by cleaning the rims of the front wheel. Give the spokes a wash-down and clean the axle. If you have a disk brake system, use a degreaser, such as muck off or white lightning to clean the disc's.[3]
    • Drop the front wheel back into the forks and tighten the quick release - not too tight, not too loose. When you have tightened the lever to the correct pressure, the quick release will leave a mark on your palm for a few seconds. If you need to adjust the tension of the quick release, turn the nut on the far side of the axle clockwise to tighten it, or anticlockwise for less tension.
    • Take the rear wheel and clean the rims, spokes, axle and rear disk rotor if you have one, as you did with the front wheel.
    • Clean the gear cassette on the rear wheel carefully. Use the lever end of the bike brush to remove any stones between the teeth, then work the brush into the cogs, using plenty of soapy water. This will remove any build-up of lubricant or dirt.
    • Drop the rear wheel back into the frame, easing the gear cassette back into the derailleur assembly. Tighten the quick release.
7

Check the wheels.

  1. Spin each wheel, making sure it turns freely and that you can see that it's straight (true). As the wheel rotates, hold your fingers against the rims, to feel if there are any dents or knocks on either side.[4]
    • If you have disc brakes, also check both sides of the rotors on each wheel for true. Make sure it looks smooth and straight. Do not touch the rotor.
    • If you have V brakes, watch the wheel while it's spinning, to make sure that the brake blocks do not make contact with the rims.
    • Check the spokes by turning the front wheel slowly and letting your hand fall over each spoke as the wheel rotates. Every spoke should feel taut but if one feels sloppy, it will need tightening.[5]
    • While the bike is still upside down, check the tire pressure and that both tires are in good condition. If you find any major damage, replace the tire before your next ride.
  2. Advertisement
8

Check the drive system.

  1. Check both pedals by spinning them, making sure that they turn freely and that there is no noise or grinding from worn bearings. If there is, you'll need to replace the bottom bracket.[6]
    • Turn a pedal to rotate the crank and listen out for any noise or signs of wear from the bottom bracket (the assembly that holds the cranks and chain ring in place). If you find any, it will need further maintenance.
    • Check the front gear mechanism. Turn the pedal and move the chain up and down the gears using the gear lever. You're looking and listening for signs of snagging, which happen when the mechanism is misaligned and needs adjusting. Do a similar check with the rear derailleur and gear cogs.
9

Wash the topside of the bike.

  1. Stand by your bike and grab the frame with both hands as you did before to turn your bike back up the right way. Then lean the bike against a wall.[7]
    • Using a clean rag and soapy water, wash the handlebars and the headset (the part where the handlebars meet the frame). Take care to clean well around the brake and gear levers. Wash the tops of the forks on the front wheel and, if you have front shocks, give the seals a good wipe down.
    • Moving to the centre of the bike, clean the down tube and the top tube or crossbar.
    • Open the quick release to remove the saddle. Wash the saddle tube and the seat post on the frame, then remount the saddle, tighten the quick release and give the saddle a wipe over.
    • Finally, clean the seat stays (the two tubes that join the seat post to the rear axle) and wash around the bottom bracket.
  2. Advertisement
10

Check the brakes.

  1. Test your brakes by standing in front of your bike, holding the handlebars. Apply the front brake and pull the bike towards you. The front wheel should not move at all and if you continue to pull, the rear wheel should lift up off the ground; otherwise, the brake will need adjusting.[8]
    • Do the same test with the back brake. When the brake is applied, the rear wheel shouldn't turn round and if you keep pulling, it should skid. If not, the rear brake will need adjusting.
    • Also, look at the brake levers - the brakes should start to grip at about 1/3 pull. The levers should not touch the handlebars. If they do, your brakes need adjusting.
    • If you have disc brakes, check that they are in good condition by standing in front of the bike and looking down inside the disk brake caliper (the bit that fits around the brake rotor). Apply the front brake and you should see both brake pads move across equally to clamp the rotor. If they don't, this indicates a problem. Repeat the above test with the rear disk brake, standing where you can see down into the rear caliper.
    • If you have V brakes, check the brake blocks for signs of wear. They should be free of graphite build-up, and the grooves in the pad should be deep; otherwise, they'll need replacing.
    • With V brakes, also check both brake cables for signs of wear or fraying. Start at the brake levers on the handlebars. Follow the cables along the top tube, then check the other end of both cables where they meet the brake calipers. If you find any signs of wear or fraying in your brake cables, they will need replacing.
12

Lubricate the drive system.

  1. Place some rags over the rear wheel rims underneath the derailleur, to catch any oil drips.[10]
    • Rotate the pedal anticlockwise to move the chain around. Holding the spray lubricant vertically, spray the chain for a few seconds as it passes over the rear gear cogs.
    • Moving the chain with the pedal, spray the teeth on the inside of the chain ring near the cranks. Rotate the pedal again and finally, lube the outside of the chain ring in the same way.

Community Q&A

  • Question
    My cycle's front shocks are not smooth. What can I do with them to make them smooth?
    Matt Gander
    Matt Gander
    Community Answer
    Cleaning and lubrication are key. Use a specific fork lubricant or a Teflon spray like GT-85. Do not use WD-40. If they feel really bad you can send them to be professionally serviced.
  • Question
    When I turn to gear 2/5, it turns to 2/6. What is the reason?
    Tristan Malone
    Tristan Malone
    Community Answer
    Your derailer probably needs to be adjusted, and for that you should go to a bike store to get it adjusted.
  • Question
    How do I free a stiff back brake on my bike?
    Community Answer
    Community Answer
    Remove the pads, and spray the area with brake cleaner, especially in and around the inside of the caliper. If you can see any residue adhering to the pistons, then try to remove it with anything made of hard plastic or wood. Do not use a metal implement. Finally get a tyre lever (not metal) and push the pistons back into he caliper. You might have to use some force. Reapply the brakes carefully, as you don't have any pads in. Repeat a few times until the pistons are moving freely.
Advertisement

Warnings

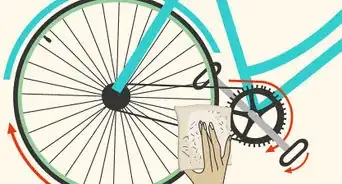
  • If you ride your bike with a misaligned gear mechanism or derailleur, the chain can easily jump off the cogs.
    ⧼thumbs_response⧽
  • Never let your brake pads wear down to the point where they scrape the rims.
    ⧼thumbs_response⧽
  • If your bike has steel parts, then using water on many of the parts listed above is likely to cause rust. To avoid this, be sure to completely dry your bike after it gets wet.
    ⧼thumbs_response⧽
  • Don't ride with dim lights - replace the batteries if necessary.
    ⧼thumbs_response⧽
Advertisement

Things You'll Need

  • 1 bike-mounted tool bag
  • 1 tyre (tire) lever set
  • 2 replacement inner tubes
  • 1 puncture kit
  • 1 chain splitter
  • few spare chain links
  • 1 folding Allen wrench and screwdriver set
  • 1 spoke adjuster
  • 1 shock pump
  • 1 spray bike lubricant
  • 1 bucket of warm soapy water
  • 1 combination bike brush
  • 1 wet rag
  • 1 dry cloth
  • 1 detergent with water

About This Article

wikiHow is a “wiki,” similar to Wikipedia, which means that many of our articles are co-written by multiple authors. To create this article, 45 people, some anonymous, worked to edit and improve it over time. This article has been viewed 532,748 times.
69 votes - 79%
Co-authors: 45
Updated: August 30, 2022
Views: 532,748
Advertisement