This article was co-authored by wikiHow Staff. Our trained team of editors and researchers validate articles for accuracy and comprehensiveness. wikiHow's Content Management Team carefully monitors the work from our editorial staff to ensure that each article is backed by trusted research and meets our high quality standards.
wikiHow marks an article as reader-approved once it receives enough positive feedback. In this case, 80% of readers who voted found the article helpful, earning it our reader-approved status.
This article has been viewed 220,772 times.
Learn more...
In England, clotted cream is served over scones, desserts, and fresh fruit; it is a considered to be a luxury addition taken on the occasional high tea as a popular treat. For those who've never had clotted cream before, it resembles a kind of cross between butter and whipped cream. Best of all, it is extremely easy to make, and requires only a single ingredient. The best clotted cream is made from cream that is not heavily pasteurized. You may use the following recipes with pasteurized cream you find in the grocery store, but best results will come from fresh, organic cream that wasn't heated to extremely high temperatures.
Ingredients
- Cream (not ultra-pasteurized, if possible)
Steps
Using an Oven
-
1Preheat your oven to 180° F (82° C). Clotted cream thrives on low heat over a long period.
-
2Get high fat, not ultra-pasteurized cream if at all possible. Pasteurization is heating food, usually a liquid, to a very high temperature and then immediately cooling it down. The high heat lessens spoilage by preventing microbial growth, but a by-product of this is that the structure of the cream erodes, along with some of the taste. In order to get the tastiest clotted cream, stick with organic, high-fat, less pasteurized cream.Advertisement
-
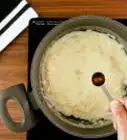
3Pour any amount of cream into a heavy-bottomed pot with a lid. The main thing to worry about here is how high up the sides of the pot the cream goes. Try to get it so that the cream comes up at least one inch and no more than three inches on the pot.[1]
-
4Place the cream-filled pot in the pre-heated oven and cook for at least 8 hours. Cover the pot with its lid and close the oven door. The cream may take as long as 12 hours to fully clot.
- After 8 hours, the cream will develop a thicker, yellowish skin resting on top of the cream. This is the clotted cream. If you're checking on the cream in the oven, be careful not to puncture the clotted cream on top.
-
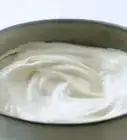
5Remove the pan with the clotted cream from the oven and let cool at room temperature. Then, place the pan in the refrigerator and refrigerate for another 8 hours, being careful not to disturb the outer skin.
-
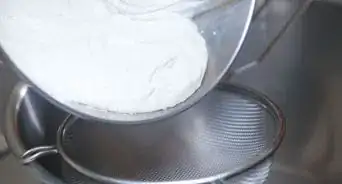
6Separate the clotted cream on top from the whey-like liquid below. Reserve the whey liquid for use in cooking or baking. (Buttermilk pancakes, anyone?)
-
7Enjoy! Store for three or four days in the refrigerator.


Using a Slow-Cooker
-
1Determine whether your slow-cooker runs hot. Most slow-cookers have different base temperatures. Because heat is the bane of clotted cream, you want to make sure you're not blasting your cream with extra heat. If you think that your slow-cooker runs hotter than the average slow-cooker, try this:
- Find a wide dish that fits inside your slow cooker. Place the dish inside the slow-cooker, transfer your cream to the dish. Pour enough water into the slow-cooker (not into the dish with the cream) so that the dish is surrounded by at least an inch of water on the sides.
- If you need to use the water-bath method with your slow-cooker, adjust the recipe accordingly. You want there to be a lot of surface area for your cream, which means not filling the dish up to the brim with cream.
-
2Turn the slow-cooker onto its lowest setting and add the cream.
-
3Wait 3 hours, being careful not to disturb the yellowish skin that starts to develop on top of the cream. After 3 hours, turn off the slow cooker and allow the cream to come to room temperature.
-
4Place the pan in the refrigerator and refrigerate for 8 hours.
-
5Separate the clotted cream from the cream with a slotted spoon. Reserve the whey for use in cooking or baking.
-
6Enjoy! Bring clotted cream back to room temperature before serving.[2] Store in the refrigerator for up to 3 or 4 days.


Community Q&A
-
QuestionDoes clotted cream ever have sugar added to it?
 Community AnswerNot traditionally. It's paired with jam most of the time, so sugar isn't added.
 -
QuestionWhat sort of target temperature would be ideal for my slow cooker when making the clotted cream?
 Community Answer175°F-185°F/80°C-85°C is generally recommended, the only way to know for sure is to make a test batch. If the top layer (the "clots") turns any darker than a buttery yellow color, reduce the temp. for the next try. If your crockpot doesn't offer that low of a temp., use the oven overnight.
 -
QuestionShould I put my slow cooker on "warm" for clotting the cream?
 Community AnswerYes, this is correct.
References
About This Article

To easily make clotted cream in the oven, start by preheating your oven to 180° F (82° C). If possible, use high-fat cream that hasn’t been ultra-pasteurized. Pour the cream into a heavy-bottomed, oven-safe pot with a lid. Cover the pot and place it in the oven for at least 8 hours, or up to 12 hours total. As the cream clots, it will form a yellowish skin on top. Once the cream is ready, remove it from the oven and let it cool to room temperature, then refrigerate it for another 8 hours. Skim the clotted cream off the top with a strainer or a slotted spoon. If you like, set aside the liquid portion underneath to use for cooking or baking. Enjoy your clotted cream spread over pastries or fresh fruit. To learn how to make clotted cream in a slow-cooker, keep reading!


-Step-12-Version-2.webp)