This article was co-authored by Mathew Rice. Mathew Rice has worked in restaurant pastry kitchens across the country since the late 1990's, and currently owns Pink Door Cookies in Nashville. His creations have been featured in Food & Wine, Bon Appetit, and Martha Stewart Weddings. In 2016, Eater named Mathew one of the top 18 chefs to follow on Instagram. In 2018, he appeared in season 18 of the Food Network's Beat Bobby Flay and won his episode.
There are 7 references cited in this article, which can be found at the bottom of the page.
wikiHow marks an article as reader-approved once it receives enough positive feedback. In this case, 100% of readers who voted found the article helpful, earning it our reader-approved status.
This article has been viewed 280,599 times.
A red velvet cake can be a delicious dessert for almost any occasion, and it doesn't have to be a hard cake to make either! Simple and full of flavor, this is a showstopping dessert worth sharing with friends.
Ingredients
- ½ cup (102 grams) shortening (or butter, margarine, or any type of fat used for baking and making pastries)
- 1 ½ cups (300 grams) sugar
- 3 eggs
- 2 tablespoons cocoa
- 1 ½ ounces red food coloring
- 1 teaspoon salt
- 2 ½ cups (315 grams) flour
- 1 teaspoon vanilla
- 1 cup (240 ml) buttermilk
- 1 teaspoon baking soda
- 1 tablespoon vinegar
- 16 ounces cream cheese, softened
- 2 cups (400 grams) powdered sugar
- 1 teaspoon vanilla
- 1 stick butter (approx 110 grams)
Steps
Making the Cake
-
1Gather and measure out all of the ingredients. Good bakers know that moving quickly and efficiently in the kitchen leads to better cakes and smaller messes. Measuring out ahead of time makes it possible.[1]
-
2Cream shortening and gradually add in sugar. Use an electric mixer set to medium speed. Add the sugar along the edges and slowly work it in to avoid sugar splatter.Advertisement
-
3Add eggs one at a time, beating well after each egg is added. Mix in well, keeping your beater moving. It is okay if you add them both at once, too.
-
4
-
5Add salt, flour, baking soda, vanilla, and buttermilk, beating well after each ingredient is added. You can also mix the flour, salt, and baking soda in a separate bowl, adding at once. You can also add it all together into the batter one at a time, using the electric mixer to get a nice consistent batter.[4]
- Add the flour slowly to avoid splatter. It can help to add it with the buttermilk.
Expert AnswerQWhen asked, "What can I use if I don't have buttermilk?"
Mathew Rice has worked in restaurant pastry kitchens across the country since the late 1990's, and currently owns Pink Door Cookies in Nashville. His creations have been featured in Food & Wine, Bon Appetit, and Martha Stewart Weddings. In 2016, Eater named Mathew one of the top 18 chefs to follow on Instagram. In 2018, he appeared in season 18 of the Food Network's Beat Bobby Flay and won his episode.Professional Baker & Dessert Influencer EXPERT ADVICEAnswer from Mathew Rice:
Mathew Rice, pastry chef, responds: "If you don’t have buttermilk, you can add just a splash of vinegar to whole milk, and that’s gonna acidulate it and give you a similar results."
-
6Pour vinegar over the batter. Just a splash is all you need -- it will give it a nice subtle tanginess.[5]
-
7Stir until well mixed. You want a thin, consistent batter with not chunks of flour or dry ingredients left. Want a little more red color? Add a few more drops of red food coloring.[6]
-
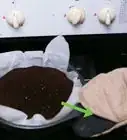
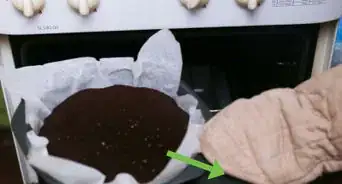
8Pour the cake in a large cake pan or 2 layer cake pans and bake in a 350ºF. The cake should take roughly an hour to cook. When it is done, you'll know through the toothpick test -- stab the center of the cake with a knife or skewer-- if it comes out without still-wet batter on it, it's done.
-
9Wait about 20 minutes to cool before frosting. After 5 minutes, remove from the pan and let cool on a wire rack. Don't frost a hot cake -- the warmth with thin out the frosting and make it difficult, if not impossible, to add smoothly.[7]


Making the Frosting
-
1Set the butter and cream cheese on the counter to warm to room temperature. You'll be whipping the butter and cream cheese up, but that only works if it is soft enough to whip! Set the two dairy products out for 15-30 minutes to get soft.
- In a pinch, you can gently microwave them to speed things up, but keep it very brief. You don't want liquid.[8]
-
2Combine butter and cream cheese. An electric mixer is best, as it will make quick work of the dairies, but a wooden spoon and whisk work well too. They don't have to be perfectly combined, just well mixed.
-
3Add powdered sugar slowly, keeping the mixing going throughout. Powdered sugar will want to poof and fly out as you mix it. To avoid a mess, add it in 3-4 parts, mixing almost all of the first part in before adding the second.
-
4Add vanilla and whip until creamy. Keep the mixer (or your mixing hand) going until the frosting is nice smooth texture. If you want to thin it out a bit so it spreads better, add 2 tablespoons of cold milk.[9]
-
5Cut the cake into layers and frost. Place a little pat of icing on the bottom of our plate or cake dish to keep the bottom layer from sliding around.[10] Then frost it and stack another layer on top, frosting the top of that. Don't worry too much about the sides yet.
- Do not try to frost the cake while it is still hot. Let it cool completely.[11]
-
6Assemble the layers and continue frosting. Stack the layers up high, frosting between each layer with a 1/4" of frosting or so, adding more to taste.
-
7Frost the cake and enjoy! For bakery quality frosting, keep the knife clean after every pass, using a little warm water to ensure your frosting knife applies the icing smoothly and evenly. Use big globs of icing at a time and don't try to spread it too thin. By working in small areas, not spreading too thin, and cleaning the knife regularly, you can get a quality frosted cake.
- If you've got time, real pros will "double frost." Start with a thin layer of frosting everywhere -- it is okay if it pulls up crumbs. Then freeze the cake for 15 minutes, pull it out, and frost "for real." You'll be astonished how easily it goes on![12]
-
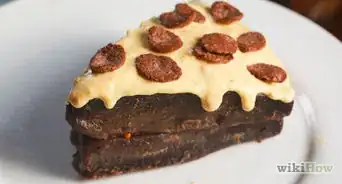
8Finished.


Community Q&A
-
QuestionWhat can I use instead of buttermilk?
 Community AnswerYou can mix regular milk with one tablespoon of lemon juice or vinegar to make it more acidic.
 -
QuestionWhat can I substitute for vinegar?Community AnswerFor every one teaspoon of white vinegar, you can use 1 teaspoon of lemon/lime juice, or 2 teaspoons white wine.
-
QuestionWhat can I substitute for shortening?Community AnswerYou can use butter or stick margarine instead. Keep in mind that this may affect the flavor a little.
Warnings
- Wear oven mitts when handling hot cakes or any hot objects.⧼thumbs_response⧽
- Be careful when dealing with stoves and knives.⧼thumbs_response⧽
- If you use non-whole milk, your frosting may be too runny and liquid-like. [citation needed]⧼thumbs_response⧽
Things You'll Need
- Cake pan
- Mixing bowls
- Cooking utensils
References
- ↑ http://www.tasteofsouthern.com/adams-original-red-velvet-cake-recipe/
- ↑ http://www.nytimes.com/2014/05/14/dining/red-velvet-cake-from-gimmick-to-american-classic.html?_r=0
- ↑ http://toriavey.com/toris-kitchen/2014/02/red-velvet-cake-history-recipe/
- ↑ http://www.tasteofsouthern.com/adams-original-red-velvet-cake-recipe/
- ↑ http://toriavey.com/toris-kitchen/2014/02/red-velvet-cake-history-recipe/
- ↑ http://www.nytimes.com/2014/05/14/dining/red-velvet-cake-from-gimmick-to-american-classic.html?_r=0
- ↑ http://www.nytimes.com/2014/05/14/dining/red-velvet-cake-from-gimmick-to-american-classic.html?_r=0
- ↑ http://www.foodnetwork.com/recipes/food-network-kitchens/cream-cheese-frosting-recipe.html
- ↑ http://www.foodnetwork.com/recipes/food-network-kitchens/cream-cheese-frosting-recipe.html
About This Article
To make red velvet cake, start by mixing sugar, egg, and shortening in a bowl. Then, mix in cocoa and red food coloring to give the batter a rich red color. Next, add salt, vanilla, flour, baking soda, and buttermilk. Once the batter is finished, pour it into a cake pan and bake it in the oven for 1 hour at 350 °F. For tips on how to make a classic frosting for your red velvet cake, read on!