X
wikiHow is a “wiki,” similar to Wikipedia, which means that many of our articles are co-written by multiple authors. To create this article, volunteer authors worked to edit and improve it over time.
This article has been viewed 33,491 times.
Learn more...
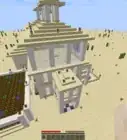
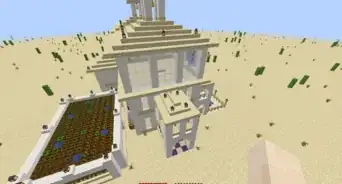
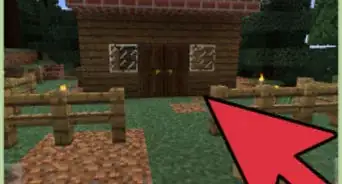
Making a nice house is the mark of an experienced player in Minecraft. With some help, and plenty of trial and error, you can make your own fancy house. One of the more popular builds is the Italian villa, known for its light, warm coloration and arching, airy structure. However, it can be a bit tricky if you don't know how to emulate it, especially since Minecraft is a rather blocky game. Once you get the technique down, though, you're ready to go!
Steps
Part 1
Part 1 of 2:
Considering and Gathering the Materials to Use
-
1Know the style you are trying to emulate. The Italian villa is a very light and open construct, with a light, but warm, color scheme. Ergo, you must consider your materials carefully to fit the overall color scheme of the structure.
-
2Consider Sandstone for walls. If you find yourself near the ocean or the desert, you can find that Sandstone is the most appropriate block for this venture. Sandstone's pale-yellow color and cobbled texture is appropriate, if not perfect, for the villa's walls. You can also make Sandstone variations—like Chiseled Sandstone, which has carvings all over it, and Smooth Sandstone, which is very much what its name states?—to widen your range of materials when building. Sandstone can also be crafted into Slabs and Stairs.
- If you dig a few blocks down from any sandy area, you'll find some natural Sandstone. This is because regular Sand is affected by gravity and tends to fall down without any supporting “solid” blocks.
- You can also make Sandstone by filling a 2x2 square on your crafting grid with Sand. Smooth Sandstone can be made by placing Sandstone on a 2x2 square on your crafting menu. Chiseled Sandstone is made by stacking two Sandstone Blocks on top of each other in a crafting grid.
Advertisement -
3Consider Quartz for walls. Quartz and Quartz Blocks is more readily available to later-game players who has access to the Nether. These have a whiter, more even color and texture than Sandstone, giving your villa a sleeker, more modern feel. In fact, Quartz is normally referred to as the marble substitute for aspiring Minecraft sculptors! Quartz itself can be mined in individual chunks, while Quartz Blocks have to be crafted. Much like Sandstone, Quartz Blocks also have the Chiseled variation and a Pillar (has lines running across it like Greek pillars) variation. You can also use this material to craft Stairs and Slabs.
- Quartz can naturally be mined from Netherrack with large white discolorations. You can craft Quartz Blocks much like Sandstone.
- You can craft Chiseled Quartz the same way as Chiseled Sandstone, and Pillar Quartz by stacking two Quartz Blocks on top of each other on any crafting grid.
-
4Decide which Woods to use. Minecraft has an abundance of Wood types for you to choose, but for the villa, it's better if you pick the warmest-colored Woods available. Jungle Wood is the preference, but Acacia, Dark Oak, and Spruce will suffice if you can't find a nearby Jungle. Oak and Birch are too pale for your villa, but can still be used for flooring, furnishing, or as a substitute for Quartz and Sandstone for one of the materials for your walls.
-
5Create Bricks. For the tile roof, the most appropriate material are Brick Blocks and Slabs. Bricks can be made by digging for Clay, usually found underwater in rivers and ponds. You can create Bricks by smelting the individual Clay pieces in a furnace, then craft Brick Blocks the same way as Sandstone and Quartz Blocks. You can also craft Slabs and Stairs with it.
- For later-game players, you can also use Nether Brick, which can be smelted from Netherrack and crafted the same way as regular Bricks. This material has a darker, slimmer texture, so it isn't as recommended as regular Bricks for the tile roofing of your Villa.
-
6Smelt Glass. Of course, a nice house needs nice windows. Glass can be acquired by smelting Sand in a furnace, and Glass Panes can be crafted by laying down two rows of Glass Blocks on your crafting table's crafting menu. Either can be used for your villa.
- You can also make Stained Glass by placing a dye in the middle of the 3x3 crafting menu of the crafting table, then surrounding it by Glass. You can make Stained Glass Panes using Stained Glass Blocks, then laying it out the same way you do for regular Glass Panes.
-
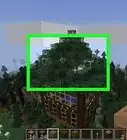
7Gather vegetation. Italian villas are full of greenery and flora. You can gather flowers, breed grass, plant trees, and place vines all over your villa for that authentic Italian look.
- You can find flowers nearly everywhere in Minecraft and they are easily picked by hand. Some of the rarer or larger flowers can be bred by using Bonemeal on the flower, and a duplicate of it is deposited as an item into your inventory or on the ground if your inventory is full. Regular flowers can't be reliably bred, but can be spawned by simply using Bonemeal on the ground and hoping to get the flower you like.
- Some flowers only exist in certain Biomes, so the Bonemeal method's yields can vary, depending on which biome you're in. If you want the widest selection of flowers, head on over to the Flower Forest and Flower Plains biomes, which are rich in colorful flora.
- Vines, Grass, Ferns, Desert Shrubs, and Leaves from trees can be only be harvested with Shears. Vines can be placed on any vertical surface; Shrubs, Grass, and Ferns can be placed on the ground; and Leaves need to be placed on Wood so it won't disappear.
- Shears can be made by placing two Iron Ingots diagonally on your personal crafting menu or your crafting table. You can then use it to “break” the flora without destroying it, letting you gather the frailest of plant matter in the game.


Advertisement
Part 2
Part 2 of 2:
Building the Villa
-
1Build wide. Italian villas are most commonly found in the countryside, and the more modern ones resemble mansions more often than not. Even when you're planning on making a small villa, build it in wider, open areas. Villas are also associated with lush, warmer environments and an abundance of greenery, so it's best to build it in the lush-type biomes like the Plains and its variations, or the Forest biome, but not the Swamp, Jungle, or Roofed Forest. In a pinch, the Savannah and Taiga biomes can work as well, though this will affect the color of Grass, Vines, Leaves, and Ferns.
-
2Build along the land. While most modern Italian villas are more mansion-like and built on large, flat expanses, you don't have to do exactly that. Older villas, especially in the countryside, follow the lay of the land, and often slope up and down with the hills. This, in turn, would lead to some impressive-looking structures, so don't be afraid to follow the land or build with differing levels!
- Searching the Internet for some references wouldn't hurt, so feel free to look up and copy some of the layout designs you spot!
- Sloping builds don't have to exactly follow the land, or at least the interior doesn't. If you think that the slope is too erratic or the area it slopes with is too small, feel free to hollow out a part of the hill and take some creative liberties with your floor design.
- For those who wish a flatter main house but decided (or can't help but) to build the house on a slope, you can just create the flat floor, fill in some necessary space in the foundation, and simply install pillars around the areas that go past the foundation ground to emulate balconies, patios, gardens, and such. Not only will it save you some resources, it will also look pretty impressive!
-
3Build the open walls. Italian villas have very large windows incorporated in their housing designs, giving them an open and sunny look. The easiest way to do this is to create a pillar segment, so to speak, at least 5 blocks long. You'll also need three types of wall material, four blocks of wood of your preference, and some two Glass Blocks for each segment, depending on how wide you want it.
- Here's the general guide to your materials:
p = pillar block
w = wall block
c = ceiling block
W = Wood
g = Glass (Panes or Blocks)
X = empty space
(...) = repeat - Place down the block you chose for your pillar material. Count three blocks away from it, then place another pillar block on the fourth. Then build up the pillars up to four blocks high in total.
p X X X p
p X X X p
p X X X p
p X X X p - Place your main wall material between the top and bottom rows of the wall.
p w w w p
p X X X p
p X X X p
p w w w p - Place two blocks of Wood on each side of the ensuing gap, and fill the middle with Glass Panes or Glass Blocks. Lastly, place the ceiling blocks on top!
c c c c c
p w w w p
p W g W p
p W g W p
p w w w p - If you want to extend the wall, simply treat the pillar block as a base, count three blocks, then place another pillar and build up another section!
c c c c c c c c c
p w w w p w w w p
p W g W p W g W p
p W g W p W g W p
p w w w p w w w p - You can even expand the wall segment to make the windows wider, if you want!
c c c c c c c
p w w w w w p
p W g g g W p
p W g g g W p
p w w w w w p - For corners, take your pillar blocks then create an L-shape where the walls meet, then build the rest of the walls along the pillars! This is so the building stays symmetrical inside and out, and preserves the pattern.
Top:
p p w w w p w w w (…)
p
w
w
w
p
w
w
w
(…) - Building the second floor is similar. Within the building, above the ceiling blocks, place another row of the same material. Then on that new layer, slowly place more of the same material blocks until it fills up the room to make a floor. Then simply repeat the steps for creating wall sections, and fill out the ceiling with more ceiling blocks!
Side:
c c c c c
p w w w p
p W g W p
p W g W p
p w w w p
c c c c c
c c c c c
p w w w p
p W g W p
p W g W p
p w w w p
Top:
p p w w w p w w w (…)
p c c c c c c c c (…)
w c c c c c c c c (…)
w c c c c c c c c (…)
w c c c c c c c c (…)
p c c c c c c c c (…)
w c c c c c c c c (…)
w c c c c c c c c (…)
w c c c c c c c c (…)
(…)
- Here's the general guide to your materials:
-
4Build arching pillars. Aside from the open design, Italian villas often have arching pillars incorporated in the design, especially for the patios, roofed balconies, and such. While tricky with such a blocky medium, it's doable with a pair of stairs and slabs. Take some blocks of your chosen material (you can use the same material as you built the walls with, stone or wood), and place them about 2–3 blocks apart to act as your pillar's support. Now, take any material you want for the arches, and simply place them on the sides of your arch's support block, with the steps of the stairs facing downwards. If you chose to place it 3 blocks apart, place a slab in between the two stairs. And there's your arch! You can use them for your entryway, the patio, or as walls to your garden!
a = arch block
s = stair
sl = slab
d = door
a s sl s a
a X X X a
a X X X a
or
a s s a
a X X a
a X X a- To make an arch for a single door, follow the three-block-gap pattern then place the doors behind the arch, on the wall. There aren't many feasible ways to create a single door arch pattern you can emulate with the arch alone, since it leave strange gaps on the top or sides of the door.
- To make on double doors, use the two-block-gap pattern, then you can place the doors either between them or behind them. This works better than the one-gap arc patterns since there's ample room for the arc and the doors without sacrificing the pattern.
-
5Build the sloping roofs. Normally, the roof of an Italian villa is a low, cheery red tile that slopes upwards, and sometimes flattening itself on the top. In Minecraft, this means that plain clay Bricks are your best bet for this.Take some Brick slabs, then place them along the top half of the outer portion of your walls, on top of the ceiling blocks. Then, on top of the outermost ceiling blocks themselves, place another set of slabs until it circles the entire wall.
(b) = brick slabs
b = brick Blocks
Top:
(b)(b)(b)(b)(…)
(b)(b)(b)(b)(…)
(b)(b) X X
(b)(b) X X
(b)(b) X X
(…)(…)
Side:
(b)(b)(b)(b)
(b)(b)(b)(b)
p w w w p
p W g W p
p W g W p
p w w w p- Place Brick Blocks behind the slabs on top of the ceiling blocks, making sure to fill up the rest of the roof.
Top:
(b)(b)(b)(b)(…)
(b)(b)(b)(b)(…)
(b)(b) b b
(b)(b) b b
(b)(b) b b
(…)(…)
Side:
b b b b
(b)(b)(b)(b)
(b)(b)(b)(b)
p w w w p
p W g W p
p W g W p
p w w w p - Add slabs on top of the Brick Blocks, just after the first row of blocks.
Top:
(b)(b)(b)(b)(…)
(b)(b)(b)(b)(…)
(b)(b) b (b)
(b)(b) b (b)
(b)(b) b (b)
(…)(…)
Side: (b)(b)(b)(b)
b b b b
(b)(b)(b)(b)
(b)(b)(b)(b)
p w w w p
p W g W p
p W g W p
p w w w p - Keep repeating this pattern of alternating slabs and bricks until you fill out the rest of the rooftop or reach enough layers according to your preference. Ideally, the layers should be around 5–6 in a smaller house. This will lend your villa a gracefully sloping roof.
- If this seems to tedious to you, you can just use Stairs instead, then after the fourth layer of stairs, you simply place slabs or bricks to close off the roof.
- Place Brick Blocks behind the slabs on top of the ceiling blocks, making sure to fill up the rest of the roof.
-
6Add vegetation. This might be the simplest step of this guide, seeing as all you have to do is add greenery to your villa.
- Place vines all over the sides of the walls. You don't need to place all the vines individually, since it naturally “creeps” down the walls after a while. Just place a couple on the highest part of your wall then wait for it to grow.
- Placing flowers and ferns on the ground along the walls can really improve the scenery as well.
- You can plant trees nearby, preferably the likes of Spruce and Birch. You can also make trees by placing a stack of Fence Posts about 2–3 blocks high, then placing some leaves around it to form a tree.
- Bushes can easily be made by placing a block of wood or wooden planks, then covering it with leaves. You can also place two Fence Posts about 1 block apart then place leaves in between to create a sort of neatly-cut topiary design.
- You can also place your plants in Flowerpots, both inside the villa and out! Flowerpots are crafted by placing 3 Bricks in a V-shape in your crafting table's grid. Once crafted, you can place nearly every type of "small" flora (like posies, dandelions, tulips, and mushrooms but not "big" ones like tall grass, ferns, rose bushes or sunflowers) in it, no matter what special conditions it has for planting. Do note that anything planted in a Flowerpot can't be bred or farmed!
-
7Experiment with your design. A villa doesn't have to remain symmetrical! Build differing floor heights, place the second floor only on one side, build an open garden on the rooftop, install three balconies if you want to. This is your villa after all! Build according to your preference, and don't be afraid to experiment and make mistakes. Soon enough, you'll have your very own, personalized Italian villa to call your home!


Advertisement
Community Q&A
-
QuestionHow can I build a wither storm in Minecraft without mods?
 Blueblazer9Community AnswerUse 4 blocks of soul sand in the shape of a T, then 3 wither skeletons on top of the upper 3 blocks.
Advertisement

About This Article
Advertisement