This article was co-authored by wikiHow Staff. Our trained team of editors and researchers validate articles for accuracy and comprehensiveness. wikiHow's Content Management Team carefully monitors the work from our editorial staff to ensure that each article is backed by trusted research and meets our high quality standards.
There are 7 references cited in this article, which can be found at the bottom of the page.
This article has been viewed 47,207 times.
Learn more...
Chainsaw chains are sized in a very unique way. Instead of 1 size measurement, these chains have 3: the pitch, the gauge, and the number of drive links. Fortunately, these numbers are often easily located on the side of the chainsaw bar. However, even if your chainsaw doesn’t have these measurements stamped on the side, you can still easily measure them yourself to determine the size of your chainsaw chain.
Steps
Finding the Measurements on the Chainsaw
-
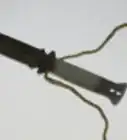
1Look on the side of the bar near the user end for the measurements. The bar of the chainsaw is the long metallic blade that the chain is wrapped around. The user end is the casing around the motor where the handle is located.[1]
- The chainsaw’s measurements are usually stamped on the right side of the bar, although this varies depending on the maker of the chainsaw bar.
-
2Read the left-most fraction printed on the bar to find the pitch. The denominator of this fraction will probably have an inch symbol next to it. The pitch is typically located below or immediately following the brand name of the chainsaw.[2]
- For example, if the number on the bar reads “3/8", this means that the chainsaw’s pitch is 3⁄8 inch (0.95 cm).
Advertisement -
3Check for a number next to an image of a drive link. The image will look like a shark’s tooth or an inverted triangle with 2 circles in the top corners. This number represents the number of driver links on the chainsaw chain.[3]
- You may also see a number next to the letters “DL” instead of an image of a driver link. For example, if your bar contains the phrase “72DL” on the side, this means your chainsaw has 72 drive links.
-
4Identify the number printed in both millimeters and inches. This number will likely be to the right of either the brand name or the drive link number. This measurement refers to the gauge of the chainsaw.[4]
- For example, if your chainsaw read “.050/1.3,” this means that the chain’s gauge is .050 inches (1.3 mm).
- This number may also have an image of a bar groove next to it.


Measuring the Chain Manually
-
1Measure the saw from the front to the tip to find the length of the bar. Place one end of the tape measure at the point where the motor casing ends and the metal blade begins. Use the tape to measure the distance from this point to the furthest cutting tip. Finally, round this measurement up to the nearest even number in inches. This is the length of the chainsaw bar.[5]
- There are several different types of chainsaws with different typical bar lengths. For example, the standard length of light-duty chainsaws is 10 to 14 inches (25 to 36 cm), while the typical bar length of heavy-duty chainsaws is 14 to 18 inches (36 to 46 cm).
- You may also see the chainsaw bar referred to as the chainsaw blade. These are the same thing.
- This length is sometimes called the “called length.”
-
2Gauge the length between any 3 rivets and divide by 2 to find the pitch. Rivets are the small, round pegs that hold the different segments of the chain together. Use your tape measure to find the distance between 3 consecutive rivets. This distance divided by 2 is equal to the distance between individual drive links in the chain itself.[6]
- For example, if the distance between 3 consecutive rivets on your chainsaw chain is 1 inch (2.5 cm), then the pitch would be this measurement divided by 2, or 1⁄2 inch (1.3 cm).
- The most common pitch measurements you’ll find on a chainsaw chain are 3⁄8 inch (0.95 cm) and .325 inches (0.83 cm).
-
3Remove the chain and count the number of drive links. Drive links are the triangular extensions on the underside of the chain that keep it attached to the bar. Use a wrench to remove the guide bar side panel, then use a screwdriver to release the tension on the chain. Pop the chain off the bar in order to count the drive links.[7]
- You’ll typically find somewhere between 66 and 72 drive links on a chainsaw chain. 16-inch bars typically have 66 drive links, while 18-inch bars usually have 72.
- Wear thick safety gloves during this step to minimize your risk of injury.
- To make counting the drive links easier, lay the chain down on a flat surface and arrange it in such a way that its driver links are aligned directly across from each other. This way, you can count pairs of driver links instead of each one individually.
-
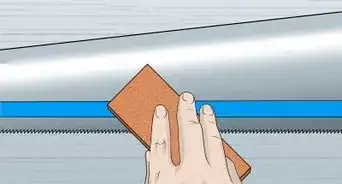
4Use a dial caliper to measure the thickness of a drive link. This measurement will give you the chain’s gauge. Close the jaws of your caliper around the drive link and read the value on the scale to find this measurement.[8]
- The most common gauge measurements are .050 inches (0.13 cm), .058 inches (0.15 cm), and .063 inches (0.16 cm).


Things You’ll Need
- Tape measure
- Dial caliper


References
- ↑ https://www.youtube.com/watch?v=eDYUvn6tTIE#t=1m40s
- ↑ https://www.youtube.com/watch?v=eDYUvn6tTIE#t=1m40s
- ↑ https://www.youtube.com/watch?v=eDYUvn6tTIE#t=1m58s
- ↑ https://www.youtube.com/watch?v=eDYUvn6tTIE#t=1m51s
- ↑ https://www.streetdirectory.com/etoday/how-do-you-measure-a-chainsaw-blade-and-chain-wljloa.html
- ↑ https://www.findsaw.com/what-is-chainsaw-pitch/
- ↑ https://www.youtube.com/watch?v=eDYUvn6tTIE#t=52s
- ↑ https://www.youtube.com/watch?v=eDYUvn6tTIE#t=1m29s
About This Article