wikiHow is a “wiki,” similar to Wikipedia, which means that many of our articles are co-written by multiple authors. To create this article, 213 people, some anonymous, worked to edit and improve it over time.
This article has been viewed 3,136,090 times.
Learn more...
Piercing your ears is a great way to give your lobes a glamorous upgrade—but can you really do it from the comfort of your own home? You’ve come to the right place. We’ve put together a comprehensive, step-by-step guide to help you pierce your own ears as safely and painlessly as possible. We’ll walk you through the simplest ways to set up for the piercing, the easiest piercing techniques you can try, and the smartest ways to care for your ears after the fact. With the proper precautions and aftercare, you’ll be rocking a stylish new pair of earrings in no time.
Steps
Setting up for the Piercing
-
1Use pre-packaged 70% isopropyl alcohol swabs to clean your ear. You must do this so that your ear is completely wiped clean of any bacteria that may have gotten into your piercing. Wait until the ear is dry to pierce it.[1]
- You can also use hydrogen peroxide or rubbing alcohol to sterilize your ear.
-
2Make a mark where you want your piercing(s) to go. It is important to plan ahead for where you would like the piercing to go; otherwise your piercing might end up crooked, too high, or too low. If you are piercing both of your ears, look in the mirror and make sure that the marks you have made on your ears are even.
- If you have other piercings and are doing your second or third piercing, make sure that you leave enough space in between piercings so that you can wear studs in both holes without the earrings overlapping. Likewise, don’t make your holes too far apart or they may look odd.
Advertisement -
3Get a sterile piercing needle. Piercing needles have a hollow center so you can easily slip your earring through your ear once you make a hole with the needle. Do not share needles with other people as this could lead to infection. Piercing needles can be cheaply obtained at many online vendors, as well at many piercing studios.[2]
- Make sure to use a needle that is one gauge bigger than the earring that you plan to wear. 16 gauge barbell studs combined with 15 gauge needles work well.
- You can also choose to buy a piercing package, which comes with two sterilized piercing earrings that have been loaded into a spring puncher. You can purchase these at beauty supply stores. Make sure to follow the directions on the package exactly as they are written.
-
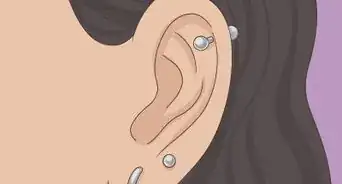
4Pick out your piercing earrings. The best thing for newly pierced ears, whether it's through lobes or cartilage, are studs. 16 gauge and about 10mm long (3/8") is a good size; the length allows for swelling, which can easily double the thickness of your ear.
- Some jewelry stores sell piercing earrings--these are earrings with a very sharp tip similar to a needle. These are good to use because they will re-pierce your ear as you slide it into the hole made by your needle.
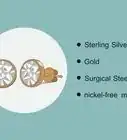
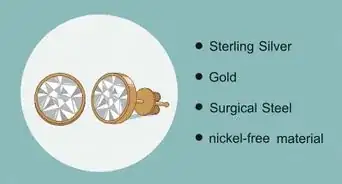
- If you can, purchase earrings of a higher quality metal such as silver or titanium. Metals of higher quality are less likely to infect your ear or cause an allergic reaction. Be aware that some people are allergic to lower quality metals like gold-plated metal.
-
5Sterilize the needle with an open flame. Do not reuse someone else's needles; your needle should come in a sterile package. Hold it there until the tip becomes red hot. You should wear sterile latex gloves while doing this so as to make sure that any bacteria on your hands does not get on the needle. Be sure to remove any soot or detritus. Wipe the needle clean with 10%+ rubbing alcohol or hydrogen peroxide. Be forewarned, this will only be a partial sterilization and will not kill all the potential microbes that may be on the needle. The only way to completely sterilize piercing utensils is by using an autoclave.
- You could also sterilize the needle by boiling water. Once the water is boiling, place the needle in the boiling water and let it stay there for 5 to 10 minutes. Remove it with tongs and only hold it with sterile latex gloves. Wipe the needle down with hydrogen peroxide or rubbing alcohol.
-
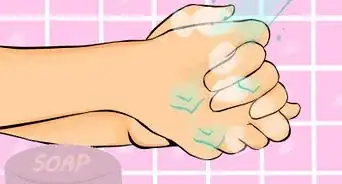
6Wash your hands with soap and water. This will decrease any chance of bacteria of spreading. Put on sterile latex gloves after you have washed your hands.[3]
-
7Keep your hair away from the spot you are planning to pierce. Your hair might get stuck in between your ear and the earring, or it could get pushed through the hole you make with the needle. If possible, tie your hair up and away from your ear.


Piercing Your Ear Safely
-
1Find something sturdy to put against your ear. You need to have something against your ear so that you can push the needle through your ear without accidentally piercing your neck too. A cold, clean bar of soap or a cork are both good choices. Avoid apples or potatoes, even though that’s generally what’s used in the movies. Apples, potatoes, or any other food may have bacteria on it that could infect your piercing.[4]
- If possible, have a friend (or friends) help you with the piercing. Either have them hold the cork against the back of your ear or, if you trust them immensely, have them do the actual piercing. This whole process is much easier to do when you have someone there to help you.
-
2Place the needle in the proper position. The needle should be perpendicular to your earlobe. This means that it should make a roughly 90-degree angle with the mark that you made on your ear. Positioning the needle this way will allow it to slide more effectively through your ear.
-
3Take a deep breath and stick the piercing needle smoothly through your ear. Make sure it goes through the spot you have marked. You may hear a popping noise when the needle goes through--don’t freak out! Wiggle the needle, then keep it bent at an angle. If you are using a hollow piercing needle, thread the jewelry through the center of the needle.
-
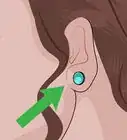
4Put the earring in your ear. After you've pierced your ear, and while the needle is sticking through the ear, place the shaft of the earring into the hollow tube of the needle and then push it all the way through the ear. This will leave the earring sitting comfortably in the new hole.
-
5Remove the piercing tool. Slowly remove the needle from your ear, making sure that the earring stays in place. Be aware that this will most likely be painful, but try not to rush it, as you don’t want the earring to fall out or else you will have to go through the piercing process again.
- Be aware that the hole you have made could close up in minutes if left without an earring in it. If your earring falls out, resterilize it as quickly as possible and try to fit it back through the hole. If it does not go through, you may have to pierce your ear again.


Taking Care of Your Pierced Ear(s)
-
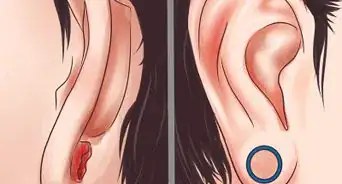
1Leave the earring in for six weeks. You should not take your earring out at any point. After the six weeks have passed, you can switch the earring out, but replace it with another earring immediately. It often takes six months to a whole year for the hole to fully take shape and not close up when you leave it without an earring for any duration of time.
-
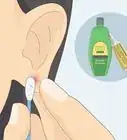
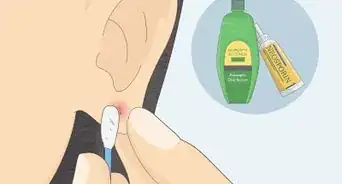
2Wash the piercing daily. Wash your ear with a warm saline solution.[5] Use sea salt or Epsom salt rather than normal table salt. The salt cleans out the piercing and keeps the hole from getting infected. Clean the piercing until it is fully healed (up to approximately six weeks). Don't use rubbing alcohol once the ear is pierced.
- An easy way to clean your ear is to find a small cup about the same size as your ear and put the salt water solution into that. Put a towel under the cup (to catch any overflow) and then lay on the couch and lower you ear slowly into the warm, salty water. 5 minutes of that and your ear will be feeling as good as new! "1 cup/250ml" measuring cups work well for this.
- You can also dip a cotton swab in the warm salt water solution and rub it around and against the piercing.
- There are also antiseptic solutions specifically made for newly pierced ears. You can buy them at beauty supply stores. Again, dip a cotton swab in the solution and then rub it in and around the piercing once a day.
-
3Rotate your earring when you clean it. Hold onto the stud part of the earring (the part in the front of your ear) and twist it so that it rotates in the hole. This will open up the hole you have made in your ear and will keep the hole from closing too tightly around the earring.
-
4Remove your piercing earrings and put new earrings in. Do this only after six weeks have passed. Put the new earrings immediately after taking the original earring out and cleaning the hole.
- It is best if your earrings are made of 100% surgical steel, titanium, or niobium, as these materials are not as prone to causing infection as cheaper materials.


Community Q&A
-
QuestionWill it hurt when I put the needle in?
 Community AnswerYes, but it also depends on your own pain tolerance. Most people liken the pain to getting pinched.
 -
QuestionCan I switch I earrings early as long as I clean it and always have an earring in?
 Community AnswerNo, you should only switch earrings after 5 to 6 weeks. Otherwise, the hole won't heal as fast as it would if you had left it in.
 -
QuestionDoes it look weird if it closes up?
 CuteUnicornCommunity AnswerNo, it ends up looking like a small scar the size of the needle you pierced it with.
Warnings
- Having your ear pierced by a professional is often much less tedious than doing it yourself.⧼thumbs_response⧽
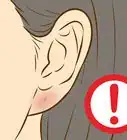
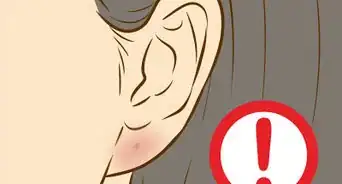
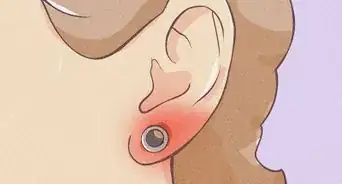
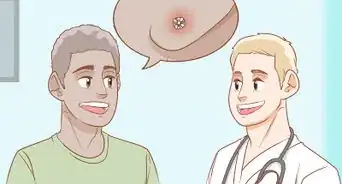
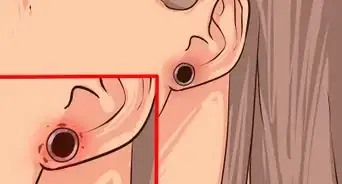
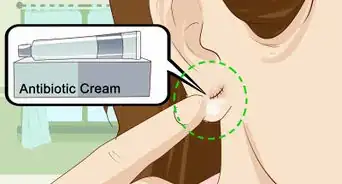
- Don't let your piercing become infected! If it does, do not remove the piercing! Doing so will seal the infection within the earlobe, which can cause many problems, such as an abscess. Rinse your ear continually with warm salt water. If the infection persists, see a doctor.⧼thumbs_response⧽
- Unless you actually know what you're doing, go to a professional and don't pierce yourself with a gun, safety pin or old ear piercing earrings. Safety pins are not made of the correct (or safe) material for piercing. Piercing guns can not be properly sterilized and the jewelry used is inserted using blunt force trauma that will kill the tissue in your ear.⧼thumbs_response⧽


References
About This Article
It’s best to get your ear pierced by a professional. But, if you are going to pierce your own ear, here’s how to do it safely. To pierce your own ear, you’ll need alcohol wipes, a clean cork or bar of soap, a sterile piercing needle, latex gloves, and an ear stud. Start by swabbing your ear with a 70% isopropyl alcohol wipe to clean away any bacteria on your skin. Use a marker to mark the spot on your ear where you want the piercing to go. If you’re piercing both ears, check your marks in a mirror to make sure they line up correctly. If your needle isn’t already sterile, sterilize it by holding the tip in a flame until it turns red. Then, wipe the needle clean with rubbing alcohol or hydrogen peroxide. Wash your hands with soap and water and put on a pair of latex gloves. If you have long hair, tie it back so it doesn’t get in the way. Put the cork or bar of soap behind your ear. This will provide extra support and prevent the needle from poking into your head or neck. Hold the needle at a 90° angle relative to the mark so it goes in nice and straight. Then, take a deep breath and slide the needle through the mark in one smooth, quick motion. You might hear a pop, especially if you’re piercing your cartilage. Don’t worry—that’s totally normal. Put the shaft of your ear stud in the open end of the needle. Then, pull the needle out through the back of your ear, leaving the stud behind in the piercing. Secure the backing onto the stud, and you’re done. To prevent infections, wash your piercing every day with a warm saline solution and gently rotate the stud in the piercing. After about six weeks, the piercing should be healed enough that you can take the stud out and put in a new earring. To learn how to take care of your new piercing, read on!