This article was co-authored by Edward Lewand. Edward Lewand is a Graduate Gemologist & Accredited Appraiser with over 36 years of experience in the jewelry industry. He completed his residency in graduate gemology at the G.I.A. in 1979, New York and now specializes in Fine, Antique and Estate Jewelry, consultations and expert witness work. He is a Certified Appraiser of the Appraiser Association of America (AAA) and an Accredited Senior Appraiser (ASA) of the American Society of Appraisers In Gems and Jewelry.
There are 18 references cited in this article, which can be found at the bottom of the page.
This article has been viewed 43,978 times.
Polishing quartz can be a little difficult, as it's a hard stone. However, you can do it by hand with a rotary tool and sandpaper. Alternatively, you can use a rock tumbler to polish rocks over several weeks. If you're more interested in polishing quartz countertops, bear in mind they don't actually need polishing; instead, keep them clean by wiping up spills immediately and deep cleaning at least once a week.
Things You Should Know
- Sand quartz crystal with 50-grit sandpaper and 150-grit sandpaper to smooth the surface. Wipe the crystal with a soft cloth to restore luster.
- Put the crystal in a rock tumbler with polishing grit and run the tumbler for 2 weeks. Then, tumble the quartz with soap and water, followed by rock polish.
- Wipe down quartz countertops daily with a damp cloth. Use a commercial cleaner to tackle stains and use an antibacterial cleaner once a week.
Steps
Polishing Quartz by Hand
-
1Clean the stones with soap and water if the quartz is dirty. Add a few drops of dish soap to a glass of water. Dip a rag or a small brush (such as an old toothbrush) into the water. Scrub the rock with the soap solution until you remove all the dirt and grime left from digging them out of the ground.[1]
- Rinse them well when you're done and let them air dry.
-
2Scrub off any iron deposits with an abrasive powder and brush. If your crystals are "stained" red with iron, you may need to scrub them a little harder than if they just have dirt on them. Try an aluminum or steel scrubbing brush, and scrub these areas thoroughly with a scouring powder, such as pumice.[2]
- Identify stained quartz by finding the red and brown patches on the crystals.
- Quartz is a very strong stone, and it will hold up to scouring while you scrub the red away.
Advertisement -
3Grind away the roughest edges with a small rotary tool after the stone is clean. If your quartz has large pieces you want to remove, cut off them off by sawing through them with a cutting wheel. Place the edge of the wheel against the part you want to cut away, then apply gentle pressure to grind through it. Don't press too hard, as you could harm yourself or the tool. For sharp edges in areas you don't want, use a grinding tool to wear away at the edge.[3]
- Also, take the time to "shape" the stone into roughly what you want the final stone to look like; grind off any areas you don't want.
- Use diamond-crusted or edged tools for this project, as quartz is very hard.
- Put on goggles and protective gloves to protect yourself.
-
4Sand the stone down to begin polishing it, starting with very coarse sandpaper. Pick a very coarse, hard sandpaper for the first round, such as a 50 grit. Work on sanding down the stone's rough edges. As they get smoother, use finer sandpaper, such as 150-grit, and sand it again. Keep moving down to progressively finer paper until the stone is fairly smooth.[4]
- At the end, use very fine grit sandpaper.
-
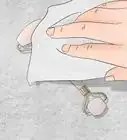
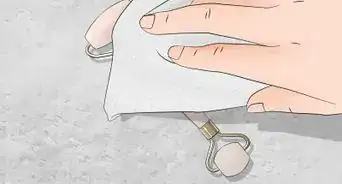
5Polish the stones with a rough fabric. Rub the stone thoroughly with the fabric, working on it until you start to see it shine. Quartz has a natural luster, so it should pick up a shine fairly quickly.[5]
- Denim, corduroy, or upholstery fabric work well for this.


Using a Rock Tumbler
-
1Place the quartz in the barrel of the tumbler. Fill the tumbler 3/4 full with your quartz rocks. You'll need room for water and grit, so don't pack it completely full of rocks. Plus, the rocks need space to tumble. Keep in mind that each stone will lose about 30% of its mass.[6]
- For home use, you have the options of a toy rock tumbler with a plastic barrel or a hobby tumbler. For quartz, a hobby tumbler is better as it is a tough rock to tumble.[7]
-
2Place 60/90 coarse grit aluminum oxide, baking soda, and water in the tumbler. Pour in 1 tablespoon (24 grams) of 60/90 coarse grit aluminum oxide for every 1 pound (0.45 kg) of rocks. Pour in 1/2 a teaspoon (3 grams) of baking soda if you have a small barrel or 1 teaspoon (6 grams) if you have a larger one.[8]
- Add enough water so you can just see it in the rocks.
-
3Tumble the rocks for at least 2 weeks before checking on them. Turn the tumbler on and let the rocks turn in the barrel. When time is up, open it to look at the rocks. If any of them are fully polished, take them out. If others still need polishing, leave them in.[9]
- If you take any stones out, replace them with new ones or use plastic pellet fillers to make the tumbler 3/4 of the way full.
- Add another 1 tablespoon (24 grams) of aluminum oxide for each 1 pound (0.45 kg) of rocks.
-
4Clean all the parts once the stones are done tumbling. Take out the stones, the pellets, and the grit. Clean everything, including the inside of the rock barrel. Scrub it down with soap and water and then put it back together.[10]
- Save the plastic pellets and write down that you used 60/90 grit on them. You can use them again but only with that grit level.
-
5Keep making the grit progressively smaller. Use 150/220 medium grit aluminum oxide next. Fill the barrel the same way. Add enough rocks to equal 3/4 of the barrel along with 1 tablespoon (24 grams) of grit per 1 pound (0.45 kg) of rocks, 1/2 teaspoon (3 grams) of baking soda, and water to cover the rocks.[11]
- Run it for 1-2 to weeks before cleaning and switching to 500 fine polish in the same proportions. Run it for another 1-2 weeks.
-
6Polish the rocks in the barrel with soap and water. Pour the rocks in and fill it up halfway with water. Add in a 0.25 cup (9.5 grams) of soap flakes. You can grate a non-sudsing bar soap for this purpose. Let it run for 3 days.[12]
- Wash the tumbler and rocks thoroughly.
-
7Finish polishing the rocks with rock polish. Add the rocks to the tumbler and 1 tablespoon (24 grams) of polish per 1 pound (0.45 kg) of rock. Fill the barrel up halfway with water. Check it in an hour to make sure the rocks have enough water to move around in and then check the rocks after a week to see if they have the shine you want.[13]
- Wash and dry the rock to see if it's shiny enough.


Cleaning Quartz Countertops
-
1Wipe up spills with water and dish soap when they happen. Quartz doesn't stain easily, but you should still get up liquids and spills as soon as possible. Pour a couple of drops of soap into a cup of water. Dip your rag in and wipe up the spill.[14]
- Rinse it with clean water when you're done.
-
2Scrape off old, dried on stains with a putty knife. If you do happen to leave a stain on the counter that dries, use a putty knife to pry or scrape it up. That will take care of dried-on bits, and then you can move on to using a cleaner to get up the residue.[15]
-
3Use commercial cleaners for more stubborn stains. Quartz isn't porous like granite, so you can use cleaning sprays meant for the kitchen. Don't use ones with bleach or ones that are heavily acidic. However, gentle kitchen cleaners are perfectly fine.[16]
-
4Deep-clean the countertops once a week with an antibacterial cleaner. Spray down the counters with the cleaner and leave it to soak into any stains for about 10 minutes, which will give it time to disinfect the counters. Wipe them down with a rag dipped in clean water to remove the spray.[19]
-
5Avoid using scouring pads. Scouring pads could remove some of the natural shine that quartz has. Opt for dishrags or even microfiber cloths instead, which are less likely to damage the countertops.[20]
- Similarly, skip harsh cleaning chemicals. Quartz countertops have resins holding them together, and the chemicals could damage those.
- Skip polishing quartz countertops. These countertops are a composite of resin and quartz rock, so they don't need polishing. They don't require sealing either. All in all, they are relatively low maintenance.[21]


Warnings
- Never empty grit water from a tumbler into the sink. Pour it outside!⧼thumbs_response⧽


References
- ↑ Edward Lewand. Graduate Gemologist & Accredited Appraiser. Expert Interview. 6 August 2019.
- ↑ https://www.mindat.org/article.php/403/Cleaning+Quartz
- ↑ https://sciencing.com/polish-rocks-gems-rock-tumbler-8164627.html
- ↑ https://sciencing.com/polish-rocks-gems-rock-tumbler-8164627.html
- ↑ https://sciencing.com/polish-rocks-gems-rock-tumbler-8164627.html
- ↑ http://www.myrockhound.com/gritsupplies/tumblinglappinginstruction.html
- ↑ https://geology.com/rock-tumblers/
- ↑ http://www.myrockhound.com/gritsupplies/tumblinglappinginstruction.html
- ↑ http://www.myrockhound.com/gritsupplies/tumblinglappinginstruction.html
- ↑ http://www.myrockhound.com/gritsupplies/tumblinglappinginstruction.html
- ↑ http://www.myrockhound.com/gritsupplies/tumblinglappinginstruction.html
- ↑ http://www.myrockhound.com/gritsupplies/tumblinglappinginstruction.html
- ↑ http://www.myrockhound.com/gritsupplies/tumblinglappinginstruction.html
- ↑ https://www.bobvila.com/articles/how-to-clean-quartz-countertops/
- ↑ https://www.bobvila.com/articles/how-to-clean-quartz-countertops/
- ↑ https://www.thisoldhouse.com/ideas/all-about-quartz-countertops
- ↑ https://blogs.extension.iastate.edu/answerline/2018/05/21/care-for-stone-countertops/
- ↑ https://www.bobvila.com/articles/how-to-clean-quartz-countertops/
- ↑ https://www.bobvila.com/articles/how-to-clean-quartz-countertops/
- ↑ https://www.thisoldhouse.com/ideas/all-about-quartz-countertops
- ↑ https://blogs.extension.iastate.edu/answerline/2018/05/21/care-for-stone-countertops/
About This Article

To polish a piece of quartz by hand, first scrub away any stains or deposits on the surface with a steel or aluminum scrub brush. You can also add a scouring powder for a little extra abrasion. Once the quartz is clean, use a rotary tool to file away any rough edges. To make your quartz extra smooth and shiny, polish the surface with sandpaper. Start with a coarse grit, such as 50, then work your way up to something finer, such as 150-grit. Once you’ve achieved the texture you want, rub the stone with a polishing cloth to make it nice and shiny. For more expert tips, like how to polish quartz in a rock tumbler, read on!