This article was co-authored by Essie Karimi and by wikiHow staff writer, Janice Tieperman. Essie Karimi is a Professional Tailor and the Owner of Sew Fit Tailoring & Alterations, a sewing shop that has been operating for over 40 years. Essie specializes in tailoring, alterations, sewing, repairs, and redesign. Essie works on a variety of clothing types, including wedding dresses, formal wear, casual wear, sportswear, swimwear, and uniforms.
There are 11 references cited in this article, which can be found at the bottom of the page.
This article has been viewed 23,339 times.
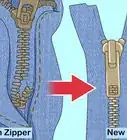
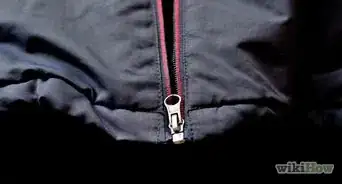
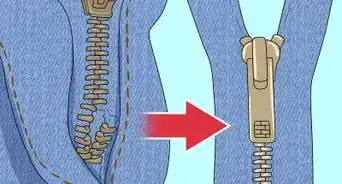
Invisible zippers add a sleek, flattering touch to your garments, but it can be frustrating when they stop cooperating. Invisible zippers tend to split at the seams, or the zipper slide can get detached from the zipper altogether. Not to worry! With a bit of focus and patience, you can repair your invisible zipper and get your garment back in working order.
Steps
Separated Zipper Seam
-
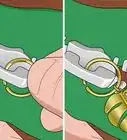
1Clip away the bottom stop from the end of the zipper. Look for a thin, metal bar along the very bottom of the zipper. Grab a pair of nippers or pliers and cut off this stop—you need to remove it completely so you can separate both sides of the zipper.[1]
- You’ll need to separate the zipper to make the repair.
- Nippers are a chunky, plier-like tool that help you make small adjustments.
-
2Slip the slider off the zipper completely. Grab the zipper tab and guide the slider down off the teeth. Don’t worry—since you’ve already removed the bottom stop, you can pull off the slider completely.[2]Advertisement
-
3Feed the zipper tape through the right side of the slider. Take the top right portion of the zipper tape and thread it through the right side of the zipper slider. It may take a few tries before the material goes through the zipper, so don’t be discouraged![3]
- Zipper tape is the material that the zipper teeth are attached to.
-
4Thread the other zipper tape through the left side. Repeat the same process with the left portion of the zipper, feeding the tape through the left part of the slider. At this point, your slider should be at the very top of the zipper teeth.[4]
-
5Tug both sections of zipper tape apart. This next part can be a little tricky—in order to thread the slider back on the zipper tape, you’ll need to create some opposing force. That’s where the ends of the zipper tape come in! Pull apart both ends of the tape, creating a “V” shape.[5]
- You’ll need a free hand to pull on the actual zipper slider. If you can, try to pull apart both sides of the zipper tape with 1 hand.
-
6Pull the slider toward you as you continue pulling the zipper tape in opposite directions. Hold the end sections of zipper tape apart with 1 hand while gripping the zipper tab with your free hand. Give the tab a good tug to force the slider back onto the zipper.[6]
- Pull the zipper tape in opposite directions and pull on the zipper again if it doesn’t feed back onto the teeth. It may take several tries before this works!
-
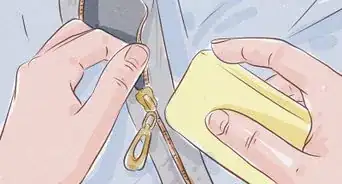
7Create a new bottom stop by melting the bottom-most zipper teeth with a soldering iron. Zip up your zipper so both rows are touching one another. Then, grab your soldering iron and melt a small section along the bottom of your zipper, which will act as the new bottom stop. You’re now able to use your zipper as normal again![7]


Detached Zipper Slider
-
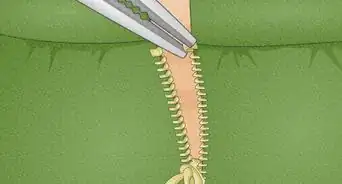
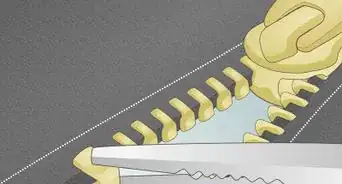
1Clip off the top stop and nearby teeth from your zipper. Search along the top of your zipper for a thin, metal bar—this is known as a top stop, and it helps keep your slider from slipping off completely. Grab a set of nippers or pliers and remove this top stop, along with a couple of teeth on each side of the zipper. This will make it easier for you to reattach and repair your invisible zipper.[8]
-
2Feed both sections of the zipper tape into the zipper slider. Grab the left section of tape and thread it through the right side of the zipper mouth. Repeat this process with the right section of zipper tape, so the slider is completely reattached.[9]
-
3Tug the zipper slider down to the top of the zipper teeth. The slider will stop when it reaches this top section.[10]
- Invisible zipper sliders have a built-in lock on the inside. This lock is what’s preventing the zipper from sliding back onto the teeth.
-
4Pull both sections of zipper tape apart. Your invisible zipper will need some extra force to help guide the slider back onto the teeth. Help the process along by pulling apart the ends of the zipper tape with 1 hand.[11]
-
5Yank the slider up and then down while still separating the tape. Jerk the slider upward in a quick motion. Then, quickly pull the zipper downward. At this point, the zipper should thread back onto the teeth.[12]
- Pull both sections of tape apart and tug on the zipper tab a few more times if the slider doesn’t reattach at first. Invisible zippers can be finicky, so don’t give up!
-
6Create a new top stop with a soldering iron. Grab a soldering gun and melt the top couple of teeth along each row. This will replace the metal stop that you clipped off in the very beginning. Now, you’re ready to use your invisible zipper again![13]
- It’s okay if the soldered section doesn’t look great. Since it’s an invisible zipper, no one will be able to see it!


Warnings
- If the zipper teeth are bent in any way, your zipper won’t work properly. Clip off the problematic teeth so your zipper can move smoothly over the teeth.[15]⧼thumbs_response⧽
Things You’ll Need
- Soldering iron


References
- ↑ https://www.thecreativefolk.com/fix-zipper-dress
- ↑ https://m.youtube.com/watch?v=kqVeA6g5ycg&t=3m24s
- ↑ https://m.youtube.com/watch?v=kqVeA6g5ycg&t=4m4s
- ↑ https://m.youtube.com/watch?v=kqVeA6g5ycg&t=4m31s
- ↑ https://m.youtube.com/watch?v=kqVeA6g5ycg&t=5m45s
- ↑ https://www.thecreativefolk.com/fix-zipper-dress
- ↑ https://www.thecreativefolk.com/fix-zipper-dress
- ↑ https://m.youtube.com/watch?v=kqVeA6g5ycg&t=9m30s
- ↑ https://m.youtube.com/watch?v=kqVeA6g5ycg&t=10m18s
- ↑ https://m.youtube.com/watch?v=kqVeA6g5ycg&t=10m40s
- ↑ https://www.thecreativefolk.com/fix-zipper-dress
- ↑ https://m.youtube.com/watch?v=kqVeA6g5ycg&t=10m55s
- ↑ https://www.thecreativefolk.com/fix-zipper-dress
- ↑ https://www.FixnZip.com/fixing-an-invisible-zipper/
- ↑ https://m.youtube.com/watch?v=kqVeA6g5ycg&t=4m55s
About This Article