This article was co-authored by Jacob Pischer. Jacob Pischer is a Home Improvement Specialist and the Owner of Helpful Badger, a home repair service in Portland, OR. With over four years of experience, Jacob specializes in a variety of handyman services including pressure washing, cleaning gutters, repairing drywall, fixing leaky plumbing fixtures, and repairing broken doors. Jacob studied at Madison Area Technical College and has a background in real estate investment.
There are 11 references cited in this article, which can be found at the bottom of the page.
This article has been viewed 50,748 times.
If a defective doorbell is failing to alert you that you have visitors, or listening to the same monotonous chimes year after year is making you want to tear your hair out, it may be time upgrade to a new and improved system. Replacing a doorbell is simple enough and you should be able to tackle this in a matter of minutes. After turning off the electricity and removing your old doorbell unit, just fit the new one into place, fasten it to the wall, and reconnect the wires. Here’s everything you need to know to get the job done.
Steps
Removing the Old Doorbell
-
1Turn off the electricity to the doorbell. Even though there’s not much current running through it, the doorbell is an electrical appliance. Find the switch indicating the doorbell unit on your home’s circuit breaker and flip it to the “off” position. This will stop the flow of electricity and allow you to work safely.[1]
- Attempting to remove or modify your doorbell without first making sure that the electricity is off could result in a nasty shock.
- If your circuit breaker isn't clearly labelled or you want to confirm that the power is off for safety's sake, press the doorbell button. If it rings, it means there's still current flowing to it.
-
2Remove the doorbell’s outer housing. Locate the interior doorbell unit. This is the small, speaker-like box that emits sound when the doorbell button is pressed. Once you’ve found it, unscrew the outer cover and set it aside. Some covers may not be secured with screws—these will simply pop off when enough pressure is applied.[2]
- Most doorbell units are situated in the hallway or foyer close to the front entrance.[3]
- If you’ve never replaced your doorbell before and you’re unsure where it is, have someone press the button and listen for where the sound is coming from.
Advertisement -
3Disconnect the wires from the doorbell unit. With the inner workings exposed, you should see 2 or 3 colored wires running to separate terminals in the center of the unit. Loosen the screws holding these wires in place and pull them free from the terminals. Pay close attention to the internal layout of the unit so you’ll remember how it needs to be configured.[4]
- It’s a good idea to tag the wires or mark the terminals with the corresponding color to help you remember what goes where. If you don't want to go to all that trouble, simply take a snapshot with your phone.[5]
- Typically, there will be 1 wire for the front doorbell and 1 for the transformer, with an additional wire if you have a separate doorbell for the back door. When the doorbell is pressed, a small current is directed from the button to the box unit, activating a series of chimes.
- If the old doorbell wasn't working, use a battery tester or a meter to make sure the wires are intact before you install the new doorbell. If they're not, consider switching to a wireless doorbell, instead.[6]
-
4Detach the doorbell from the wall. Unscrew the old unit and lift it away from its base, maneuvering it around the wiring carefully. The new unit will go in the same spot for a quick and easy switch-out.[7]
- Chuck your old doorbell in the trash, or consider having it repaired and using it as a backup in case you experience a problem with the new one.


Installing the New Doorbell
-
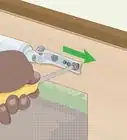
1Fit the new doorbell into place. Mount the unit on the wall, guiding the wires through the slots in the face. Make sure the edges and corners are straight and that all screw holes are aligned. If the new doorbell differs in size from the old one, adjust it until you’re satisfied with the placement.[8]
- Attaching a different model may require you to drill new holes.
- Use a level to line up the edges of the new unit more precisely.[9]
-
2Secure the doorbell to the wall. Re-insert and tighten the screws by hand. If you drilled a fresh set of holes, double check that they’re the right size to support the new unit.[10]
- Use plastic anchors to keep your walls from being damaged by the screw threads.[11]
- Replace the screws in the upper corners first to hold the unit in place while you finish tightening the bottom corners.
-
3Reconnect the wires. Remember to run the wires to their appropriate terminals. Match them up with their designated colors or labels before screwing them down. Otherwise, the doorbell won’t work correctly.[12]
- Crossing up the wires could even put the doorbell in danger of shorting out.
-
4Snap the housing into place. Fit the outer cover over the new unit and press it until it clicks. If the unit features a faceplate with separate screws, make sure they’re each properly fastened. That’s all there is to it!


Testing Your New Doorbell
-
1Flip the breaker for the doorbell back on. Head back to your home’s circuit breaker and switch it over to the “on” position. Once the electricity has been restored, your new doorbell will be operational.
- Avoid handling the new doorbell unit while the electricity is live.
-
2Press the doorbell button. You should hear it chime loud and clear, in which case you can call it a day and admire your handiwork. If it doesn’t make a noise, there may be an issue with the wiring. Double check that the colored wires are running to the right terminals and that each connection is secure, then give it another shot.[13]
- Push the button a few times to make sure it works consistently.
- A dysfunctional doorbell with no obvious causes may be the result of a bad wire or transformer. Call an electrician to come out and take a closer look at your doorbell’s power source and replace it if necessary.[14]
-
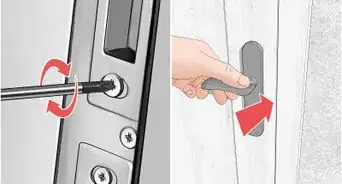
3Replace a bad doorbell button. Should you discover that the doorbell still doesn't work after upgrading the inside unit, the problem may be with the button itself. Dead doorbell buttons are an easy fix—just unscrew the faceplate, put a new button in its place and reconnect the wires on the backside. It should work like a charm the next time you give it a push.[15]
- Use a small strip of tape to keep the wires from falling into the hole in the door frame while you switch out the buttons.
- While you have the doorbell faceplate off, it may be a good idea to test the outgoing current using a multimeter tool to see if bad wiring is to blame.[16]
-
4Listen for the doorbell from different parts of your home. Have a helper press the doorbell a few times as you move throughout the house. That way, you can confirm that it’s audible from every room. New doorbell chimes can take some getting used to, especially if you’ve been using the same ones for years.
- If you live in a big house, you might find it useful to install 2 different doorbells for the front and back doors. Each will have a distinctive chime to let you know which door your visitors have arrived at.[17]


Expert Q&A
Did you know you can get expert answers for this article?
Unlock expert answers by supporting wikiHow
-
QuestionHow do I know if the problem is my old doorbell or the wiring?
 Jacob PischerJacob Pischer is a Home Improvement Specialist and the Owner of Helpful Badger, a home repair service in Portland, OR. With over four years of experience, Jacob specializes in a variety of handyman services including pressure washing, cleaning gutters, repairing drywall, fixing leaky plumbing fixtures, and repairing broken doors. Jacob studied at Madison Area Technical College and has a background in real estate investment.
Home Improvement SpecialistIf you're replacing a wired-in doorbell, use a battery tester or a meter to make sure everything is conductive all the way through. If it's not, there's a cut in the wire somewhere, and you're better off switching to a wireless doorbell.
Support wikiHow by unlocking this expert answer.
Things You'll Need
- Doorbell unit
- Screwdriver
- Masking tape, sticker labels, or colored markers
- Level
- Electric drill (optional)
- Screws (optional)
- Plastic wall anchors (optional)


References
- ↑ https://www.homedepot.com/c/how_to_replace_a_doorbell_button_HT_PG_EL
- ↑ https://www.thisoldhouse.com/how-to/how-to-fix-doorbell
- ↑ http://www.all-about-the-house.com/troubleshooting-and-repairing-a-broken-doorbell/
- ↑ https://www.youtube.com/watch?v=ksuyK8og0oM&feature=youtu.be&t=43
- ↑ https://www.thisoldhouse.com/how-to/how-to-fix-doorbell
- ↑ Jacob Pischer. Home Improvement Specialist. Expert Interview. 4 September 2020.
- ↑ https://www.homedepot.com/c/how_to_replace_a_doorbell_button_HT_PG_EL
- ↑ https://www.youtube.com/watch?v=KZtZX0dilUA&feature=youtu.be&t=83
- ↑ https://www.youtube.com/watch?v=ksuyK8og0oM&feature=youtu.be&t=58
- ↑ https://www.homedepot.com/c/how_to_replace_a_doorbell_button_HT_PG_EL
- ↑ https://www.naturalhandyman.com/iip/inffastener/infanchor/infanchor.html
- ↑ https://www.thisoldhouse.com/how-to/how-to-fix-doorbell
- ↑ https://www.homedepot.com/c/how_to_replace_a_doorbell_button_HT_PG_EL
- ↑ https://www.bobvila.com/articles/how-to-install-a-doorbell/#.WftmxmhSzIV
- ↑ https://www.youtube.com/watch?v=KZtZX0dilUA&feature=youtu.be&t=26
- ↑ https://www.thisoldhouse.com/how-to/how-to-fix-doorbell
- ↑ http://articles.chicagotribune.com/1999-06-26/news/9906260080_1_chimes-transformer-wiring
About This Article