This article was co-authored by wikiHow staff writer, Jennifer Mueller, JD. Jennifer Mueller is a wikiHow Content Creator. She specializes in reviewing, fact-checking, and evaluating wikiHow's content to ensure thoroughness and accuracy. Jennifer holds a JD from Indiana University Maurer School of Law in 2006.
There are 11 references cited in this article, which can be found at the bottom of the page.
This article has been viewed 12,962 times.
Learn more...
The last part of setting up any guitar or bass so it will play ideally for you is to set the intonation. If your instrument's intonation is off, you'll sound like you're playing out of tune, even if you've tuned your strings to perfect pitch. If your instrument has a Floyd Rose bridge, the process of setting your intonation is a bit more of a hassle than it is with other bridges, unless you have "The Key" — an intonation tool created by Floyd Rose specifically for their original bridges. Without The Key, you're better leaving this job to a guitar tech unless you're thoroughly familiar with the parts of your guitar and how they work together.[1]
Steps
Adjusting the Saddle Manually
-
1Hold your guitar as you do while playing it. Guitars pull on the strings differently depending on how the instrument is oriented. You want your intonation to be as close to perfect as possible while you're playing your instrument, not while it's lying flat on a table.[2]
- If you move your guitar around while you're playing, you might be tempted to check it in different positions. However, it's not possible to have the ideal intonation in every intonation, so choose the position that you're holding your instrument in the majority of the time.
-
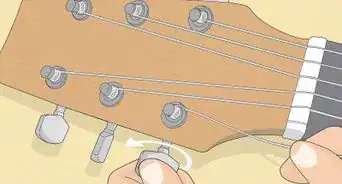
2Loosen all the nut clamps. Your strings are locked at the nut with clamps that are easily loosened using a hex key. If you don't loosen the nut clamps before adjusting the bridge, your string could snap.[3]
- You don't need to remove the screws entirely. Simply loosen them until your string can move freely.
Advertisement -
3Tune your instrument using an electronic tuner. When you set your intonation, you'll be making tiny, precise changes, so you need a precise tuner that's capable of picking up minute differences in tone. Tune your instrument with the nut clamps loosened.[4]
- When you're done tuning your instrument, keep your tuner close by. You'll likely need to use it several times to set the intonation for each string.
-
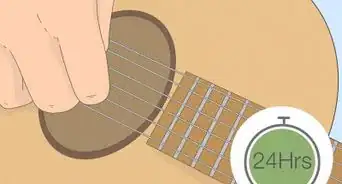
4Pluck the first open string to confirm it's in tune. You can start with any string you want, but it usually makes sense to start with the first string and move on to the next. Pluck the string next to your tuner to confirm that it's still in tune.[5]
- If your string is out-of-tune, fix it before starting the intonation process. Otherwise, everything you do to set the intonation for that string will also be off.
-
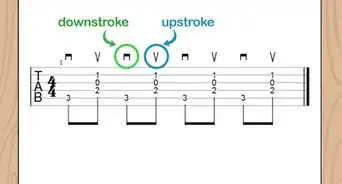
5Fret the first string at the 12th fret to check if it's sharp or flat. Fret the first string at the 12th fret, then pluck it and look at your tuner. Your intonation is flat if it's registering lower than the correct pitch. It's sharp if the tone is registering higher than the correct pitch.[6]
- You can also compare the tone when you fret at the 12th fret to the 12th harmonic. To hear the harmonic, tap the string at the 12th fret so the string will chime.
-
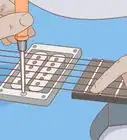
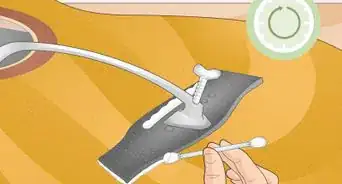
6Loosen the string so you can unscrew the saddle-locking screw. To loosen the saddle-locking screw, you have to be able to get a hex key to it. However, the string runs across the screw, so you'll have to create some slack in the string so you can move it to the side. Then take your hex key and loosen the saddle-locking screw.[7]
- Simply loosen the screw — try to avoid taking it all the way out. If you do, at least note which hole it's in so you can replace it correctly.
- Avoid simply pushing the string out of the way without loosening it. Although this seems like a short-cut, you could stretch the string and ruin your previous work.
Alternative: If you don't want to loosen the string, you can also depress the tremolo all the way down until the strings have slackened and no longer pull on the saddle. You'll have to hold the tremolo in this position the whole time you're adjusting the bridge, so make sure you can do this comfortably.
-
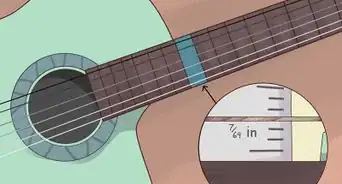
7Nudge the saddle in 1/16-inch (about 1.5 mm) increments. Use micro-adjustments to keep from moving too far in one direction or the other. Move the saddle either towards or away from the fretboard depending on the intonation you found at the 12th fret:[8]
- If your intonation is sharp (higher than the correct pitch), you want to increase the length of the string by moving the bridge further away from the fretboard.
- If your intonation is flat (lower than the correct pitch), you want to decrease the length of the string by moving the bridge closer to the fretboard.[9]
-
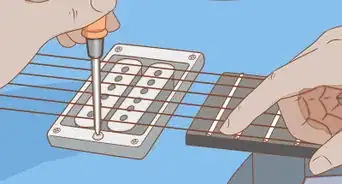
8Tighten the saddle locking screw to clamp the saddle to the baseplate again. When you think you're done adjusting the saddle, reverse your actions to tighten the saddle locking screw. Make sure the saddle sits flush with the baseplate.[10]
- If you took the screw out, make sure you get it back in the same hole. That will help ensure that the saddle sits flush with the baseplate.
-
9Tune the string back up to pitch and check it again. Re-tune the string, then fret it at the 12th fret and check if the tone is sharp or flat. If it's still off, you'll have to repeat the process of adjusting the saddle again. Otherwise, you're done with that string.[11]
- If this is the first time you've ever set intonation, you'll likely have to do this several times. Before you get a feel for it, you'll probably overcorrect at first. Have patience and focus on getting it right. Try to learn from your mistakes and the process will get more smooth.
-
10Repeat the same process for the rest of the strings. Once you've got the intonation set in the first string, go back and repeat the entire process with the second string, and so on, until all of your strings have good intonation. Make sure you tighten the nut clamps when you're done, then check one last time to make sure all your strings are in tune.[12]
- You'll likely have to detune and retune each string several times before you've figured out the correct saddle position for each string. Although this can be a hassle that takes several hours, having good intonation will be worth it in the end.


Using "The Key" Intonation Tool
-
1Confirm that you can use The Key with your instrument. Floyd Rose created The Key to make it easier to set the intonation on Floyd Rose bridges. However, The Key only works on Original Floyd Rose (OFR) style bridges. If you have another type of locking bridge, you'll have to use the manual method.[13]
- You can buy this tool online or at any guitar store. It runs around US $25, so it's a worthwhile investment f you regularly set up guitars or basses with OFR style bridges.
-
2Unlock your nut clamps. Use a hex key to loosen the bolts on your nut clamps. Since you'll only be doing one string at a time, it's typically best to only unlock one string at a time. However, you can also unlock them all at once if you want to save yourself an extra step for each string.[14]
- The benefit of only unlocking the nut clamp on one string at a time is that you prevent the other strings from moving while you're tuning the string and adjusting the bridge.
Tip: Unlocking all of the strings at once won't affect the process of setting your intonation. Whether you unlock them all at once or do them one at a time is a matter of personal preference. Just make sure they're all re-locked before you play your guitar.
-
3Link the teeth of the tool to the back of the bridge's whale tail. The tool has a thumbwheel on the back and teeth coming out of the front. Those teeth are designed to grab the head of the screw. Line the teeth up with either side of the string you're working on. You'll feel it snap into place if you've got it inserted through the back of the whale tale correctly.[15]
- You can only work on one string at a time with The Key. However, it makes the process easier because you don't have to loosen the string and you don't have to re-tune it multiple times to get the intonation right.
-
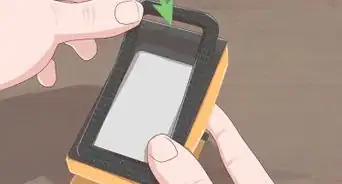
4Turn the thumbwheel to grab the head of the screw. Slowly turn the thumbwheel clockwise, watch the teeth of the tool. Keep turning until you can see that the teeth have grabbed on to the head of the screw.[16]
- You can also give the tool a little tug to confirm that the teeth of the tool have taken hold of the screw.
-
5Unlock the saddle-mounting screw. Unlike when you're setting intonation manually, you don't have to loosen the string to remove the saddle-mounting screws. You can simply push the string to the side. Loosen the screw until the saddle is unlocked.[17]
- Only unlock the screws for one string at a time, then re-tighten it when you're done with that string.
-
6Check the tone of the first string at the 12th fret. Tune the first string if necessary. Then, fret it at the 12th fret, pluck the string, and look at your tuner to see if it's flat (lower than it should be) or sharp (higher than it should be).[18]
- You can also compare the tone when you fret the string at the 12th fret to the 12th harmonic. Tap the string at the 12th fret to make it chime for the harmonic sound. Then, determine if the tone of the fretted string is higher or lower than that harmonic.
-
7Adjust the saddle as necessary to correct the intonation. If the tone is sharp (higher than it should be), move the bridge away from the fretboard by turning the thumbwheel clockwise. If the tone is flat (lower than it should be), turn the thumbwheel counter-clockwise to move the bridge forward toward the fretboard.[19]
- Once you've made your adjustment, re-tune the string and check the intonation again. You may need to do this several times. However, it's a much quicker and more straightforward process than if you were setting the intonation manually.
-
8Remove the tool and repeat the process with the other strings. When you're done with a string, tighten the saddle-mounting screw to lock the bridge in place. Then, loosen the key with the thumbwheel to take some of the pressure off, then pull it off the whale tail and attach it in line with the next string. Unlock the saddle-mounting screw for that string and set the intonation.[20]
- When you've finished setting the intonation, check to make sure all screws are tightened. When the process is complete, you may need to re-tune your guitar one more time.


Warnings
- Setting up a guitar or bass is a relatively advanced skill. If you aren't familiar with all the parts of your instrument and how they work together, you're better off getting your guitar set up by an experienced luthier.⧼thumbs_response⧽


References
- ↑ https://hazeguitars.com/blog/setting-intonation-on-a-floyd-rose
- ↑ https://www.guitarrepairbench.com/electric-guitar-repairs/adjust-intonation-electric-guitar/
- ↑ https://floydrose.com/blogs/tech-talk/intonation-your-floyd-rose
- ↑ https://floydrose.com/blogs/tech-talk/intonation-your-floyd-rose
- ↑ https://hazeguitars.com/blog/setting-intonation-on-a-floyd-rose
- ↑ https://floydrose.com/blogs/tech-talk/intonation-your-floyd-rose
- ↑ https://hazeguitars.com/blog/setting-intonation-on-a-floyd-rose
- ↑ https://floydrose.com/blogs/tech-talk/intonation-your-floyd-rose
- ↑ https://guitargearfinder.com/guides/guitar-intonation/
- ↑ https://hazeguitars.com/blog/setting-intonation-on-a-floyd-rose
- ↑ https://floydrose.com/blogs/tech-talk/intonation-your-floyd-rose
- ↑ https://hazeguitars.com/blog/setting-intonation-on-a-floyd-rose
- ↑ https://hazeguitars.com/blog/setting-intonation-on-a-floyd-rose
- ↑ https://youtu.be/KqMtqFfImgE?t=43
- ↑ https://youtu.be/KqMtqFfImgE?t=68
- ↑ https://youtu.be/KqMtqFfImgE?t=77
- ↑ https://youtu.be/KqMtqFfImgE?t=100
- ↑ https://youtu.be/KqMtqFfImgE?t=143
- ↑ https://youtu.be/KqMtqFfImgE?t=172
- ↑ https://youtu.be/KqMtqFfImgE?t=213
- ↑ https://hazeguitars.com/blog/setting-intonation-on-a-floyd-rose
About This Article