This article was co-authored by Kent Bry. Kent Bry is a certified ski and snowboarding instructor and the director of Adventure Ski & Snowboard, a school based in the San Diego, California metro area. With over 50 years of skiing and snowboarding performance and instruction experience, Kent is certified by the Professional Ski Instructors of America (PSIA). Adventure Ski & Snowboard is a member of the PSIA and the American Association of Snowboard Instructors (AASI). Kent holds a BS in Recreational Therapy from San Diego State University and is also a California-registered recreational therapist.
There are 11 references cited in this article, which can be found at the bottom of the page.
wikiHow marks an article as reader-approved once it receives enough positive feedback. In this case, several readers have written to tell us that this article was helpful to them, earning it our reader-approved status.
This article has been viewed 1,091,909 times.
While the idea of skiing may inspire images of powdery snow, gorgeous vistas and steamy hot chocolate, it is important to remember that skiing is no walk in the park. It is, however, a thrilling sport that can satiate anyone's need for an adrenaline rush. If you've always wanted to try out skiing but have not yet had the opportunity to do so, this guide can help you get started. Keep in mind that while this article covers the basics of alpine ("downhill") skiing, it is not a substitute for actual lessons — read on and then go enroll in a class to begin to have ridiculous amounts of snowy fun!
Steps
Knowing the Rules of the Slope
-
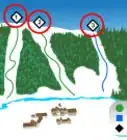
1Learn how to distinguish trail difficulty. You can tell how hard a trail is by the symbol on the trail marker or ski map. In North America, trail difficulty is indicated as follows:
- A green circle indicates an easy, or beginner, trail.[1] These trails are not too steep, will contain few or no obstacles, and usually aren't too long.
- A blue square indicates an intermediate trail.[2] It may contain some obstacles, moguls (many small bumps of snow), or have a steeper grade. You shouldn't go on these until you've mastered the easier trails.
- A double blue square indicates a difficult blue, and under bad snow conditions, can be closer to a black diamond trail. However, these are less commonly found across North American resorts.
- A black diamond indicates a difficult trail.[3] It may contain obstacles, steeper moguls, and a steep grade with a narrow way down. Don't attempt a trail like this if you are uncomfortable with the most difficult blue runs. If you doubt you are ready, you probably aren't. Many people have been injured by attempting too difficult a run too early.
- A double black diamond, or a black diamond with an exclamation mark in it, indicates a run that should only be attempted by very advanced skiers. Do not go down a run like this unless you are completely comfortable with all other single black diamond runs. It's a good idea to ski these runs with a partner. Once you are ready for a double black, be sure it does not have "EX" in the middle. This indicates an 'Expert Only" trail, the only thing harder than this is heli-skiing. (Where they drop you off in helicopters. These slopes are very avalanche prone.)
- In European countries a red trail is equivalent to double black diamond
-
2Know that these difficulty ratings are only in comparison to other trails at the same resort. Therefore, a run marked with a blue square at one resort may be more challenging than a run marked with a black diamond at another resort. For this reason, when skiing at a new resort, you should always begin with a green run and work your way up, even if you are an accomplished skier.Advertisement
-
3Know who has the right of way on the slope. People ahead of you (meaning down the slope from you) have the right of way. It is your responsibility to avoid them, even if they fall right in front of you. Because of this, it is best to keep a fair amount of distance between you and the skier or snowboarder in front of you.[4]
-
4Always stay in control when on the slope. It is your responsibility to know what speed and slope difficulty you can handle. Do not go on a black diamond simply because you think you are a natural-born skier. You run the risk of seriously injuring, even killing someone else, or yourself, if you crash.
-
5Do not stop on the trail if you cannot be seen from above. While it is common to stop and catch your breath on the slope, it's very dangerous to stop if you obstruct the trail or cannot be seen by someone coming down the trail from above. People coming down the slope could crash into you.[7]
- If you do feel the need to stop, try to stop at the top of the next section of the slope that's visible from above, like the crest of a hill
- Pull over to the side of the run to stop, rather than stopping in the middle of the run.


Putting Your Skis On
-
1Put on your ski boots. If you are renting your boots, ask an attendant to help you figure out which boot is best for you. You'll need to find the right size and adjust the tightness. At rest, your foot should be be essentially immobile but not compressed. Your toes should not press against the front of the boot when you bend your knees to point your shins slightly forward at the angle of the boot. The top of the boot should be snug around your ankle.[8]
- There are many online retailers where you can buy ski boots. There are a variety of great brands like Nordica, Dalbello, and Rossignol. You can browse Rossignol boots here.
- It's easiest to walk in ski boots by taking long steps, smoothly rolling the stiff boot bottom forward heel-to-toe with your lower leg straight as your body passes over.
- Once you have your boots on, carry your skis and poles out to the snow. The skis have sharp metal edges that might have jagged spots, so carry them with gloves.
-
2Separate your skis. Your skis might be locked together, bottom-to-bottom, by the clip-like "snow brakes" extending from the bindings past the flat sides. Their purpose is to keep the skis from sliding away when they pop off your boots during a fall, which protects your knees from twisting. They also make your skis easier to carry. Find a flat area in the snow. Set the pair of skis upright on their back end, hold down the one with its brake "inside", and gently shake and wiggle off the one with its brake "outside".
-
3Step into your skis. Set the skis pointing in the same direction about a foot apart. Most skis will work on either foot, but check to see if your skis have any "L" or "R" markings on them and, if so, put them on the correct side. Stick your poles in the snow on each side of the skis, a few inches to the side and next to the front edge of the binding. Hold onto the poles and, one foot at a time, tuck the flange at the boot's toe into the front binding and then push the flange at the boot's heel into the rear binding, which should close with a click. Slide each foot back and forth a little to check that the ski has attached. If it hasn't, try again.
- If you didn't hear a click, try again.
- If there is too much snow on the bottom of your boot, it may not click into the ski properly. Kick the boot with snow against your other boot to get the snow off and try again.
- Need to buy skis? Make sure you have a pair that fits you. You can find the correct size and find options for purchase here.
-
4Learn how to take your skis off. To take off a ski, or to reset its latch to retry a failed mounting (or if it fails to reset itself after detaching from your boot during a fall), push down the lever behind the boot so that it is parallel to the ski. This is most easily pushed with a pole by putting the spike into the indentation.
- If you fall and have trouble righting yourself, take off the ski on your "ground side" (the side that is flat on the ground), right yourself with the other ski and poles, and then remount the removed ski.

Learning the Basics
-
1Enroll in ski lessons. Although this may not be a first option for everyone, since they can be expensive, it is arguably the fastest way to get the basics down. Look for beginners' classes that are offered at ski resorts and on the mountain.
- It is best to enroll in a class weeks before you will go up to the mountains, as they generally fill up quickly. Enroll in a class that fits your age group (or else you may accidentally end up in a childrens' ski class.)
- Many resorts offer inexpensive and plentiful lift-ticket, rental and beginner group class packages. You can generally show up and sign right up. Some have inexpensive novice and intermediate level group short classes running on a schedule throughout the day as well. These are great for working out initial kinks, as a refresher, or to build confidence for bigger hills.
-
2Learn how to stop. Point the front tip of your skis together, then push your heels out to form a wedge. This is known as the "pizza", "wedge", or "snowplow"[9] . The wider you spread your skis, the slower you go.
- Keep in mind that this method works best for slopes that are less steep.
- Never overlap the tips of your skis; you will easily lose control.
-
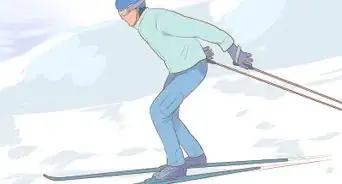
3Learn how to walk in skis. One of the first things you should learn is how to move around in skis. You will end up walking in skis when you are getting to a lift, or if you fall and have to get to a wayward ski, among other instances. One of the most common ways to move yourself over flat terrain is to keep the skis parallel and push yourself forward with your poles. With both arms simultaneously, stab the poles into the snow beside you, pull yourself forward, and repeat. Pull one side more than the other to turn.
- Do not "saw" the skis back and forth as with a skiing exerciser or move arms alternately: cross-country skiing[10] uses special hinged bindings to enable sweeping ski motion and wax to help pressure on part of the ski during part of the sawing motion move you forward. This method is good for starting onto a downhill stretch because the skis are positioned parallel, ready to go.
- When first starting to ski, expect to use more muscle than when you are more skilled.
-
4Learn how to walk uphill in skis. This will help you if you need to get to a trail that begins uphill of where you are, or if you need to get to a ski pole that you lost when you fell.
- Try to "side-step" up an incline. Stand perpendicular (sideways) to the slope of the hill, so that you are not moving. Dig the uphill edges of your skis into the snow and take small steps uphill, sideways like a crab. Keep the skis perpendicular to the slope right where you are, and use the poles to keep from slipping as you work your way sideways up the hill. This is the easiest and least tiring way to get uphill.
- "Herringbone" technique (named after the fish-bone patterns the skis leave in the snow). Point the front tips of your skis away from each other, so they make a "V" shape, and take small steps forward. Tilt the leading edge into the snow and push forward to prevent slipping back. Bend your knees and lean forward a little so you can use the stronger leg-extension muscles to push yourself forward rather than the weaker leg-rotation muscles to pass one ski after another under you. Spread the skis more on steeper hills and if you begin to slide backwards. Use the poles to avoid falling over, but keep them away from the skis, so you don't trip on them.
- Skate-skiing is fastest way to get uphill.[11] . Angle the skis as if to "herringbone", but allow yourself to slide forward smoothly on one close to directly under you and transition to gently digging it in sideways and kicking it outward as you place the other ski under you on the other side, maintaining forward momentum, much as with ice skating.[12] . You'll smoothly transition to herringbone movement on steep surfaces. This method takes more coordination and muscle than the other two.
-
5Know which technique works best for you. The leg muscles are stronger than the arm muscles, especially in women and untrained men, so as a beginner try to use the side-step and herringbone techniques as much as possible to avoid prematurely tiring your upper body and lower body.
- Do not go up any hills until you are confident in basic movements with your skis.
-
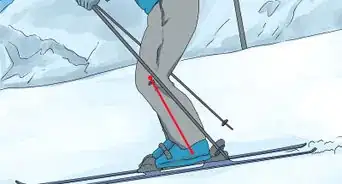
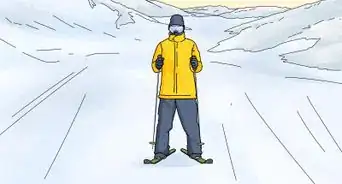
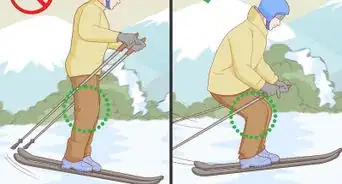
6Assume the basic skiing posture. Bend your knees so your shins rest on the front of the boots and lean forward slightly. The length of the skis will make falling forward unlikely. Leaning back is tempting when you're feeling out of control, but it will not stop you and will make the skis harder to control. Put your hands through the straps on the ski poles and hold the poles by your sides. You don't need them to ski as a beginner, but they are useful for walking. [13]
- Do not bend sharply forward. Ski racers often use the "French egg position" of hunching forward onto their thighs to minimize air resistance in straights, but it keeps the hips from swiveling and the arms from swinging freely for balance or leveraging poles for turns.
-
7Keep yourself from sliding around. Spread the tips apart (herringbone) to stop sliding backwards, and the backs apart (wedge) to stop sliding forwards. Be careful that you don't end up in uncomfortable "splits".
-
8Learn how to turn. Once you have mastered the “pizza”, you can move on to a more advanced way of stopping. Turning is an important part of skiing (as well as stopping). To turn, all you have to do is point your feet (and your skis) in the direction you want to travel. For a strong "parallel turn", push the "outside" ski away from the body keeping it parallel to the direction of travel. You and your skis will turn. For an extra smooth "carved" turn, tilt the outside ski's ankle [14] to bite its ski's inside edge into the snow and ride on a banked turn. You should feel the ski cutting into the snow to generate the turning force, rather than sliding sideways over the snow. If you want to stop while turning, keep your feet in the plow position and turn across and slightly up the hill. You will come to a slow stop.[15]
- Eventually, you will be able to stop simply by turning and placing enough force against the snow that you come to a halt with your skis still in a parallel position.
- A very quick parallel turn of the skis before the body's motion has a chance to catch up to their new orientation, followed by pressure on the uphill ski to dig them into the snow, results in a "hockey stop". This takes practice!
- Eventually, you will be able to stop simply by turning and placing enough force against the snow that you come to a halt with your skis still in a parallel position.
-
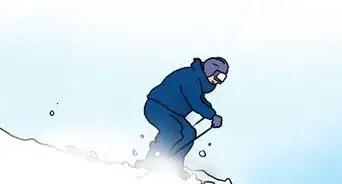
9Learn how to fall. If you are about to crash into a tree or another person, and are a beginner, don't try to swerve, as you will probably hit something else. Instead, just fall to your side. When possible, fall uphill as you are much less likely to get injured when you fall uphill (your distance to fall is shorter and your skis stay downhill from your body). Try to absorb a fall with your hip and shoulder.
- Do not try to catch yourself with your arms, as you are much more likely to injure your arms than you are to injure your hip or shoulder.
- Try to stay as relaxed as possible when you fall. If you feel yourself falling, try not to tense up or you will probably do more damage to yourself. When you tense up, your muscles become tight and you are much more likely to pull something.
-
10Learn how to get up after falling. Move so that your head is towards the top of the hill and your feet are at the bottom. Get your skis perpendicular to the slope, and dig the inside edge of the bottom ski into the snow. You can push up from the slope using the hand closest to the slope, or try using your poles.
- If you are unable to push yourself with one hand, turn your skis around, and try getting up with your other hand.
-
11Learn how to use a chairlift.
- Ski-walk up to the chairlift. If you have poles, be sure to take the straps off your wrist and safely hold both poles in one hand. Keeping your poles on your wrists can be dangerous and will make it more challenging to get on the lift.
- Wait until the operator indicates it's your turn, and then quickly move into the loading area. Once there, look over your shoulder to watch the chair coming around.
- As it approaches, you can optionally grab the side pole or back of the chair to steady yourself. Then simply sit down and allow it to pick you up. Don't be alarmed if it seems to be coming around quickly.
- Lifts usually have room for two, four or even six people per chair, so make sure you and your friend are side by side when the chair approaches.
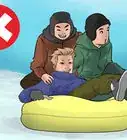
- Enjoy the view, but don't lean over the edge of the chair while you are in the air, even if your ski or a mitten falls off. You will be able to get it later. Leaning too far out of the lift could cause you to fall, which almost always results in serious injury and can occasionally lead to death.
- When your chair reaches the top, point your ski tips upward and straight forward. Push away from the chair as it goes around. Use the movement of the chair to propel you up and away from the lift.[16]
- If you fail to get off the chairlift at the right point, do not panic, and do not try to jump down. You will automatically trip a switch which will stop the lift, and somebody will help you down.


Testing Out the Bunny Slope
-
1Start on the bunny hill. A bunny hill is defined as a small slope, possibly with a rope tow. Go up the carpet lift, rope tow or chairlift to the top of the bunny hill.
- A carpet lift is a big conveyor belt. In one arrangement, you push yourself forward onto the leading edge, ride it most of the way with your poles on the belt, ready to brace yourself on them against a sudden stop usually caused by a child's or beginner's error. Several feet from the end, lift your poles to avoid jamming the end mechanism and lean gently forward to smoothly ski to a halt off the end of it.
- If it is a rope tow, wait until a handle comes around, grab it, and allow the rope to pull you up. Do not drag yourself or sit on the rope tow. When the rope pulls you to the top, let go and use the herring board to get away from the lift.
-
2Ready yourself at the top. Watch out for others, especially if the bunny slope is at the foot of another slope from which other skiers may come in fast. Allow yourself to begin sliding down the slope, but go slowly. Keep your skis pointed together. Once you reach the bottom, point the skis toward each other and make a wide angle. This will stop you fairly quickly. If you fall, point the skis so they point across the slope, not down it. Push yourself up, orient yourself, and continue down the slope.
-
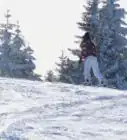
3Go down the slope. For your first few times going down the hill, you may want to stay in the “pizza” position (which gives you the most control.) After you have done the bunny hill a few times, you will likely begin to want to turn. To do this, shift your weight onto the ski that is not in the direction you want to turn. Pushing against it tends to swing your body sideways behind it so that it continues, now at an angle cutting against the snow, in front of you. Lean into and dig the ski edges into a turn a little to make it sharper. Plan ahead: curves will be wide at first. Give obstacles plenty of space! Once you know how to do this, you can go down the hill in a curved kind of zigzag.
- Look ahead. If you're looking directly down at your skis while going down a run, you could hit a tree, another person, or anything else that might block your path.
-
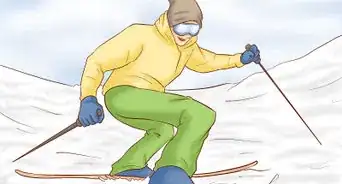
4Keep your weight in the correct place. If you lean too far back, you will have a very hard time turning, which may cause you to lose control and crash. If you lean too far forward, your skis will get squirrelly, and you may wipe out. A good technique is to keep your knees slightly bent, and keep your hands in front of you, like you're holding a lunch tray.


Trying More Advanced Trails
-
1Move on to more advanced trails. Once you have mastered the bunny hill -- that is, you can ride the lift, walk on the flat part, ski down in a controlled manner, turn both ways and stop with ease -- you should be ready to try a beginner hill. Consult with your instructor. See if he or she thinks you are ready, and then get ready for the rest of the mountain!
-
2Start with your first beginner trail. Consult the ski map to find a suitable trail. It should be close to the base area. Try to find a green run that starts at the top of a lift and ends at the base area, or a series of trails that are all green. Ride up the lift, and start on the trail.
-
3Try skiing without using the "pizza technique". As you go down more runs, you should learn to ski without using the technique that keeps you moving slowly. Once you become accustomed to skiing the green trails, try putting your skis parallel to each other for parts of the slope. Parallel skiing will cause you to go faster. Instead of going back into pizza turn across the mountain to control your speed. Instead of using the pizza technique, try using the parallel stopping technique. Stopping parallel will make you stop faster and have more control.
-
4Try your first intermediate trail. Before selecting a trail, make sure you know how to turn and stop. These skills will be very important. Select a trail that starts at the top of a lift and ends at the base area, or select a path made up of blue and green trails. While going down the intermediate trail, you may notice it is steeper and you will probably wipe out a little more. Don't worry about this. With practice, these trails will become easier.
-
5Stick with the intermediate trails for a while. There are generally more intermediate trails than any other kind of trail. This is your chance to really get comfortable on your skis. Practice all of the techniques listed above. Enjoy yourself! Explore all of the intermediate trails and find the one you like best--then go down it multiple times!
-
6Attempt a black diamond trail. Always ski with caution. By now, you have left the pizza far behind and are now using parallel skiing and, hopefully, turning to make your way down the mountain. If you are not yet at this stage, please stick to the intermediate trails, because you can get hurt and disturb other experienced skiers if you try to start hard trails too soon. You should also learn to turn with the edges of your skis as you advance.
- If you do find yourself on a trail that you think you can't handle, by all means, ask somebody to get the ski patrol. They will most likely give you a "courtesy" ride down in a toboggan. Also, don't be afraid to ask any of the ski patrol or other mountain staff if you have any questions about any particular trail or the mountain as a whole.
-
7Try skiing some moguls. Moguls are mounds of snow created by repeated turns made on ungroomed runs. Only more advanced skiers should try a mogul run out, as they can be very challenging to ski without falling many times. When going down a mogul run, you want to curve up and around the mounds. To control yourself, only ski as fast as you can handle. Make sure you can stop your skis at any time.
- As you get more comfortable with the moguls, you can begin to point your skis down the slope, which will cause you to travel more quickly down and around the moguls.


How Many Ski Lessons Should I Take?
Skiing Warm Up, Exercises, and Stretches

Expert Q&A
-
QuestionHow can you find a great skiing or snowboarding instructor?
 Kent BryKent Bry is a certified ski and snowboarding instructor and the director of Adventure Ski & Snowboard, a school based in the San Diego, California metro area. With over 50 years of skiing and snowboarding performance and instruction experience, Kent is certified by the Professional Ski Instructors of America (PSIA). Adventure Ski & Snowboard is a member of the PSIA and the American Association of Snowboard Instructors (AASI). Kent holds a BS in Recreational Therapy from San Diego State University and is also a California-registered recreational therapist.
Certified Ski & Snowboarding Instructor
-
QuestionHow can I learn how to ski before hitting the slopes?Kent BryKent Bry is a certified ski and snowboarding instructor and the director of Adventure Ski & Snowboard, a school based in the San Diego, California metro area. With over 50 years of skiing and snowboarding performance and instruction experience, Kent is certified by the Professional Ski Instructors of America (PSIA). Adventure Ski & Snowboard is a member of the PSIA and the American Association of Snowboard Instructors (AASI). Kent holds a BS in Recreational Therapy from San Diego State University and is also a California-registered recreational therapist.
Certified Ski & Snowboarding InstructorI would recommend training on a simulator close to home where you won't have all the expenses and other things involved with learning to ski. If that's not possible, definitely watch some videos and then take a lesson right when you get to the snow. Let them know you're a beginner. I recommend a private lesson if you can afford it. -
QuestionIs 55 to old to learn to ski? Son has persuaded me to go, but I am not sure I will be able to do it.
 Community AnswerNo, it's never too late to learn. There will likely be instructors there and very small hills you can practice on until you get comfortable.
Warnings
- Never cross your skis over each other. This makes your ski edges lose contact with the snow, so they can't grip the ground. You will find that this quickly causes you to lose control.⧼thumbs_response⧽
- You may find that you like to listen to music while skiing, but make sure that you can always hear what is going on in your surroundings if you do.⧼thumbs_response⧽
- Skiing can be very dangerous! Please stay on a slope that you can handle. Never ski on slopes too fast or too steep for your ability. Practice new techniques on easier slopes first. If you try a slope that you are not ready for, you risk injuring yourself or someone else.⧼thumbs_response⧽
- Always be aware of your surroundings. If you fall in a crowded area, be mindful of nearby skiers, so that you don't get clipped by another set of skis by accident.⧼thumbs_response⧽
- Read and follow the "Skier's Responsibility Code". These are a set of rules that all skiers must obey, much like the "rules of the road". They should be printed on the trail map as well as on signs at the base of all the lifts. They are also often on a sign near where lift tickets are purchased (and sometimes printed on the lift ticket itself).⧼thumbs_response⧽
- Ski at your own risk 🙃⧼thumbs_response⧽
Things You'll Need
- Skis (rentals or store-bought)
- Boots (rentals or store-bought)
- Ski Bindings (rentals or store-bought)
- Helmet
- Goggles
- Poles (rentals or store-bought)
- Outer Layer - Ski jacket and salopettes (or snow pants)
- Inner Layer - fleece, long johns, wool ski socks
- Base Layer - polyester thermal undergarments
- Gloves/Mittens (waterproof and warm)
- Ski Pass/Lift Pass (different resorts call them different names)

References
- ↑ Kent Bry. Certified Ski & Snowboarding Instructor. Expert Interview. 14 July 2020.
- ↑ Kent Bry. Certified Ski & Snowboarding Instructor. Expert Interview. 14 July 2020.
- ↑ Kent Bry. Certified Ski & Snowboarding Instructor. Expert Interview. 14 July 2020.
- ↑ http://www.skiingresource.com/ethics-on-snow.html
- ↑ Kent Bry. Certified Ski & Snowboarding Instructor. Expert Interview. 14 July 2020.
- ↑ Kent Bry. Certified Ski & Snowboarding Instructor. Expert Interview. 14 July 2020.
- ↑ http://www.skiingresource.com/ethics-on-snow.html
- ↑ http://www.evo.com/ski-boot-fitting-guide-how-to-try-on-your-new-ski-boots.aspx
- ↑ http://en.wikipedia.org/wiki/Snowplow
- ↑ http://en.wikipedia.org/wiki/Cross-country_skiing
- ↑ http://en.wikipedia.org/wiki/Cross-country_skiing#Skate_skiing
- ↑ http://en.wikipedia.org/wiki/Ice_skating#Physical_mechanics_of_skating
- ↑ http://www.mechanicsofsport.com/skiing/basic_mechanics/stance.html
- ↑ http://www.mechanicsofsport.com/skiing/manoeuvres/carving.html
- ↑ https://www.e4s.co.uk/docs/top-skiing-tips.htm
- ↑ http://traveltips.usatoday.com/off-ski-chair-lift-51990.html
About This Article

To ski, assume the basic skiing posture by bending your knees and leaning slightly forward. If you begin to slide, spread the tips of the skis apart to stop from sliding backwards. Alternately, spread the backs of the skis apart to stop from sliding forwards. Similarly, you can stop by pushing the front tips of your skis together, then pushing your heels out to form a wedge. Finally, if you fall, which will inevitably happen at some point, try to remain relaxed and fall to your side so your hip and shoulder absorb the impact. If you want to learn how to put your skis on and get around while you're wearing them, keep reading the article!