This article was co-authored by wikiHow staff writer, Hannah Madden. Hannah Madden is a writer, editor, and artist currently living in Portland, Oregon. In 2018, she graduated from Portland State University with a B.S. in Environmental Studies. Hannah enjoys writing articles about conservation, sustainability, and eco-friendly products. When she isn’t writing, you can find Hannah working on hand embroidery projects and listening to music.
There are 12 references cited in this article, which can be found at the bottom of the page.
The wikiHow Video Team also followed the article's instructions and verified that they work.
This article has been viewed 14,405 times.
Learn more...
Scrunchies are cute accessories that are fun to make, wear, and collect. If you love scrunchies, you probably know that keeping them organized can be tough, especially if you have a lot. Fortunately, there are a few ways you can make your own scrunchie organizer by using items that you might already have around your home. Try using a few different storage solutions to clean up your hair accessories and make your scrunchies easy to grab in the morning.
Steps
Making a Toilet Paper Roll Organizer
-
1Cut out a 4.25 by 5.75 in (10.8 by 14.6 cm) piece of paper. You can use bright, colorful paper for a fun design, or keep it simple by using plain white paper. Either way, use a ruler and some sharp scissors to cut out the paper that you need.[1]
- If you have patterned fabric, you can use that instead.
-
2Wrap the paper around a toilet paper roll. Find an empty toilet paper roll and make sure there aren’t any bits of toilet paper stuck to it. Line up the short side of the paper with the toilet paper roll lengthwise, then wrap the paper around it completely, covering all of the cardboard.[2]
- If you used thick paper, it might be slightly hard to bend.
- For a taller holder, use a paper towel roll instead and cut out a 11 by 5.75 in (27.9 by 14.6 cm) sheet of paper.
Advertisement -
3Glue the ends of the paper to the roll with hot glue. Keeping the paper in place, draw a line of hot glue onto the toilet paper roll and press the paper down onto it. Hold it there for about 30 seconds, then set it aside to dry fully for about 5 minutes.[3]
- Try not to get hot glue on your fingers! It can burn your hands if it’s too hot.
-
4Stack your scrunchies onto the roll to keep them organized. Set your toilet paper roll organizer upright so that it stands up on its own. Slide your scrunchies one at a time onto the roll, then leave them standing up or lay the roll down to fit inside of a drawer.[4]
- You can also use your organizer to hold hair ties.
- If you use scrunchies a lot, try displaying your organizer on your windowsill or a shelf in your room.


Crafting an Organizer with Wooden Dowels
-
1Paint a wooden disc and wooden dowel with acrylic paint. Find a 4 in (10 cm) round wooden disc and a 6 in (15 cm) tall wooden dowel. Using a paint brush and some acrylic paint, transform your plain wooden pieces into whatever bright, fun colors you’d like. Set your pieces aside to dry for about an hour before you move on.[5]
- You can also use spray paint if you can work outside or in a ventilated area.
- Look for your wooden disc and dowel at a craft store near you.
-
2Mark the center of the wooden disc using a ruler. With the circular disc sitting flat on a table, grab a ruler and lay it on the disc. Line it up until you find the 2 in (5.1 cm) mark, then make a small dot with a pencil to find the exact center of your circle.[6]
- Finding the center of the disc isn’t strictly necessary, but it will make your organizer look more sophisticated.
-
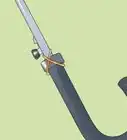
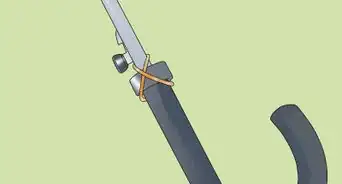
3Glue the dowel onto the middle of the wooden disc. Grab some wood glue and dab it onto one end of the wooden dowel. Stand the dowel up on the center of the disc that you marked with the pencil, then hold the two together for about 1 minute to let the glue bond. Let the organizer dry for about 1 hour before you use it.[7]
- You can find liquid wood glue or glue stick wood glue for a hot glue gun.
- If any wood glue squeezes out from underneath of the dowel, wipe it up right away to avoid a clump of dried glue later on.
-
4Stack your scrunchies onto the wooden dowel. Now you can use your display organizer to stack your scrunchies one by one. Set it on top of your dresser, your windowsill, or your desk for easy access to your cute accessories![8]
- Try making a few dowel organizers if you have a lot of scrunchies to store.

Using Household Items
-
1Slide your scrunchies onto a pants hanger if you have a lot. Grab a metal pants hanger for a closet and open up one of the hinges. Slide your scrunchies on one by one, then close the hinge once it’s full. Move onto the next hinge until your pants hanger is full of scrunchies, then hang it in your closet or on your bathroom door for easy access.[9]
- You can find pants hangers at most home goods stores for around $10.
-
2Stack your scrunchies onto a paper towel holder to display them. Find a paper towel holder with a heavy base and a skinny rod in the middle. Slide your scrunchies onto the rod one by one, then set the paper towel holder onto your desk, vanity, or bathroom counter.[10]
- There are many different designs and types of paper towel holders, so you can find one that fits your home decor.
- Look for paper towel holders at a home goods store near you.
-
3Keep your scrunchies in a plastic container for easy access. Pick up a plastic tub, bucket, or basket, then throw your scrunchies into it in one big pile. This isn’t the prettiest method of organization, but it keeps all of your scrunchies in one place and you don’t have to store them one by one.[11]
- You can keep the container out in the open or hide it in a drawer in your bathroom or bedroom.
-
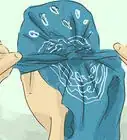
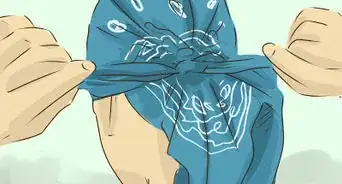
4Hang your scrunchies up with twine to make them decorative. Cut 2 to 3 lengths of twine that are about 2 ft (0.61 m) long. Tie each end of the twine to a push pin, then hang the twine up in a horizontal line on your wall. Use clothespins to attach your scrunchies individually to the twine for a fun, innovative decoration.[12]
- Try hanging your scrunchies up in a rainbow pattern for a cute, interesting design.
- Add some polaroid photos in between the scrunchies to make this display even more personal.
- Try overlaying the twine with some fairy lights for an eye-catching wall display.


Warnings
- Avoid touching hot glue with your bare hands, as it can burn your fingers.⧼thumbs_response⧽
Things You’ll Need
Making a Toilet Paper Roll Organizer
- Empty toilet paper roll
- Ruler
- Scissors
- Patterned paper
- Hot glue
Crafting an Organizer with Wooden Dowels
- Wooden disc
- Wooden dowel
- Acrylic paint
- Paint brush
- Wood glue


References
- ↑ https://www.youtube.com/watch?v=LeO11AdZ7M8&feature=youtu.be&t=13
- ↑ https://www.youtube.com/watch?v=TNjYzkaoPWo&feature=youtu.be&t=53
- ↑ https://www.youtube.com/watch?v=LeO11AdZ7M8&feature=youtu.be&t=23
- ↑ https://www.youtube.com/watch?v=TNjYzkaoPWo&feature=youtu.be&t=162
- ↑ https://www.youtube.com/watch?v=UJed5kl1M6Y&feature=youtu.be&t=96
- ↑ https://www.youtube.com/watch?v=UJed5kl1M6Y&feature=youtu.be&t=172
- ↑ https://www.youtube.com/watch?v=UJed5kl1M6Y&feature=youtu.be&t=189
- ↑ https://www.youtube.com/watch?v=tp1Sq2W6kXY&feature=youtu.be&t=119
- ↑ https://www.youtube.com/watch?v=xHc37WRRiUM&feature=youtu.be&t=110
About This Article