This article was co-authored by Brianna Bowling. Brianna Bowling is a Hair Stylist and the Co-Owner of The CRAFT Salon in Glendora, California. With more than 11 years of experience, she specializes in balayage, blonding, and vivid colors. Brianna has received years of in-depth training on advanced color techniques.
There are 14 references cited in this article, which can be found at the bottom of the page.
This article has been viewed 13,808 times.
Parting your hair down the center is an easy, classic styling choice. What you do with your hair after parting it can take your look from casual to dressy or somewhere between. Middle parts are versatile in the sense that you can style your hair relaxed and wavy or sleek and straight. If you prefer to wear your hair relaxed or wavy, focus on playing with the volume and texture of your hair to create alluring looks. Straight hair can be styled in a variety of ways to suit the occasion and emphasize your best features.
Steps
Parting Your Hair
-
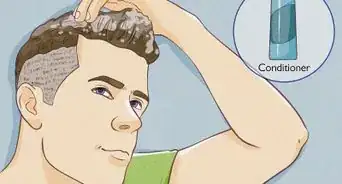
1Shampoo and condition your hair to make it easier to work with. Work up a lather with shampoo at your roots and apply conditioner all over, focusing on the ends. If you have a super-stubborn cowlick that has hindered a center-part in the past, part your hair down the center before you wash it. Hold it in place with pins for 30 minutes to 1 hour before washing your hair.[1]
- Your hair follicles (and any cowlicks) are more malleable when they're wet.
- Feel free to skip this step if you’re in a hurry or if you’re not battling any strong cowlicks.
- As an alternative, use a detangling spray or spray it with water, focusing on the roots so it’s easier to part.
- You can towel dry your hair for a tousled look or blow dry it for a sleek look. Either way, wrap it in a towel to absorb some of the moisture.
-
2Brush or comb your wet hair straight back.[2] Place a comb or brush at your hairline and sweep it straight back so you have a slicked-back look. Starting with your hair back will make it easier for the strands to go either to the left or the right of the parting tool.[3]
- This is a good way to prep your hair if you’re starting with it dry.
Advertisement -
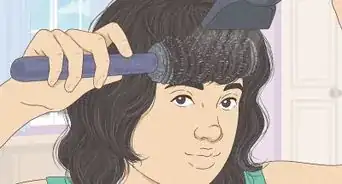
3Place the tip of a rattail comb at the center of your hairline. Use the bridge of your nose as a reference for finding the center of your hairline. The tip of a rattail comb is the perfect tool because it can get even the smallest hairs to part on either side. However, you can also use one end of a wide-tooth or fine-tooth comb to make the part.[4]
- Some professional roller brushes have a parting tip on the end of the handle, so use that if you have one.
-
4Draw a straight line with the tip of the comb on top of your head. Run the comb from your hairline all the way to the back crown of your head. Use your dominant hand so you can draw the line as straight as possible.[5]
- If you see a few curves in the part try again. It may take a few tries to get it right if you're not used to doing it.
-
5Comb each side of your hair against your head to complete the part. Hold the comb parallel to the center part and brush downward to your shoulder. Then repeat this on the other side and the back portion of your hair so it lays flat against your scalp.[6]
- Use a detangling hair spray if you have trouble combing your hair all the way through.[7]


Creating Wavy or Relaxed Looks
-
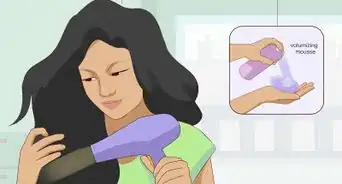
1Scrunch and air-dry your hair for loose, beachy waves. Relaxed, natural waves and short hair can give you an effortless bed-head look. After washing your hair, deposit a dime or quarter-sized amount of wave-forming gel or mousse into your hands and rub them together. Then scrunch your damp hair with your fingers, focusing on distributing the product toward the ends.[8]
- If your hair is naturally slick-straight, use a strong-hold curling serum to scrunch your damp hair before using a diffuser or towel-drying it.
- Follow-up by using a texturizing spray on your hair once it's completely dry for a messy-chic look.
- Ask your stylist to cut long face-framing layers to give your hair some volume to complete the look.
- For volume at the roots, lift sections of your hair and spray root-volumizing serum on your roots (1 or 2 sprays on each side will do).
-
2Apply mousse and diffuse your hair for structured waves or tendrils. After making the part while your hair is damp, use a dime or quarter-sized amount of medium-hold mousse or curl-shaping serum and scrunch your hair on the sides and back. Attach a diffuser attachment to your hairdryer and set the power to low heat. Scrunch sections of your hair inside the diffuser attachment until your hair is dry.[9]
- It may help to lean your head to the side and point the hairdryer slightly upwards.
- A universal diffuser attachment will fit almost all models of hairdryers.
-
3Use a curling wand on dry hair for sleek tendrils. Dry your hair with a hair dryer before heating the curling wand. Once your hair is dry and the wand is hot, separate a 1⁄2 in (1.3 cm) section of hair and coil it around the curling iron, being careful not to touch it with your fingers. Hold your hair on the wand for 4 seconds before releasing the curled strands. Repeat this all over your hair or just sections you’d like curled.[10]
- For an edgy look, don't let the tips of your hair touch the curling iron so they're left pointing straight down.
- Spray your hair with a heat-protecting spray while the curling wand is heating up to minimize damage.
- Make sure your hair is completely dry before using the wand because curling wet or damp strands can cause them to fry and break.
- This is a good look if you have short layers, long layers, or none at all.
-
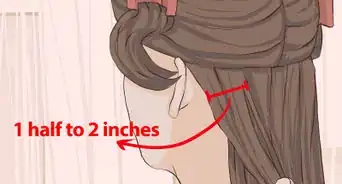
4Twist the front sections of your hair back for an elegant half-up-half-down look. Take 1 in (2.5 cm) to 2 in (5.1 cm) of hair from the front section on your right side and twist it outward until the twist is long enough to secure with a pin towards the back of your head. Repeat this on the left side to complete the half-up-half-down twist back. If you like, curl the ends of your hair with a curling iron for a more red-carpet-glamorous look.[11]
- If you like, twist each side of your hair back and secure them together with a hairband.
- For a more nuanced look, twist each side only 2 in (5.1 cm) back and secure each side with bobby pins just above your ears. Then let loose strands cover the bobby pins.
- To elevate the look, pull all of your hair up into a loose ponytail or bun.
-
5Pull your hair into a loose, low side ponytail and curl the ends. After air-drying or blow-drying your hair, sweep your hair to one side and secure it with a hairband. Leave the rubberband somewhat loose and tease it out to make it look messy-casual. Wrap the ends around a hot curling iron for structured tendrils at the end of the ponytail.[12]
- If you don’t want to band to be visible, use a clear elastic band for a seamless look or use a band that closely matches your hair color.
- Attach a plush clip-on flower to the band to add some personality and hide the band.
- Use a plush scrunchie for a casual, retro look.


Styling Straight Hair
-
1Blow-dry your hair with a roller brush for a classic, voluminous look. Blow-dry your hair until it's damp and then pin up the top sections. Use a small or medium-sized roller brush to dry the sections underneath before releasing the top sections and drying those straight.[13]
- An A-line cut (shorter in the back and longer in the front) is very en-vogue while a regular bob is a timeless cut.
- This looks the cleanest if your hair is not layered at all. However, it can work if you have longer layers.
- If you like, spray your hair with a heat-protecting spray and use a flat-iron to make it super straight. Work in small, thin sections for the best results.
-
2Flip out the ends for short, layered hair to frame your face. Blow dry your hair with a medium round-brush. Instead of running the brush under your hair, position the brush on the outside of your hair. Spin the brush when you get down to the ends of your hair to create an outward flip.
- You can also use a curling wand or flatiron to flip out the ends—just make sure your hair is dry before you use either one to prevent damage.
- If you have medium to long layers, a middle part can act as a curtain, beautifully emphasizing your facial features.
- This is a great option for hair with short or long face-framing or all-over layers.
-
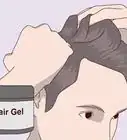
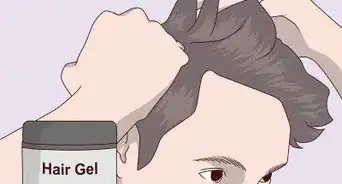
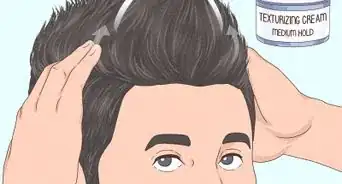
3Slick your hair back with styling cream, hair wax or pomade for a bold, modern look.[14] Brush your hair straight back and deposit a quarter-sized amount of hair wax or pomade onto your palms and rub them together. Then, pat the outer layer of your hair with your palms to distribute the product. Run a comb from your hairline and then upwards and down to your neck. Use more product as necessary until every strand is in place.
- Spray your hair with extra-strength hairspray to hold it in place.
- If your hair is long enough to brush your shoulders, consider leaving the last 2 in (5.1 cm) free of hair wax to create a modern-looking poof at the ends.
- Keep in mind that the pomade or wax will make your hair slightly crunchy and greasy afterward—you’ll probably want to wash it out that night or the next morning.
- If you have a pixie cut, brush your hair straight down towards your shoulders instead.
-
4Wear braids to emphasize your center part. Place the tip of a comb at the end of your center part (near the back of your head) and move it in a straight line all the way down towards your neck. Use clips to keep the two sides separate before separating one side into 3 sections and beginning to braid.[15]
- For braids that hang in front of your shoulders, pull your hair forward as you start the braid.
- For braids that hang towards your back, station your hands near the back of your head to set them in place. You may need to have someone help you if you have really long hair.
- Keep your braids loose and tease out some of the strands for a more relaxed, messy look.
- Pull your braids tight and massage them with argan oil or anti-frizz serum for a sleek look.
-
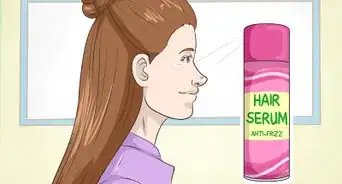
5Slick your hair back into a ponytail for a runway-ready look. Pull your hair back and make a low or middle-height ponytail. Use a clear elastic hairband or a thick, sturdy one for a tighter hold. Rub argan oil or anti-frizz serum onto your palms and run them over your hair to tame flyaways.[16]
- To hide the band, separate a small chunk of hair from the bottom of the ponytail and loop it around the band a few times. Tuck the last 1 in (2.5 cm) into the band to secure it.
- A slicked-back ponytail will draw attention to your facial features.


Expert Q&A
-
QuestionHow do you get your middle part to stay?
 Brianna BowlingBrianna Bowling is a Hair Stylist and the Co-Owner of The CRAFT Salon in Glendora, California. With more than 11 years of experience, she specializes in balayage, blonding, and vivid colors. Brianna has received years of in-depth training on advanced color techniques.
Hair StylistAlways part your hair when it's wet—don't wait for it to dry. As your hair is transitioning, use a styling cream when you get out of the shower before you comb it into a middle part; that way, it holds the part a little better. If the hair still refuses to stay, use a flexible hold hairspray to bring it into place. -
QuestionWhat hairstyle should I get with a middle part?Brianna BowlingBrianna Bowling is a Hair Stylist and the Co-Owner of The CRAFT Salon in Glendora, California. With more than 11 years of experience, she specializes in balayage, blonding, and vivid colors. Brianna has received years of in-depth training on advanced color techniques.
Hair StylistThe shag/wolf cut is a great option, along with any kind of curtain fringe looks.
Warnings
- Do not use a curling iron or flatiron on wet hair because it will destroy the structure of your strands.⧼thumbs_response⧽

-Step-15.webp)
References
- ↑ https://www.today.com/series/shortcuts/how-tame-cowlick-win-battle-t40471
- ↑ Brianna Bowling. Hair Stylist. Expert Interview. 25 February 2022.
- ↑ https://youtu.be/2nR2nfmCxz4?t=122
- ↑ https://youtu.be/2nR2nfmCxz4?t=141
- ↑ https://youtu.be/2nR2nfmCxz4?t=149
- ↑ https://youtu.be/2nR2nfmCxz4?t=149
- ↑ Brianna Bowling. Hair Stylist. Expert Interview. 25 February 2022.
- ↑ https://youtu.be/IzXWIf-RGVk?t=81
- ↑ https://youtu.be/ZiWDhClK8cE?t=163
- ↑ https://youtu.be/Jmw3kngdM4Y?t=268
- ↑ https://www.hairromance.com/2014/09/the-twist-back-easy-half-up-hairstyle-tutorial.html
- ↑ https://youtu.be/DtrL0OIYZFg?t=13
- ↑ https://www.self.com/story/blow-dry-mistakes
- ↑ Brianna Bowling. Hair Stylist. Expert Interview. 25 February 2022.
- ↑ https://www.cosmopolitan.com/style-beauty/beauty/how-to/a32463/braid-how-to/
- ↑ https://youtu.be/DtrL0OIYZFg?t=159
- ↑ https://www.naturallycurly.com/curlreading/frizz-control/15-must-have-essential-no-frizz-tips
About This Article