220th Siege Battery, Royal Garrison Artillery
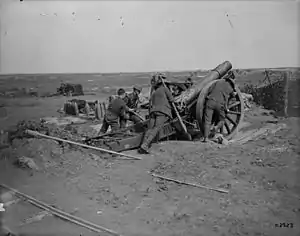
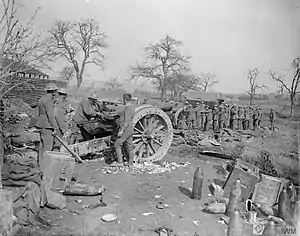
220th Siege Battery was a heavy howitzer unit of Britain's Royal Garrison Artillery (RGA) raised in Essex and Suffolk during World War I. It saw active service on the Western Front at Arras and Ypres, in the 'Great Retreat' of March 1918 and in the final Allied Hundred Days Offensive.
| 220th Siege Battery, RGA | |
|---|---|
 Cap Badge of the Royal Regiment of Artillery | |
| Active | 31 July 1916–1919 |
| Country | |
| Branch | |
| Role | Siege Artillery |
| Part of | Royal Garrison Artillery |
| Garrison/HQ | Harwich |
| Engagements | Operations on the Ancre Battle of Arras Third Battle of Ypres German Spring Offensive Hundred Days Offensive |
Mobilisation
On the outbreak of war in August 1914, units of the part-time Territorial Force (TF) were invited to volunteer for Overseas Service[1] and the majority of the Essex and Suffolk Royal Garrison Artillery did so. This unit had mobilised as part of No 14 (Essex & Suffolk) Coastal Fire Command at Landguard Fort, charged with defending the Haven ports of Harwich, Felixstowe and Ipswich and the associated naval base.[2][3] By October 1914, the campaign on the Western Front was bogging down into Trench warfare and there was an urgent need for batteries of siege artillery to be sent to France. The WO decided that the TF coastal gunners were well enough trained to take over many of the duties in the coastal defences, releasing Regular RGA gunners for service in the field.[4] Soon the TF RGA companies that had volunteered for overseas service were also supplying trained gunners to RGA units serving overseas and providing cadres to form complete new units.[5]
In August 1915 Harwich was chosen as one of the depots for forming these units, under the command of Major G.W. Horsfield of the Essex & Suffolk RGA.The rest of the personnel were returning wounded Regulars, men of the Special Reserve, 'Kitchener's Army' volunteers and 'Lord Derby men'.[6][7]
220th Siege Battery, RGA, was formed at Harwich on 31 July 1916 from the Essex & Suffolk RGA under Army Council Instruction 1544 of 8 August 1916.[8][9][10]
Western Front
Arras

The battery went out to the Western Front on 25 December 1916, equipped with four 6-inch 26 cwt howitzers. The advance party joined 72nd Heavy Artillery Group (HAG) at Bertrancourt in the Somme sector on 26 December and was sent to Sailly-au-Bois next day. The main body of the battery joined on 8 January 1917 and moved to the battery positions the advance party had prepared. 72nd HAG was serving under Fifth Army, which was renewing operations on the Ancre after the previous year's Somme Offensive.[11][12][13][14]
72nd HAG was engaged in counter-battery (CB) fire and in shelling the German front lines and villages, including Serre-lès-Puisieux, for the small-scale attacks being attempted. On 22 January the Germans retaliated, bombarding Sailly and smashing the carriage of one of 220 Siege Bty's howitzers. 72nd HAG bombarded the trench known as Ten Tree Alley, which was captured on the night of 10/11 February. On 24 February the front line troops noticed that the Germans were retiring from in front of Serre – part of their planned withdrawal to the Hindenburg Line (Operation Alberich). The British followed up against German rearguards, and pushed their artillery forward across the zone of devastation left by the enemy: 220th Siege Bty reached Beauval on 21 March.[14][15]
Arras
On 22 March 72nd HAG moved north to join Third Army in the Arras sector. There 220th Siege Bty transferred to the command of 81st HAG. At first it was firing on trench systems, but from 1 April it joined with the other batteries of 81st HAG in CB fire and registering individual strongpoints as targets for the forthcoming Arras Offensive. The four-day preliminary bombardment (V, W, X and Y days) began on 4 April and was extended by an extra day (Q, inserted between X and Y). Z Day was 9 April, and as the infantry of VI Corps went 'over the top' at 05.30 the 6-inch howitzers began firing a standing barrage on the German support trench. When the field guns' creeping barrage reached this line ahead of the infantry, the howitzers lifted onto the second objective. The group's forward observation officer (FOO) moved up with the infantry and set up his observation post (OP) on Observation Hill. The infantry were delayed in capturing the Blue Line (the fourth line of enemy trenches) and there was not time to push on to the Brown line that night. They renewed their attack behind a new barrage at dawn on 10 April and completed the task.[12][13][14][16][17][18][19][20]
Next morning, 220th Siege Bty moved up to a forward position where it came under 32nd HAG. It continued firing CB tasks and against strongpoints such as Guémappe and on towns further back like Biache as the offensive continued. On 21 April 32nd HAG began the bombardment to support VI Corps' next operation (the Second Battle of the Scarpe) beginning on 23 April. Firing went on for 10 hours at a time and included hurricane bombardments of villages along the German lines, but the CB fire was less effective and the German artillery was not mastered. VI Corps did manage to take Guémappe. The next major operation (the Third Battle of the Scarpe on 3 May) was even less successful, despite 32nd HAG's efforts to disrupt German communications.[12][17][18][21][22][23]
As the Arras offensive wound down, 220th Siege Bty was transferred to 47th HAG on 16 May. The group was engaged in CB fire by day and harassing fire (HF) by night. It also supported 29th Division's failed attempt to capture Hook Trench on 30 May, and 3rd Division's more successful attack on Long Trench on 14 June, where the heavy artillery halted German counter-attacks.[12][21][24][25] The battery's command was changed on 19 June when it came under 48th HAG, continuing CB work on the Arras front,[12][24][26][27] and changed again when 48th HAG was ordered north on 1 July. Next day 220th Siege Bty transferred to 39th HAG, which was supporting XVII Corps of Third Army.[12][27][28] The battery continued firing CB tasks and supporting minor operations on XVII Corps' front until 9 August 1917 when it was handed over to 55th HAG with VI Corps.[12][28][29]
Ypres

After six months with Third Army in what had become a quiet sector, the personnel of Right Section of 220th Siege Bty (Left Section remaining to man the guns) were sent north on 31 August to relieve exhausted gunners of Fifth Army which was engaged in the Third Ypres Offensive. The section joined 56th HAG on 2 September and relieved a section of 173rd Siege Bty. The rest of 220th Siege Bty arrived on 14 September. Many of 56th HAG's targets at this time were concrete pillboxes; 220th Siege Bty took on the strongpoint of Gloster Farm. The Ypres offensive was now restarting: 19 September was Y day for the bombardment preceding the Battle of the Menin Road Ridge. The batteries carried out intense bombardments of the registered strongpoints, interspersed with practice attack barrages. The battle was successful, though more so on Second Army's front than Fifth Army's. The Battles of the Menin Road and Polygon Wood (26 September) were successful because of the weight of artillery brought to bear on German positions and then on their counter-attacks. The Battle of Broodseinde on 4 October was tougher. But as the offensive continued the tables were turned: British batteries were clearly observable from the Passchendaele Ridge and were subjected to CB fire, while their own guns sank into the mud and became difficult to aim and fire. The Battle of Poelcappelle (9 October) was a disappointment and the First Battle of Passchendaele on 12 October resulted in very heavy casualties for Fifth Army. 220th Siege Bty provided barrage fire in all these major attacks, and for the fighting in Houthulst Forest on 22 October. 56th HAG fired a large bombardment programme on 26 October for the opening of the Second Battle of Passchendaele, but the group's firing tailed off thereafter until a last attempt was made on Passchendaele on 10 November. After the ruins of the village had been captured, 56th HAG's batteries fired many rounds in its defence.[12][29][30][31][32][33][34]
Winter 1917–18

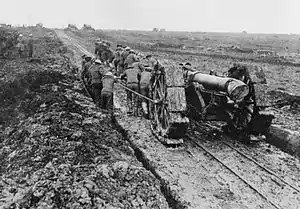
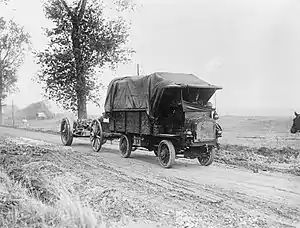
Trench raids, CB and HF tasks continued through the winter, with No 7 Squadron, Royal Flying Corps spotting for the guns when weather permitted. Some of the 6-inch howitzers were dragged forward with great difficulty along muddy roads by FWD Model B lorries to bring more distant targets into range. Ammunition expenditure was high despite the difficulty of resupply, made worse on 11 November when a German shell hit an ammunition dump by the light railway, causing a huge crater and leaving 220th Siege Bty unable fire for some time.
By now HAG allocations were becoming more fixed, and they were converted into permanent RGA brigades during the winter. 56th HAG became 56th Brigade on 20 December. Apart from temporary detachments, 220th Siege Bty remained with this brigade until 1919.[12][13][31][35][36] Major H.M.A. Ward, commanding 220th Siege Bty was awarded the Distinguished Service Order at the new year.[31]
On 7 January 1918 56th Bde was ordered to pull out all its guns ready for a move. Despite snowstorms and freezing conditions, 220th Siege Bty got three of its guns out onto the road before the thaw set in. Finally, all the battery's guns were withdrawn to the Siege Park on 10 January. After a week's rest the brigade entrained for the south, travelling by a circuitous route to Longueau, near Amiens afterwards moving by road to join III Corps Heavy Artillery (HA) at Frières-Faillouël, close to the Hindenburg Line, with 220th Siege Bty billeted in reserve by the end of the month. The order to 'Prepare for battle' came on 28 February and 220th Siege Bty pulled its four guns into position at Clastres, under the tactical direction of 66th Bde, RGA. These guns were ready for action on 1 March,[31]
Spring Offensive
Throughout March preparations continued to meet the anticipated German attack, with 220th Siege Bty digging new positions at Clastres. The German Spring Offensive was launched on 21 March with a massive bombardment. Clastres came under shellfire, communications with 66th Bde broke down, and the battery posted Lewis guns for local defence in case of a German breakthrough. During the day the battery fired over 1000 rounds on targets given by the infantry division HQ in Clastres. Two officers and 14 other ranks of 325th Siege Bty who arrived for training were immediately in action with 220th; the battery also gathered stragglers from both the RGA and Royal Field Artillery who had lost their guns. At 14.30 III Corps HA HQ sent orders for 220th Siege Bty to pull out and to find a new position at the sugar factory at Flavy-le-Martel across the Crozat Canal where III Corps was going to make a stand; two FWD lorries went up to move the battery one section at a time. The first despatch rider taking the orders to the battery was blown off his motorcycle by a shell, but a second got through with the orders at 17.10 while 56th Bde's signal officer went round the billets to gather all the men of the battery and get them to the sugar factory. Four more FWDs and the battery's own lorries arrived and the move began, with a small guard left on the ammunition until they were ordered back. Other men of the battery on duty at an ammunition dump at La Motte became prisoners of war.[30][31][37][38][39]
However, the sugar factory was in III Corps' new front line on the canal and next morning Corps HA ordered the battery to pull out. It did so under a German machine gun barrage and got back to a position near Petit-Detroit. Bombardier Jagger and 20 volunteers then went back with the FWDs and four lorries to recover ammunition from Flavy. Fire orders finally arrived at 15.00 and the battery targeted the canal bank and the railway bridge at Montescourt-Lizerolles that the engineers had been unable to blow up. There was confusion as the Germans crossed the canal and continued advancing: by 23 March 220th Siege Bty had lost communications with 66th Bde again. III Corps HA ordered it back to Guivry, then forward again to fire on Flavy: two of the guns were used to destroy the abandoned ammunition dump. On 24 March they got back to Beaugies-sous-Bois where 220th Siege Bty found some ammunition lorries and took them over. German cavalry could be seen in the distance and some of 56th Bde's other batteries had been cut off and captured. 220th Siege Bty retreated through Quesmy to the Noyon–Guiscard road, where it was ordered to fire off all its ammunition at Ugny-le-Gay.[31][37][38][40]

That day V French Corps took over the front from III Corps and on 25 March 56th Bde HQ was ordered to fight 220th and another 6-inch battery as a subgroup at Cuy under French command. Next morning the battery was in action at Lassigny, but during the day was pulled back to west of Thiescourt where it fired on Scaucourt and Candor. The retreat continued next day, the battery firing from St Cloud Farm before pulling back that night to south of Élincourt-Sainte-Marguerite, staying in touch with the French. The retreat continued, and by the end of the month 56th Bde and 220th Siege Bty had reached Chevrières. The German advance had been halted in this sector, but the battery then had a long march to Fresnoy-au-Val near Amiens, where on 5 April 56th Bde was rejoined by its other batteries.[41][42][43]
From Fresnoy the brigade was sent to the Abbeville area to rest and refit. On 22 April it returned to the front, joining IV Corps in Third Army in the Somme sector; 220th Siege Bty was billeted at Bayencourt. The 6-inch batteries improved their gun positions and began registering their guns, firing HF tasks at night. On 4 May they took part in a small operation to straighten 42nd (East Lancashire) Division's front. On 15 May the 6-inch batteries were ordered forward into new positions where they would remain silent, 220th moving into theirs on the night of 19 May. However, when the neighbouring brigade went into reserve, 220th Siege By took over the positions of 59th Siege Bty and became active once more, carrying out CB shoots with aircraft observation. This continued into the summer. Major Dunston took over command of 220th Siege Bty from Maj Ward on 15 June.[16][41][44]
Hundred Days Offensive
The Allied Hundred Days Offensive began with the Battle of Amiens on 8 August. 56th Brigade's batteries had been pulled out of the line by sections on the nights of 4/5 and 5/6 August to go into GHQ Reserve under orders to move at 24 hours' notice. However, they returned to their old positions on 16/17 August and resumed bombardment of hostile batteries and strongpoints, with night HF shoots. Third Army joined in the offensive with a surprise attack by IV Corps on 21 August (the Battle of Albert). Zero hour was 04.55, and at 08.00 220th Siege Bty moved up to positions near Rossignol Wood as IV Corps achieved a 3 mile advance and the Germans retired hastily towards Bapaume. Third Army resumed its advance on 23 August, with 56th Bde shelling Achiet-le-Petit in support of IV Corps' attack. Next day the mobility of the siege batteries was tested as the whole brigade advanced across country, 220th reaching the line Pusieux–Achiet-le-Petit. On 25 August the 6-inch batteries supported 63rd (Royal Naval) Division towards Bapaume.[16][41][44][45]
A lull followed on IV Corps' front, but the artillery remained active, 56th Bde firing 1–2000 rounds per day until Third Army launched the Second Battle of Bapaume on 31 August. The New Zealand Division of IV Corps took Bapaume while 56th Bde fired on Villers-au-Flos beyond. On 2 September 56th Bde supported 127th (Manchester) Brigade's tricky attack on Villers-au-Flos. 220th Siege Bty was rested from 6 to 9 September, then returned to action shelling Dead Man's Corner for the New Zealanders. IV Corps attacked at the Battle of Havrincourt on 12 September as Third Army closed up to the Hindenburg Line. After another lull, all of 56th Bde's batteries opened up on trenches and strongpoints for the Battle of Épehy on 18 September. Although IV Corps only had a minor role in the attack, it was strongly counter-attacked that night and the howitzers helped to repulse this.[16][41][44][46]
There were only minor operations until 27 September, when the 6-inch howitzers fired a barrage and concentrations on selected strongpoints to support 5th Division's attack on the Hindenburg Line defences (part of the Battle of the Canal du Nord). The howitzers then fired gas shells as well as high explosive on the trenches round Gouzeaucourt as the Germans abandoned their defences. There were several days of bombardment before the Second Battle of Cambrai opened on 8 October, with 56th Bde's 6-inch batteries moving up to the Escaut Canal. On 10 October 220th Siege Bty moved forward again to Caudry to operate directly under 37th Division as it pursued the Germans across the River Selle. IV Corps' guns then had a quiet period until 20 October, when the corps joined in the Battle of the Selle, taking the high ground beyond the river. The 6-inch howitzers executed a fire programme, then spent the night harassing roads behind the German lines.[16][41][44][47][48]
By now artillery ammunition was restricted because of the difficulties of bringing it up over damaged roads and temporary bridges, and the heavy guns became less useful in a fast-moving pursuit. On 25 October 220th Siege Bty was pulled out of the line and its guns parked. However, guns and ammunition were massed for the full-scale assault of the Battle of the Sambre. 220th Siege Bty began CB fire on 30 October, and after the assault went in on 4 November it remained in position at readiness to move at 30 minutes' notice. However, the state of the roads was such that only limited numbers of 6-inch howitzers could go forward. When hostilities were ended by the Armistice with Germany on 11 November, IV Corps HA had been left behind at Ghissignies.[16][41][44][49][50]
Disbandment
On 25 November 56th Bde and its batteries moved to Vertain, on 2 December to Neuville, and finally to Thy, near Genappe in Belgium where they moved into winter quarters. Demobilisation began in January 1919. On 11 April 56th Bde left Belgium for Germany to join the British Army of the Rhine, with 220th Siege Bty stationed at Esch.[41] The battery was disbanded during 1919.[9]
Notes
- Becke, Pt 2b, p. 6.
- Farndale, Forgotten Fronts, pp. 402, 409.
- Maurice-Jones, p. 185.
- WO Instruction No 248 of October 1914.
- Maurice-Jones, pp. 200–1.
- Army List, August 1914.
- Penstone, pp. 9–14.
- Army Council Instructions August 1916.
- Frederick, pp. 702–6.
- Raising of 206 to 221 Siege Btys RGA at Long, Long Trail.
- RGA at Long, Long Trail.
- 'Allocation of Siege Batteries RGA', The National Archives (TNA), Kew, file WO 95/5494/4.
- 'Headquarters Heavy Artillery Groups', TNA, file WO 95/5494/1.
- 72nd HAG War Diary November 1916–February 1919, TNA file WO 95/323/6.
- Falls, 1917, Vol I, pp. 65–9, 72–3, 95–6.
- Becke, Pt 4, pp. 89–98.
- Becke, Pt 4, pp. 169–74.
- 81st HAG War Diary December 1916–December 1917, TNA file WO 95/230/1.
- Falls, 1917, Vol I, pp. 182–6, 198–200, 214–25, 248–51.
- Farndale, Western Front, pp. 165–6, 170–1.
- 32nd HAG War Diary April 1916–July 1919, TNA file WO 95/389/2.
- Falls, 1917, Vol I, pp. 381–2, 389–94, 438–40.
- Farndale, Western Front, pp. 177–8.
- 47th HAG War Diary March 1916–July 1919, TNA file WO 95/473/1.
- Falls, 1917, Vol I, p. 517.
- 48th HAG War Diary August 1915–June 1917, TNA file WO 95/225/1.
- 48th HAG War Diary July 1917–January 1919, TNA file WO 95/225/2.
- 39th HAG War Diary April 1916–December 1917, TNA file WO 95/391/1.
- 55th HAG War Diary July 1916–December 1917, TNA file WO 95/545/1.
- Becke, Pt 4, pp. 111–20.
- 56th Bde War Diary, August 1916–March 1918, TNA file WO 95/392/2.
- Edmonds, 1917, Vol II, pp. 247–8, 263–71, 309–14, 334–7, 343–4, 348, 351–2, 358–9.
- Farndale, pp. 211–13.
- Wolff, pp. 223–35, 249–51.
- Farndale, Western Front, Annex E.
- Farndale, Western Front, Annex M.
- Becke, Pt 4, pp. 145–51.
- 220th Siege Bty report, 21–31 March 1918, in 56th Bde War Diary.
- Edmonds, 1918, Vol I, pp. 167, 208–11.
- Edmonds, 1918, Vol I, pp. 211, 267–9.
- 56th Bde War Diary, April 1918–My 1919, TNA file WO 95/392/3.
- Edmonds, 1918, Vol I, pp. 402–4.
- Farndale, Western Front, p. 273.
- Becke, Pt 4, pp. 153–60,
- Edmonds, 1918, Vol IV, pp. 180, 182, 188–92, 228, 230–1, 272.
- Edmonds, 1918, Vol IV, pp. 370, 380, 410, 469-70, 493.
- Edmonds & Maxwell-Hyslop, 1918, Vol V, pp. 43–5, 157, 203, 239–41, 329, 334–5, 338-9, 343, 364–5.
- Farndale, Western Front, pp. 302–4.
- Edmonds & Maxwell-Hyslop, 1918, Vol V, pp. 477–8, 480–1, 496–7.
- Farndale, Western Front, p. 304.
References
- Maj A.F. Becke,History of the Great War: Order of Battle of Divisions, Part 2b: The 2nd-Line Territorial Force Divisions (57th–69th), with the Home-Service Divisions (71st–73rd) and 74th and 75th Divisions, London: HM Stationery Office, 1937/Uckfield: Naval & Military Press, 2007, ISBN 1-847347-39-8.
- Maj A.F. Becke,History of the Great War: Order of Battle of Divisions, Part 4: The Army Council, GHQs, Armies, and Corps 1914–1918, London: HM Stationery Office, 1944/Uckfield: Naval & Military Press, 2007, ISBN 1-847347-43-6.
- Brig-Gen Sir James E. Edmonds, History of the Great War: Military Operations, France and Belgium 1917, Vol II, Messines and Third Ypres (Passchendaele), London: HM Stationery Office, 1948/Uckfield: Imperial War Museum and Naval and Military Press, 2009, ISBN 978-1-845747-23-7.
- Brig-Gen Sir James E. Edmonds, History of the Great War: Military Operations, France and Belgium 1918, Vol I, The German March Offensive and its Preliminaries, London: Macmillan, 1935/Imperial War Museum and Battery Press, 1995, ISBN 0-89839-219-5/Uckfield: Naval & Military Press, 2009, ISBN 978-1-84574-725-1.
- Brig-Gen Sir James E. Edmonds, History of the Great War: Military Operations, France and Belgium 1918, Vol IV, 8th August–26th September: The Franco-British Offensive, London: Macmillan, 1939/Uckfield: Imperial War Museum and Naval & Military, 2009, ISBN 978-1-845747-28-2.
- Brig-Gen Sir James E. Edmonds & Lt-Col R. Maxwell-Hyslop, History of the Great War: Military Operations, France and Belgium 1918, Vol V, 26th September–11th November, The Advance to Victory, London: HM Stationery Office, 1947/Imperial War Museum and Battery Press, 1993, ISBN 1-870423-06-2.
- Capt Cyril Falls, History of the Great War: Military Operations, France and Belgium 1917, Vol I, The German Retreat to the Hindenburg Line and the Battle of Arras, London: Macmillan, 1940/London: Imperial War Museum & Battery Press/Uckfield: Naval and Military Press, 2009, ISBN 978-1-84574722-0.
- Gen Sir Martin Farndale, History of the Royal Regiment of Artillery: Western Front 1914–18, Woolwich: Royal Artillery Institution, 1986, ISBN 1-870114-00-0.
- Gen Sir Martin Farndale, History of the Royal Regiment of Artillery: The Forgotten Fronts and the Home Base 1914–18, Woolwich: Royal Artillery Institution, 1988, ISBN 1-870114-05-1.
- J.B.M. Frederick, Lineage Book of British Land Forces 1660–1978, Vol II, Wakefield: Microform Academic, 1984, ISBN 1-85117-009-X.
- Col K. W. Maurice-Jones, The History of Coast Artillery in the British Army, London: Royal Artillery Institution, 1959/Uckfield: Naval & Military Press, 2005, ISBN 978-1-845740-31-3.
- L.F. Penstone, The History of 76 Siege Battery, R.G.A., 1937/Uckfield: Naval & Military Press, 2009, ISBN 978-1-845740-80-1.
- War Office, Army Council Instructions Issued During May 1916, London: HM Stationery Office.
- Leon Wolff, In Flanders Fields: The 1917 Campaign, London: Longmans, 1959/Corgi, 1966.