Hohenzollern Redoubt action, 2–18 March 1916
The Hohenzollern Redoubt action, 2–18 March 1916 was fought on the Western Front during the First World War. The Hohenzollern Redoubt was a German defensive position north of Loos-en-Gohelle (Loos), a mining town north-west of Lens in France. The Redoubt was fought over by the British and German armies from the Battle of Loos (25 September – 8 October 1915) to the beginning of the Battle of the Somme on 1 July 1916. Over the winter of 1915–1916, the 170th Tunnelling Company RE dug several galleries under the German lines in the area of the redoubt, which had changed hands several times since September 1915. In March 1916, the west side was held by the British and the east side was occupied by the Germans, with the front near a new German trench known as The Chord. No man's land had become a crater field and the Germans had an unobstructed view of the British positions from the Fosse 8 slag heap. The British front line was held by outposts to reduce the number of troops vulnerable to mine explosions and the strain of knowing that the ground could erupt at any moment.
| Hohenzollern Redoubt action, 2–18 March 1916 | |||||||
|---|---|---|---|---|---|---|---|
| Part of Local operations December 1915 – June 1916 Western Front, First World War | |||||||
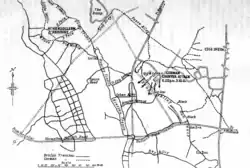 Hohenzollern Redoubt, Loos battlefield, 1915, site of the 1916 operations | |||||||
| |||||||
| Belligerents | |||||||
|
|
| ||||||
| Commanders and leaders | |||||||
| Sir Douglas Haig | Erich von Falkenhayn | ||||||
| Strength | |||||||
| 2 brigades | 2 regiments | ||||||
| Casualties and losses | |||||||
| 1,978 | 97 (incomplete) | ||||||
 Hohenzollern Redoubt (Loos) | |||||||
The 12th (Eastern) Division was selected to conduct an attack to capture the crater field, gain observation from crater lips over the German defences back to Fosse 8 and end the threat of German mine attacks. Four mines, the largest yet sprung by the British, were detonated on 2 March and followed up by two battalions of infantry, which captured the new craters, several German occupied craters, Triangle Crater which had not been seen until it was overrun and a large length of The Chord, most of the rest being obliterated in the explosions. The main entrance of the German mine galleries was discovered in Triangle Crater and the 170th Tunnelling Company RE crossed no man's land to demolish the entrance. German counter-attacks concentrated on the recovery of Triangle Crater, which was re-captured on 4 March. The recovery by the Germans of the gallery entrance threatened the positions captured by the British, who attacked Triangle Crater on 6 March and were repulsed.
The British tunnellers got into the German gallery system from a British tunnel and were able to demolish the system on 12 March, which relieved the threat of another German mine attack. Skirmishing around the craters diminished and it was thought that the Germans were concentrating on consolidating new positions. On 18 March, the Germans surprised the British with five mines which had been quietly dug through the clay layer above the chalk. The German attack had nearly as much success as that of the British on 2 March, forcing them back to the original front line, before local counter-attacks regained some of the craters. When the fighting died down after 19 March, both sides occupied the near lips of the craters. Brigadier-General Albemarle Cator, the 37th Brigade commander, recommended that attempts to occupy craters should end and the near lips be held instead, because craters were death traps against howitzer and mortar fire; observation from the crater lip was obstructed by its convex shape and the large lumps of chalk brought to the surface by the explosions.
Background
Mining
170th Tunnelling Company began work for a mining attack on the Hohenzollern Redoubt on 14 December 1915. By the end of the month, it was in the process of sinking six shafts. Two sections of 180th Tunnelling Company were then attached to 170th Tunnelling Company, and the miners began another three shafts. Mining was carried out in the clay layer to distract the Germans from other mine workings in the chalk.[1] In the meantime, the Hohenzollern Redoubt area had changed hands several times since September 1915. In March 1916, the west side was held by the British and the east side was occupied by the Germans, with the front near a new German trench known as The Chord. The Germans had an unobstructed view of the British positions, from a slag heap called Fosse 8 and in previous mining operations no man's land had become a crater field. The British front line was held by outposts, to reduce the number of troops vulnerable to mine explosions and the strain of knowing that the ground could erupt at any moment.[2] It had been calculated that the German mining effort in the area of the Hohenzollern Redoubt was six weeks more advanced than the British effort.[3]
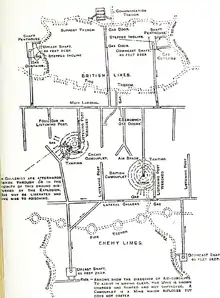
Mining was intended to destroy fortifications and the troops in them and to prevent the opponent from doing the same. Mining had to be conducted under conditions, which concealed the effort from the opponents, to prevent counter-mining. Excavated material in the Loos area was chalk and thus easily seen; some of the material was used in the front line but most had to be removed by large carrying-parties and dumped out of sight of German ground observers and the crews and cameras of reconnaissance aircraft. A shaft was dug well back in the defensive system and then a gallery was driven forward, with branch galleries dug at intervals. As the main gallery got close to German defences, the need for silence became paramount, to elude the Germans conducting a similar mining operation. Plans of the mine workings were kept, on which rival German works were plotted, based on mines already sprung and the reports of listeners.[3]
When galleries came close, a camouflet (a small mine insufficient to disturb the surface) would be planted, to collapse the opponents' gallery and then the digging of the offensive gallery would resume. If the gallery reached the target, a chamber would be dug and then loaded with explosives, ready to fire. The nearing of a German gallery, listening for clues, breaking into a rival gallery and waiting for the mine to explode, caused great strain to the miners and was nerve-racking for troops in front line positions on the surface, who knew that a mine could be sprung under them at any moment. To reduce the danger to front-line troops, the area was held by posts rather than a continuous front line, with only the minimum number of troops. German mining had formed craters in no man's land, named craters 1–4 by the British and which were held by each side, dug in on their respective near lips. In February 1916, mining was being conducted at the Quarries and near Fosse 8, where explosions were frequent and were followed by infantry attacks to occupy the near lip and by sapping forward.[4]
Prelude
British offensive preparations
The British effort over the winter gradually overtook the German mining operation and a plan was made to destroy the German galleries. Four mines were planted under the Hohenzollern Redoubt, to be exploded just before an attack on The Chord, which would leave the British in possession of the crater-field, counter the German advantage in observation from Fosse 8 and possibly lead to the destruction of the German gallery system. Chamber A was loaded with 7,000 lb (3,200 kg) of ammonal, Chamber B with 3,000 lb (1,400 kg) of blastine and 4,000 lb (1,800 kg) of ammonal; Chamber C was loaded with a charge of 10,550 lb (4,790 kg), the Germans being apparently taken unawares.[5] While the 36th Brigade was out of the line resting and training, the 37th Brigade conducted preparatory work, dumping hand grenades close to the front line, preparing communication trenches, jumping-off places and arranging to carry hot soup to the raiding parties after the attack.[5]
British plan of attack
The commander of the 170th Tunnelling Company produced a forecast of the effect of the mines, to help orientate the attackers, in which mines A and B were predicted to make craters 100 ft (30 m) wide, 35 ft (11 m) deep and that Crater C to be 130 ft (40 m) wide and 35 ft (11 m) deep. The fourth, smaller mine had been planted under the side of Crater 2 and was expected to leave a bigger crater, slightly offset.[5] The 12th divisional artillery was supported by the 59th and 81st Siege batteries and the I Corps artillery supplied a section of 9.2-inch howitzers, two sections of 8-inch howitzers and two sections of 60-pounder guns. No preparatory bombardment was to be fired but from 5:10 p.m., ten trench mortars were to fire on Crater 1 and The Chord; as the attack began, the mortars were to fire smoke to screen the advance. As a precaution, the front line infantry were to be withdrawn, before the mines were sprung.[6]
German defensive preparations
Increased British activity at the end of February near the Hohenzollern Redoubt, an unusual amount of patrolling and greater amounts of heavy artillery and trench mortar fire, put the Germans on their guard against a British attack. The area was held by I Battalion, Bavarian Infantry Regiment 23 and III Battalion, Bavarian Infantry Regiment 18 of the 3rd Bavarian Division, each with three companies in the front line and one in reserve.[7]
Battle
2 March

At 5:45 p.m., three mines were sprung, about 30 ft (9.1 m) short of The Chord, which made crater lips from which the German trenches could be seen. As dark fell, the 9th Royal Fusiliers (9th RF) attacked on the right, as the 8th Royal Fusiliers on the left and troops of the 35th Brigade on the right, gave covering fire. There had been much snow, sleet and rain during the week previous and the attackers found that in the displaced earth from the mine explosions, they were shin deep. C Company of the 9th RF reached craters 1, 2 and A, then stumbled on Triangle Crater with few casualties. A party detailed to block Big Willie Trench ran down the south-east face of the crater, caught the German trench garrisons in their underground shelters and took 80 prisoners, before being slowly driven back to Triangle Crater, after they ran out of hand grenades. Fifty men assembled on the western face, where they were showered with debris from mine A; twenty men were temporarily buried. The rest of the party captured The Chord, from crater A to C4 Trench and then repulsed German counter-attacks.[8]
On the left flank, the 8th RF captured craters 4, B and C but the party that attacked to capture The Chord from B to C4 were caught in no man's land by the Germans; only two men reached the objective. Twenty men from a supporting unit joined the two survivors but The Chord had mostly been destroyed in the area, leaving little cover. The British eventually fell back to the crater line, where another twenty men arrived and helped to hold the position and consolidate craters 4, B and C. German counter-attacks were made all through the night but were repulsed and consolidation was begun, despite the loss of contact with the rear and the soft ground.[9] The 170th Tunnelling Company followed up the infantry and began to blow up the German gallery entrance found in Triangle Crater. The objectives of the attack had been achieved, except at the north end of The Chord and a later bombing attack up The Chord from the south by the 9th RF, was also repulsed.[10]
3–5 March
At 9:37 a.m., the 36th Brigade commander, Brigadier-General L. B. Boyd-Moss reported that the situation was satisfactory, the craters having been captured, consolidation begun and the unexpected Triangle Crater had been captured, in which had been found the main entrance of the German gallery system. Observation of the German lines back to Fosse 8 had been gained, some of The Chord had been captured and much of the rest had been destroyed but German artillery-fire from 6–8:00 a.m., had caused many casualties. During the day, the two attacking battalions were relieved by the 11th Middlesex and the 7th Royal Sussex (7th RS) battalions. Immediate German counter-attacks failed until 4 March, when an attack at 6:00 a.m., from The Chord and Little Willie Trench was repulsed. More attacks at 7:00 and 9:00 a.m. were driven off, then at 4:15 p.m., another German bombardment began on the craters on the right flank and Triangle Crater was recaptured by three attacks..[11]
The battalions of Bavarian Infantry regiments 18 and 23, were withdrawn during the night of 4/5 March and counter-attacks continued by fresh troops until 6 May, when it was decided to conduct an organised counter-attack with all of Bavarian Infantry regiments 18 and 23, reinforced by Reserve Infantry regiments 55 and 91. The 36th Brigade was relieved by the 37th Brigade on 5 March and the 11th Middlesex and 7th RS positions were taken over by the 6th Buffs and the 7th East Surrey. German attacks were made on Crater C at 8:00, 9:22 and 10:35 p.m., which were repulsed with the help of the divisional artillery.[12] The German attacks were intended to deprive the British of observation over the remaining German defences.[13]
6 March
The German recovery of Triangle Crater and the entrance to the German gallery system, made precarious the British hold on the new craters but time was needed to clear the British galleries and resume mining. Another attack on Triangle Crater and The Chord to block Big Willie, C1 and C2 trenches by the 6th Buffs was planned. A party was to attack from Crater 2 up the south face of Triangle Crater to the east lip and then block Big Willie Trench, a second group was to attack from the same place up the north side of Triangle Crater to The Chord and a third unit was to attack from Crater A to reach The Chord and block trenches C1 and C2. The attack by C Company began at 6:00 p.m. on 6 March, when number 1 party attacked along the southern fringe of Triangle Crater but men sank up to their knees and were caught by machine-gun fire and German hand grenades as they floundered.[14]
The German defenders counter-attacked and pushed the party back to Crater 2, where a mêlée developed, until the Germans retired after two hours. The second and third parties rendezvoused at The Chord but retired, when they ran out of hand grenades. The Germans made a determined attack on Crater 1 and reduced the defenders to one man with a Lewis gun, who held off the Germans until reinforcements arrived. The failure of the attack and the vulnerability of the start line, was reported at 6:55 p.m. and a company of the 6th Battalion, Royal West Kent was sent forward. The reinforcement and the divisional artillery, managed to repulse the German counter-attack but from 6–7 March, the 37th Brigade lost 331 men.[15]
7–15 March
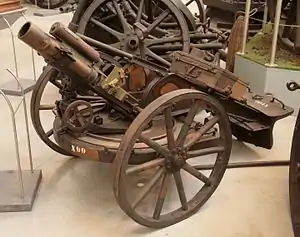
The 170th Tunnelling Company broke into the German gallery system from Crater 2 and found it to be empty, which relieved fears of a German counter-mine and the German system was destroyed on 12 March. German attacks on the craters continued but were defeated, despite restrictions imposed on British artillery ammunition consumption. The Germans began to use a Minenwerfer (mortar) on 15 March, which was highly accurate, brought plunging fire to bear on the craters and destroyed British field defences, demoralising the British infantry.[16]
18 March

Skirmishing took place in bitter cold and snowstorms but German attacks diminished; it was thought that the Germans had abandoned the attempt to recover the lost ground and were concentrating on improving their defensive positions. By 18 March, the British front line was held by the 6th Buffs, a company of the 6th Queen's, one company of the 6th RWK and the 7th East Surrey of the 37th Brigade. The troops were very tired, after holding the positions for a fortnight, against German attacks in such cold and wet weather. German artillery-fire increased in the morning and fire from trench mortars caused a great deal of damage. A much greater bombardment occurred from 5:15–6:15 p.m., during which the fire of heavy Minenwerfer made the craters untenable; the village of Vermelles was hit by about 2,000 shells and the 12th (Eastern) Division communications back to Annequin and Noyelles were bombarded by lachrymatory shells.[17]
The troops of the 6th Buffs in craters 1, 2 and A, were killed or buried and the confusion was made worse because West Face Trench, Saville Row and Saps 9 and 9a had been filled by the debris thrown about by the bombardment. Five mines detonated short of the British lines at 6:15 p.m., causing a certain amount of disorganisation and dismay in III Battalion, Bavarian Infantry Regiment 23, which then rallied and commenced the attack. The Bavarians recaptured The Chord and pushed back the 37th Brigade to the near lips of the craters and the old British front line. A British counter-attack was delayed by the need to clear the saps and then three companies of the 6th RWK recaptured the near lips of the craters. The 7th East Surrey held the left of the British line, where one of the German mines blew up Crater C and the German attackers overran the four surviving men in craters B and 4, then got into Sap 12, Russian Sap and Sticky Trench.[18]
A counter-attack was organised by some of the 7th East Surrey, which recaptured Crater 4 and a commanding position over Crater B. Sap 12 and Russian Sap were blocked and consolidated by 9:15 p.m. Crater 3 had been held during the attack and at 3:15 a.m. on 19 March, the near lips of craters B and C were re-captured. The lip of Crater C was relinquished when day dawned. The British held craters 3 and 4 and the near lips of 1, 2, A and B craters and by 10:30 p.m., the near lip of Crater C had been regained and connected to Russian Sap. The Germans then retired to the near lips on the German side. It later emerged that the Germans had driven new galleries through the clay layer on top of the chalk, which could be dug quietly, contributing to the surprise of the German mine explosions. The 35th Brigade relieved the 37th Brigade and by the time that the crater fighting died down, both sides held the near side of each crater.[18][13]
Aftermath
Analysis
| Month | Total |
|---|---|
| December | 5,675 |
| January | 9,974 |
| February | 12,182 |
| March | 17,814 |
| April | 19,886 |
| May | 22,418 |
| June | 37,121 |
| Total | 125,141 |
The new German garrison of the Hohenzollern Redoubt was doubled for several days and a high level of alert maintained until the end of the month, when the possibility of another British attack was considered to have ended. The 37th Brigade commander, Brigadier-General Cator, reported that the interiors of craters were mantraps. The craters attracted artillery and mortar fire but gave no protection, being confined spaces with a morass of liquid chalk and black mud at the bottom, which was unusable as a material for fortification. Building up crater lips with a parados (the embanked rear lip of the trench) or hurdles and boards failed, because shellfire soon dislodged them and the inner sides collapsed into the crater. Defending the forward lip had proved difficult, due to its breadth and the presence of clay mounds 12–20 ft (3.7–6.1 m) high, which obstructed the field of fire. Cator recommended that the near lips of craters or a line beyond them were better positions and the interiors of craters left empty, with positions maintained on the rear lips.[7]
Casualties
The 36th Brigade had 898 casualties and the 37th Brigade 1,084 losses from 5–18 March. The 8th RF lost 254 casualties and the 9th RF had 160 losses in the 2 March attack. From 2 to 19 March, the 12th (Eastern) Division had more than 3,000 casualties and when the division was relieved on 26 April, its losses had risen to 4,025 men.[20] German casualty figures are incomplete, none being available for Bavarian Infantry Regiment 23 but Bavarian Infantry Regiment lost 95 men. James Edmonds, the British official historian wrote that Bavarian Infantry Regiment 23 was in the path of the initial British attack, made the first counter-attack and would have had a much larger number of casualties.[21]
Subsequent operations
The British exploded another mine on 19 March and the Germans sprung two mines in the Quarries on 24 March. British mines were blown on 26 and 27 March, 5, 13, 20, 21 and 22 April; German mines were exploded on 31 March, 2, 8, 11, 12 and 23 April. Each explosion was followed by infantry attacks and consolidation of the mine lips, which were costly to both sides and turned more areas of no man's land into crater fields. The 12th (Eastern) Division was relieved on 26 April and missed the German gas attack at Hulluch, which began the next day.[22]
Hulluch
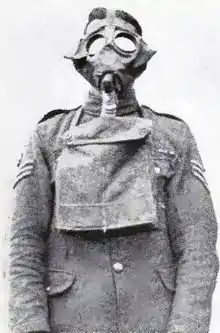
A German gas attack by the divisions of the II Bavarian Corps took place from 27 to 29 April against the positions of I Corps. Just before dawn on 27 April, the 16th (Irish) Division and part of the 15th (Scottish) Division were subjected to a German cloud gas attack near Hulluch, 1 mi (1.6 km) north of Loos. The gas cloud and artillery bombardment were followed by raiding parties, which made temporary lodgements in the British lines. Two days later, another gas attack blew back over the German lines. A large number of German casualties were caused by the error, which was increased by British troops firing at the Germans as they fled in the open. The German gas was a mixture of chlorine and phosgene, which was of sufficient concentration to penetrate the British PH gas helmets. The 16th Division was unjustly blamed for poor gas discipline and it was put out that the gas helmets of the division were of inferior manufacture, to allay doubts as to the effectiveness of the helmet. Production of the Small Box Respirator, which had worked well during the attack, was accelerated.[23]
Footnotes
- Jones 2010, p. 98.
- Edmonds 1993, p. 174.
- Middleton Brumwell 2001, pp. 33–34.
- Middleton Brumwell 2001, p. 34.
- Middleton Brumwell 2001, p. 35.
- Middleton Brumwell 2001, pp. 35–36.
- Edmonds 1993, p. 177.
- Middleton Brumwell 2001, pp. 36–37.
- Middleton Brumwell 2001, p. 37.
- Edmonds 1993, p. 175.
- Middleton Brumwell 2001, pp. 37–38.
- Middleton Brumwell 2001, p. 39.
- Edmonds 1993, pp. 177, 176.
- Middleton Brumwell 2001, p. 40.
- Middleton Brumwell 2001, pp. 40–41.
- Middleton Brumwell 2001, p. 41.
- Middleton Brumwell 2001, pp. 43–44.
- Middleton Brumwell 2001, p. 44.
- Edmonds 1993, p. 243.
- Middleton Brumwell 2001, pp. 38, 45–46.
- Edmonds 1993, p. 176.
- Middleton Brumwell 2001, pp. 45–46.
- Edmonds 1993, pp. 194–197.
References
- Edmonds, J. E. (1993) [1932]. Military Operations France and Belgium, 1916: Sir Douglas Haig's Command to the 1st July: Battle of the Somme. History of the Great War Based on Official Documents by Direction of the Historical Section of the Committee of Imperial Defence. Vol. I (Imperial War Museum & Battery Press ed.). London: Macmillan. ISBN 978-0-89839-185-5.
- Jones, Simon (2010). Underground Warfare 1914–1918. Pen & Sword Military. ISBN 978-1-84415-962-8.
- Middleton Brumwell, P. (2001) [1923]. Scott, A. B. (ed.). History of the 12th (Eastern) Division in the Great War, 1914–1918 (Naval & Military Press ed.). London: Nisbet. ISBN 978-1-84342-228-0. Retrieved 25 October 2014.
Further reading
- Jones, H. A. (2002) [1928]. The War in the Air, Being the Story of the Part played in the Great War by the Royal Air Force. Vol. II (Naval & Military Press ed.). London: Clarendon Press. ISBN 978-1-84342-413-0. Retrieved 31 October 2014.