Battle of Langemarck (1917)
The Battle of Langemarck (16–18 August 1917) was the second Anglo-French general attack of the Third Battle of Ypres, during the First World War. The battle took place near Ypres in Belgian Flanders, on the Western Front against the German 4th Army. The French First Army had a big success on the northern flank from Bixschoote to Drie Grachten (Three Canals) and the British gained a substantial amount of ground northwards from Langemark to the boundary with the French.
| Battle of Langemarck | |||||||
|---|---|---|---|---|---|---|---|
| Part of the Third Battle of Ypres in the First World War | |||||||
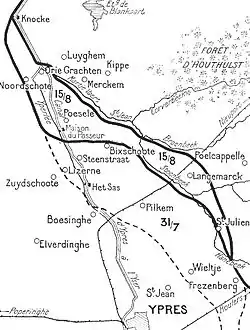 Front line after Battle of Langemarck, 16–18 August 1917 | |||||||
| |||||||
| Belligerents | |||||||
|
|
| ||||||
| Commanders and leaders | |||||||
|
|
| ||||||
| Strength | |||||||
|
10 divisions 8 British, 2 French |
6 Stellungsdivisionen 5 Eingreifdivisionen | ||||||
| Casualties and losses | |||||||
| 16–28 August: 36,190 |
11–21 August: 24,000 16–18 August: 2,087 POW | ||||||
Langemark, a village in the Belgian province of West Flanders | |||||||
The attack on the Gheluvelt Plateau on the right (southern) flank captured a considerable amount of ground but failed to reach its objectives. German counter-attacks recaptured most of the lost territory during the afternoon. The weather prevented much of the British programme of air co-operation with the infantry, which made it easier for German reserves to assemble on the battlefield.
An unusually large amount of rain in August, poor drainage and lack of evaporation turned the ground into a morass, which was worse for the British and French, who occupied lower-lying ground and attacked areas which had been frequently and severely bombarded. Mud and flooded shell holes severely reduced the mobility of the infantry and poor visibility hampered artillery observers and artillery-observation aircraft. Rainstorms and the costly German defensive success during the rest of August, led the British to stop the offensive for three weeks.
In early September, the sun came out and with the return of a breeze, dried much of the ground. The British rebuilt roads and tracks to the front line, transferred more artillery and fresh divisions from the armies further south and revised further their tactics. The main offensive effort was shifted southwards and led to success on the Gheluvelt Plateau on 20, 26 September and 4 October, before the rains returned.
Background
Strategic background
Artillery preparation for the Second Battle of Verdun, in support of the Allied offensive in Flanders, which had been delayed from mid-July began on 20 August, after an eight-day bombardment.[1] Attacking on an 11 mi (18 km) front, the French captured Mort Homme, Hill 304 and 10,000 prisoners. The 5th Army could not counter-attack because its Eingreif divisions had been sent to Flanders. Fighting at Verdun continued into September, adding to the pressure on the German army.[2] The Canadian Corps fought the Battle of Hill 70 (15–25 August), outside Lens on the British First Army front. The attack was costly but inflicted great losses on five German divisions and pinned down troops reserved for relief of tired divisions on the Flanders front.[3] The strategy of forcing the German army to defend the Ypres salient, to protect the Belgian hinterland, the coast, railways and submarine bases, had succeeded. The French and Russians could make local attacks but needed more time to recuperate free of big German attacks. The British had forced the Germans into a costly defensive battle but the Fifth Army (General Hubert Gough) had struggled to advance since 31 July, due to the tenacity of the German defence and the unusually wet weather. Gough kept pressure on the 4th Army, to prevent the Germans from recovering and to enable Operation Hush on the coast, which needed the high tides due at the end of August.[4]
Tactical developments
On 31 July 1917, Field Marshal Sir Douglas Haig had begun the Third Battle of Ypres, to inflict unsustainable losses on the German army and to advance out of the Ypres Salient to capture the Belgian coast and end the submarine threat from Belgian bases to the southern North Sea and the Dover Straits. At the Battle of Messines Ridge (7–14 June) the ridge had been captured down to the Oosttaverne line and a substantial success had been gained at the Battle of Pilckem Ridge (31 July – 2 August).[5] Ground conditions in August were poor, as the surface had been bombarded, fought over and partially flooded, at times severely so. Shelling had destroyed drainage canals in the area and the unseasonable heavy rain in August turned parts into morasses of mud and waterlogged shell-craters. Supply troops walked to the front on duck boards laid across the mud; carrying loads of up to 99 lb (45 kg) they could slip into the craters and drown. Trees were reduced to blasted trunks, the branches and leaves torn away and corpses from earlier fighting were uncovered by the rain and shelling. The ground was powdery to a depth of 30 ft (9 m) and when wet had the consistency of porridge.[6]
Brigadier-General John Davidson, Director of Operations at BEF HQ, submitted a memorandum on 1 August, urging caution on Haig and Gough. Davidson recommended that the preliminary operation by II Corps not be hurried; a full artillery preparation and a relief by fresh divisions should be completed before the operation. Tired and depleted units had often failed in such attacks; two fresh divisions were sent to II Corps. Two or three clear days were needed for accurate artillery-fire, especially as captured ground on the Gheluvelt plateau gave better observation. Captured German maps revealed the positions of their machine-gun emplacements, which being small and concealed, needed accurate fire by the artillery to destroy them. The capture of the black line, from Inverness Copse north to Westhoek, would be insufficient to protect an advance from the Steenbeek further north and large German counter-attacks could be expected on the plateau, given that it was the German defensive point of main effort (Schwerpunkt).[7]
Weather
Except where shell-holes obstructed drainage, the ground in west Flanders dried quickly and became dusty after a few dry days.[8] A 1989 study of weather data recorded from 1867 to 1916 at Lille, 16 mi (26 km) down the road from Ypres, showed August to be more often dry than wet, that there was a trend towards dry autumns (September–November) and that average rainfall in October had decreased over the previous fifty years.[9] From 1 to 10 August, 59.1 mm (2.33 in) of rain fell, including 8 mm (0.31 in) in a thunderstorm on 8 August.[10] During August 1917, 127 mm (5.0 in) of rain fell, 84 mm (3.3 in) of which fell on 1, 8, 14, 26 and 27 August. The month was so overcast and windless that water on the ground dried slower than usual. September had 40 mm (1.6 in) of rain and was much sunnier, the ground drying quickly, hard enough in places for shells to ricochet and for dust to blow in the breeze. In October, 107 mm (4.2 in) of rain fell, compared to the 1914–1916 average of 44 mm (1.7 in) and from 1 to 9 November there was another 7.5 mm (0.30 in) of rain and only nine hours of sunshine, little of the water drying; another 13.4 mm (0.53 in) of rain fell on 10 November.[11]
Prelude
British preparations
Few of the pillboxes captured on 31 July had been damaged by artillery-fire. Before the attack, the 109th Brigade [36th (Ulster) Division] commander, Brigadier-General Ambrose Ricardo, arranged three-minute bombardments on selected pillboxes and blockhouses by the XIX Corps heavy artillery, with pauses so that artillery observers could make corrections to contradictory maps and photographs. It was discovered that on many of the targets, the shell dispersion covered hundreds of yards, as did wire-cutting bombardments.[12] On 2 August, at the suggestion of Brigadier-General Hugh Elles, commander of the Tank Corps, it was decided that the surviving tanks were to be held back due to the weather, for use en masse later on, although some were used later in the month. The preliminary operation intended for 2 August was delayed by rain until 10 August and more rain delays forced the postponement of the general offensive from 4 to 15 August and then again to 16 August.[13]
The 20th (Light) Division replaced the 38th (Welsh) Division on 5 August. The 7th Battalion of the Somerset Light Infantry took over captured German trenches behind the front line on 5 August, which had been turned into the British reserve line and lost three men to shellfire while waiting for dark. On arrival at the support line 500 yd (460 m) forward and the front line another 500 yd (460 m) beyond, the battalion found that the front line consisted of shell hole posts with muddy bottoms strung along the Steenbeek, from the Langemarck road to the Ypres–Staden railway. British artillery was engaged in destructive bombardments of the German positions opposite and German artillery fire was aimed at the British infantry concentrating for the next attack. After heavy rain all night, the battalion spent 6 August soaked through and had 20 casualties, two men being killed. On 7 August, there were 35 casualties, including twelve killed, before the battalion was relieved until 14 August. Training began for the next attack, planned from trench maps and aerial photographs. Each company formed three platoons, two for the advance, with two rifle sections in the lead, the Lewis-gun sections behind and the third platoon to mop up.[14]
Training emphasised the need for units to "hug" the creeping barrage and to form offensive flanks, to assist neighbouring troops whose advance had been halted by the defenders. Infantry that got forward could provide enfilade fire and envelop German positions, which were to be left behind and mopped-up by reserve platoons. Every known German position was allocated to a unit of the c. 470 men left in the battalion, to reduce the risk of unseen German positions being overrun and the occupants firing at the leading troops from behind. While the Somersets were out of the line, the 10th and 11th battalions, the Rifle Brigade edged forward about 100 yd (91 m) beyond the Steenbeek, which cost the 10th Battalion 215 casualties. On 15 August an attempt to re-capture the Au Bon Gite blockhouse, 300 yd (270 m) beyond the Steenbeek, which had been lost to a German counter-attack on 31 July, failed. It was decided that the infantry for the general attack, due on 16 August, would have to squeeze into the ground beyond the river in front of the blockhouse for the attack on Langemarck.[15]
Operation Summer Night
Operation Summer Night (Unternehmen Sommernacht) was a German methodical counter-attack (Gegenangriff) near Hollebeke in the Second Army area on the southern flank, which began at 5:20 a.m. on 5 August. The 22nd Reserve Division had been relieved by the 12th Division and the 207th Division after its losses on 31 July. After a short bombardment, three companies of I Battalion, Infantry Regiment 62 of the 12th Division captured a slight rise 0.62 mi (1 km) north-east of Hollebeke, surprising the British, who fell back 260 ft (80 m). The new German positions were on higher and drier ground and deprived the British of observation over the German rear, reducing casualties from British artillery-fire.[16]
Further to the south, Reserve Infantry regiments 209 and 213 of the 207th Division attacked Hollebeke through thick fog and captured the village, despite many casualties, taking at least 300 prisoners. Most of the British were in captured pillboxes and blockhouses, which had to be attacked one by one and at 5:45 a.m., three signal flares were fired to indicate success. The Germans later abandoned Hollebeke and reoccupied the old A line, then withdrew to their start line because of the severity of British counter-attacks and artillery-fire. Sommernacht left the front-line ragged, with a 1,300 ft (400 m) gap between regiments 209 and 213, which the British tried to exploit with attacks and counter-attacks, before the bigger British effort of 10 August against the Gheluvelt Plateau.[17]
Capture of Westhoek

The Gheluvelt Plateau became a sea of mud, flooded shell craters, fallen trees and barbed wire. Troops were exhausted quickly by the weather, massed artillery bombardments and lack of food and water. The rapid relief of units spread the exhaustion through all the infantry, despite the front being held by fresh divisions. British artillery fired a preparatory bombardment from Polygon Wood to Langemarck but the German guns concentrated on the Plateau. The British gunners were hampered by low cloud and rain, which made air observation extremely difficult and shells were wasted on empty gun emplacements. The British 25th Division, 18th (Eastern) Division and the German 54th Division had relieved the original divisions by 4 August but the German 52nd Reserve Division was left in the line.[18]
By 10 August the infantry on both sides of no man's land were exhausted. The 18th (Eastern) Division attacked on the right; some troops quickly reaching their objectives but German artillery isolated them around Inverness Copse and Glencorse Wood. German troops counter-attacked several times and by nightfall the Copse and all but the north-west corner of Glencorse Wood had been recaptured. The 25th Division on the left flank advanced quickly and reached its objectives by 5:30 a.m., rushing the Germans in Westhoek. Snipers and attacks by German aircraft caused an increasing number of casualties; the Germans counter-attacked into the night and the British guns bombarded German troops in their assembly positions. The appalling weather and costly defeats began a slump in British infantry morale; lack of replacements began to concern the German commanders.[18]
Plan
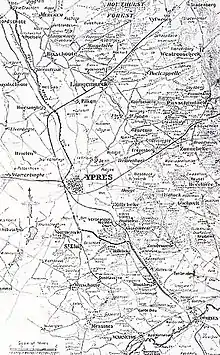
The attack was planned as an advance in stages, to keep the infantry well under the protection of the field artillery.[19] II Corps was to reach the green line of 31 July, an advance of about 1,480–1,640 yd (1,350–1,500 m) and form a defensive flank from Stirling Castle to Black Watch Corner. The deeper objective was compensated for by reducing battalion frontages from 383–246 yd (350–225 m) and leap-frogging supporting battalions through an intermediate line, to take the final objective.[20]
On the 56th (1/1st London) Division front, the final objective was about 550 yd (500 m) into Polygon Wood. On the right, the 53rd Brigade of the 18th (Eastern) Division was to advance from Stirling Castle, through Inverness Copse to Black Watch Corner, at the south-west corner of Polygon Wood, to form a defensive flank to the south. Further north, the 169th Brigade was to advance to Polygon Wood through Glencorse Wood and 167th Brigade was to reach the north-western part of Polygon Wood through Nonne Bosschen.[21]
The 8th Division was to attack with two brigades between Westhoek and the Ypres–Roulers railway, to reach the green line on the rise east of the Hanebeek stream.[22] Eight tanks were allotted to II Corps to assist the infantry. The artillery support for the attack was the same as that for 10 August, 180 eighteen-pounder guns for the creeping barrage moving at 110 yd (100 m) in five minutes, with seventy-two 4.5-inch howitzers and thirty-six 18-pounders placing standing barrages beyond the final objective. Eight machine-gun companies were to fire barrages on the area from the north-east of Polygon Wood to west of Zonnebeke.[23]
XIX and XVIII corps, further north, were also to capture the green line, slightly beyond the German Wilhelmstellung (third position). Each XIX Corps division had fourteen 18-pounder batteries for the creeping barrage, twenty-four 4.5-inch howitzer batteries and forty machine-guns for standing barrages, along with the normal heavy artillery groups.[24] Each division also had a hundred and eight 18-pounders and thirty-six 4.5-inch howitzers for bombardment and benefited from supply routes which had been far less heavily shelled than those further south.[25] In the XVIII Corps area, a brigade each from the 48th (South Midland) Division and 11th (Northern) Division with eight tanks each, was to attack from the north end of St Julien to the White House east of Langemarck.[26]
The 20th (Light) Division planned to capture Langemarck with the 60th Brigade and 61st Brigade. The 59th Brigade was to go into reserve after holding the line before the attack, less the two battalions in the front line, which were to screen the assembly of the attacking brigades. The attack was to begin on the east bank of the Steenbeek, where the troops had 77–148 yd (70–135 m) of room to assemble, crossing over on wooden bridges laid by the engineers the night before the attack.[27][lower-alpha 1] The first objective (blue line), was set on a road running along the west side of Langemarck, the second objective (green line) was 500 yd (460 m) further on, at the east side of the village and the final objective (red line) was another 600 yd (550 m) ahead, in the German defences beyond Schreiboom. On the right, the 60th Brigade was to attack on a one-battalion front, with two battalions to leapfrog through the leading battalion, to reach the second and final objectives. The attack was to move north-east behind Langemarck, to confront an expected German counter-attack up the road from Poelcappelle, 2,000 yd (1,800 m) away, while the 61st Brigade, attacking on a two-brigade front, took the village shielded by the 60th Brigade. The manoeuvre of the 60th Brigade would also threaten the Germans in Langemarck with encirclement.[28]
Au Bon Gite, the German blockhouse which had resisted earlier attacks, was to be dealt with by infantry from one of the covering battalions and a Royal Engineer Field Company. Artillery for the attack came from the 20th (Light) Division, 38th (Welsh) Division and the heavy guns of XIV Corps. A creeping barrage was to move at 98 yd (90 m) in four minutes and a standing barrage was to fall on the objective lines in succession as the infantry advanced. The first objective was to be bombarded for twenty minutes, as the creeping barrage moved towards it, then the second objective was to be shelled for an hour to catch retreating German soldiers, destroy defences and force any remaining Germans under cover. A third barrage was to come from the XIV Corps heavy artillery, sweeping back and forth with high explosive, from 330–1,640 yd (300–1,500 m) ahead of the foremost British troops, to stop German machine-gunners in retired positions from firing through the British barrage. Smoke shell was to be fired to hide the attacking troops, as they re-organised at each objective. A machine-gun barrage from 48 guns was arranged, with half of the guns moving forward with the infantry, to add to their firepower. German troops were also to be strafed by British aircraft from low altitude.[29] The French First Army was to extend the attack north, from the Kortebeek to Drie Grachten, aiming to reach the St Jansbeck.[30]
German defences

The German 4th Army operation order for the defensive battle was issued on 27 June.[31] German infantry units had been reorganised on similar lines to the British, with a rifle section, assault troop section, a grenade-launcher section and a light machine-gun section. Field artillery in the Eingreif divisions had been organised into artillery assault groups, which followed the infantry to engage the attackers with observed or direct fire. Each infantry regiment of the 183rd Division, based around Westroosebeke behind the northern flank of Group Ypres, had a battalion of the divisional field artillery regiment attached.[32] From mid-1917, the area east of Ypres was defended by six German defensive positions: the front position, Albrechtstellung (second position), Wilhelmstellung (third position), Flandern I Stellung (fourth position), Flandern II Stellung (fifth position) and Flandern III Stellung (under construction).[33]
Between the German positions were the Belgian villages of Zonnebeke and Passchendaele.[34] On 31 July, the German defence in depth had begun with a front system of three breastworks: Ia, Ib and Ic, each about 220 yd (200 m) apart, garrisoned by the four companies of each front battalion, with listening-posts in no-man's-land. About 2,200 yd (2,000 m) behind these works was the Albrechtstellung (artillery protective line), the rear boundary of the forward battle zone (Kampffeld). Companies of the support battalions, (25 per cent security detachments (Sicherheitsbesatzung) to hold the strong-points and 75 per cent storm troops [Stoßtruppen] to counter-attack towards them), were placed at the back of the Kampffeld, half in the pill-boxes of the Albrechtstellung, to provide a framework for the re-establishment of defence-in-depth, once the enemy attack had been repulsed.[33] Dispersed in front of the line were divisional sharpshooter (Scharfschützen) machine-gun nests called the strongpoint line (Stützpunkt-Linie). Much of the Kampffeld north of the Ypres–Roulers railway, had fallen on 31 July.[35]
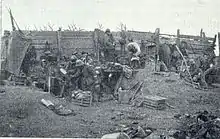
The Albrechtstellung (second position) roughly corresponded to the British black line (second objective) of 31 July, much of which had been captured, except on the Gheluvelt Plateau. The line marked the front of the main battle zone (Grosskampffeld), which was about 2,500 yd (1.4 mi; 2.3 km) deep, behind which was the Wilhelmstellung (third position) and most of the field artillery of the front divisions. In pillboxes of the Wilhelmstellung were the reserve battalions of the front-line regiments.[36] The leading regiment of an Eingreif division was to advance into the zone of the front division, with its other two regiments moving forward in close support from support and reserve assembly areas, further back in the Flandern Stellung.[37][lower-alpha 2] Eingreif divisions were accommodated 9,800–12,000 yd (5.6–6.8 mi; 9.0–11.0 km) behind the front line and at the beginning of an attack began their advance to assembly areas in the rückwärtige Kampffeld behind Flandern I Stellung, ready to intervene in the Grosskampffeld, for den sofortigen Gegenstoß (the instant-immediate counter-thrust).[38][39]
Opposite the French First Army (1re Armée), the Germans had counter-flooded the area between Dixmude and Bixschoote and fortified the drier ground around the waters to stop an attack across or around the floods. Drie Grachten (Three Canals) was the main German defensive fortification in the area, blocking the Noordschoote–Luyghem road at the crossing of the Yperlee Canal north of the Steenbeek. The area was beyond the confluence with the Kortebeek, where the rivers joined to become the St Jansbeek. From Luyghem, a road ran south-east to Verbrandemis and the road from Zudyschoote and Lizenie to Dixmude crossed the Yperlee at Steenstraat. The capture of Luyghem, Merckem and the road would threaten Houthoulst Forest, to the south of Dixmude and north of Langemarck. By 15 August, the French had closed up to Drie Grachten from Bixschoote to the south-east and Noordschoote to the south-west.[40]
_bridgehead%252C_1917.png.webp)
West of the Yperlee Canal, the bridgehead consisted of a semi-circular breastwork due to waterlogged soil. Reinforced concrete shelters were connected by a raised trench of concrete, earth and fascines, with a communication trench leading back to a command post. Several hundred yards along a communication trench on the north side of the road was a small blockhouse. Barbed wire entanglements had been laid above and below the water in front of the post and blockhouse astride the Noordschoote–Luyghem road. To the north was l'Eclusette (the sluice) Redoubt and another pillbox lay to the south, on the west side of the Yperlee. The redoubts corresponded to the defences on the east bank of the canal and enclosed the flanks of the position 2.2 yd (2 m) above the inundations. Platforms gave machine-guns command of a wide arc of ground in front. On the east bank of the Yperlee was a rampart of reinforced concrete, behind and parallel with the canal, from opposite l'Eclusette to the southern redoubt. Communication between the rampart and the defences of the Luyghem peninsula was via the raised road from Drie Grachten to Luyghem and two footbridges through the floods, one north and one south of the road. Every 38–55 yd (35–50 m), were traverses with reinforced concrete shelters.[41]
In an appreciation of 2 August, Group Ypres correctly identified the Wilhelmstellung as the British objective on 31 July and predicted more attacks on the Gheluvelt Plateau and further north towards Langemarck. In the Group Ypres area, only the 3rd and 79th Reserve divisions remained battleworthy, the other four having suffered c. 10,000 casualties. On 4 August, a Gruppe Wijtschate assessment concluded that the British needed to force back the 52nd Division on the Gheluvelt Plateau, where the defensive scheme had the front regiment of each division backed by the other two regiments in support and in reserve behind the front line. Crown Prince Rupprecht expressed concern on 5 August, that the weather conditions were rapidly exhausting the German infantry. Casualties were about 1,500–2,000 men per division, lower than the average of 4,000 casualties on the Somme in 1916 but only because divisions were being relieved more frequently. Supplying troops in the front line was extremely difficult because the British were using more gas, which caught carrying parties by surprise; the 6th Bavarian Reserve Division had suffered 1,200 gas casualties.[17]
Battle
II Corps
| Date | Rain mm |
°F | |
|---|---|---|---|
| 11 | 4.4 | 69 | dull |
| 12 | 1.7 | 72 | dull |
| 13 | 0.0 | 67 | dull |
| 14 | 18.1 | 79 | — |
| 15 | 7.8 | 65 | dull |
| 16 | 0.0 | 68 | dull |
| 17 | 0.0 | 72 | fine |
| 18 | 0.0 | 74 | fine |
| 19 | 0.0 | 69 | dull |
| 20 | 0.0 | 71 | dull |
| 21 | 0.0 | 72 | fine |
| 22 | 0.0 | 78 | dull |
At 4:45 a.m., the British creeping barrage began to move and the infantry advanced. German flares were seen rising but the German artillery response was slow and missed the attackers. In the 18th (Eastern) Division area, German machine-gun fire from pillboxes caused many losses to the 53rd Brigade, which was stopped in front of the north-west corner of Inverness Copse. Part of the brigade managed to work forward further north and form a defensive flank along the southern edge of Glencorse Wood. To the north, the 169th Brigade of the 56th (1/1st London) Division advanced quickly at the start but veered to the right around boggy ground, then entered Glencorse Wood. The German main line of resistance was in a sunken road inside the wood, where after a hard-fought and mutually costly engagement, the German defenders were overrun and the rest of the wood occupied. The leading waves then advanced to Polygon Wood.[43]
The 167th Brigade also had a fast start but when it reached the north end of Nonne Bosschen, found mud 4 ft (1.2 m) deep, the brigade veering round it to the left but the gap which this caused between the 167th and 169th brigades was not closed. Another problem emerged, because the quick start had been partly due to the rear waves pushing up to avoid German shelling on the left of the brigade. The follow-up infantry mingled with the foremost troops and failed to mop up the captured ground or German troops who had been overrun. Isolated German parties began sniping from behind at both brigades. Part of one company reached the area north of Polygon Wood at about the same time as small numbers of troops from the 8th Division.[44] The ground conditions in the 56th (1/1st London) Division area were so bad that none of the tanks in support got into action.[45]
On the 8th Division front, the two attacking brigades started well, advancing behind an "admirable" barrage and reached the Hanebeek, where hand bridges were used to cross and continue the advance up Anzac Spur, to the green line objectives on the ridge beyond. Difficulties began on the left flank, where troops from 16th (Irish) Division had not kept up with the 8th Division. After reaching the vicinity of Potsdam Redoubt a little later, the 16th (Irish) Division was held up for the rest of the day. The check to the Irish left German machine-gunners north of the railway free to enfilade the area of 8th Division to the south. On the right flank, the same thing happened to the 56th (1/1st London) Division, which was stopped by fire from German strongpoints and pillboxes in their area and from German artillery concentrated to the south-east. After a long fight, the 8th Division captured Iron Cross, Anzac and Zonnebeke redoubts on the rise beyond the Hanebeek, then sent parties over the ridge.[45]
XIX Corps
The 16th (Irish) Division and 36th (Ulster) Division attacked from north of the Ypres–Roulers railway to just south of St Julien. The divisions were to advance 1 mi (1.6 km) up the Anzac and Zonnebeke spurs, near the Wilhelmstellung (third position). Providing carrying parties since the last week in July and holding ground from 4 August in the Hanebeek and Steenbeek valleys, which were overlooked by the Germans, had exhausted many men. From 1 to 15 August, the divisions had lost about a third of their front-line strength in casualties. Frequent reliefs during the unexpected delays caused by the rain spread the casualties and fatigue to all of the battalions in both divisions. The advance began on time and after a few hundred yards encountered German strong points, which were found not to have been destroyed by a series of special heavy artillery bombardments before the attack.[25]
The 16th (Irish) Division suffered many casualties from the Germans in Potsdam, Vampire and Borry farms, which had not been properly mopped up, because of the acute the infantry shortage. The garrisons were able to shoot at the advancing Irish troops of the 48th Brigade from behind and only isolated parties of British troops managed to reach their objectives. The 49th Brigade on the left was also held up at Borry Farm, which defeated several costly attacks but the left of the brigade got within 400 yd (370 m) of the top of Hill 37.[46] The 36th (Ulster) Division also struggled to advance, Gallipoli and Somme farms found to be behind a new wire entanglement, with German machine-guns trained on gaps made by the British bombardment, fire from which stopped the advance of the 108th Brigade. To the north, the 109th Brigade had to get across the swamp astride the Steenbeek. The infantry lost the barrage and machine-gun fire from Pond Farm and Border House forced them to take cover. On the left troops got to Fortuin, about 400 yd (370 m) from the start line.[47]
XVIII Corps
The 48th (South Midland) Division attacked at 4:45 a.m. with one brigade, capturing Border House and gun pits either side of the north-east bearing St Julien–Winnipeg road, where they were held up by machine-gun fire and a small counter-attack. The capture of St Julien was completed and the infantry consolidated along a line from Border House, to Jew Hill, the gun pits and St Julien. Troops were fired on from Maison du Hibou and Hillock Farm, which was captured soon after, then British troops seen advancing on Springfield Farm disappeared. At 9:00 a.m., German troops gathered around Triangle Farm and at 10:00 a.m., made an abortive counter-attack. Another German attack after dark was defeated at the gun pits and at 9:30 p.m., a German counter-attack from Triangle Farm was repulsed.[48]
The 11th (Northern) Division attacked with one brigade at 4:45 a.m. The right flank was delayed by machine-gun fire from the 48th (South Midland) Division area and by pillboxes to their front, where the infantry lost the barrage. On the left, the brigade dug in 100 yd (91 m) west of the Langemarck road and the right flank dug in facing east, against fire from Maison du Hibou and the Triangle. Supporting troops from the 33rd Brigade were caught by fire from the German pillboxes but reached the Cockcroft, passed beyond and dug in despite fire from Bulow Farm. On the left flank, these battalions reached the Langemarck road, passed Rat House and Pheasant Trench and ended their advance just short of the White House, joining with the right side of the brigade on the Lekkerboterbeek.[49]
XIV Corps
The 20th (Light) Division attacked with two brigades at 4:45 a.m. The battalions of the right brigade leap-frogged forward on a one-battalion front over the Steenbeek and then advanced in single file, worming round flooded shell craters. Alouette Farm, Langemarck and the first two objective lines were reached easily. At 7:20 a.m., the advance to the final objective began and immediately encountered machine-gun fire from the Rat House and White House. Firing continued until they were captured, the final objective being taken at 7:45 a.m., as German troops withdrew to a small wood behind White House. The left brigade advanced on a two-battalion front and encountered machine-gun fire from the Au Bon Gite blockhouse before it was captured and was then fired on from German blockhouses in front of Langemarck and from the railway station. Once these had been captured, the advance resumed at 7:20 a.m., despite fire from hidden parties of defenders and reached the final objective at 7:47 a.m., under fire from the Rat House. German counter-attacks began around 4:00 p.m. and advanced 200 yd (180 m) around Schreiboom, being driven back some distance later on.[49]
The 29th Division to the north attacked at the same time with two brigades. On the right the first objective was reached quickly and assistance given to the 20th (Light) Division on the right. The Newfoundland Regiment passed through, being held up slightly by marshy conditions and fire from Cannes Farm. The Newfoundlanders continued, reached the third objective and then took Japan House beyond. The left brigade took the first objective easily and then met machine-gun fire from Champeaubert Farm in the French First Army sector and from Montmirail Farm. The advance continued to the final objective, which was reached and consolidated by 10:00 a.m. Patrols moved forward towards the Broombeek and a German counter-attack at 4:00 p.m., was stopped by artillery and small-arms fire.[50] Langemarck and the Wilhelmstellung (third position), north of the Ypres–Staden railway and west of the Kortebeek had been captured.[51]
1re Armée
The French I Corps, on the northern flank of the Fifth Army, attacked from the army boundary north-west of Weidendreft, south of the hamlet of St Janshoek (Sint Jan), north of Bixschoote and the edge of the floods, to the Noordschoote–Luyghem road, which crossed the Yperlee at Drie Grachten (Three Canals).[40] The German defences were more visible than those opposite the British and being above ground, were easier to destroy. The floods obstructed an attack but made it hard for the Germans to move reserves and the open country made French air observation easier.[41] The I Corps objectives were the Drie Grachten bridgehead and the triangular spit of land between the Lower Steenbeek and the Yperlee (Ypres–Ijzer) Canal. The division on the right flank was to cross the Steenbeek and assist XIV Corps on the right, north-west of Langemarck. The Steenbeek was 6 ft 7 in (2 m) broad and 4 ft 11 in (1.5 m) deep here and was broader between St Janshoek and the Steenstraat–Dixmude road; from the Martjewaart Reach to the Yperlee Canal it was 20 ft (6 m) wide and 13 ft (4 m) deep.[52] During the night of the 15/16 and the morning of 16 August, French aircraft bombed the German defences, bivouacs around Houthoulst Forest and Lichtervelde railway station 11 mi (18 km) away. French and Belgian air crew flew at a very low altitude to bomb and machine-gun German troops, trains and aerodromes and shot down three German aircraft.[41]
I Corps crossed the Yperlee from the north-west of Bixschoote to north of the Drie Grachten bridge-head and drove the Germans out of part of the swampy Poesele peninsula but numerous pillboxes built in the ruins of farmhouses further back were not captured. The French crossed the upper Steenbeek from west of Weidendreft to a bend in the stream south-west of St Janshoek. Keeping pace with the British, they advanced to the south bank of the Broombeek. Mondovi blockhouse held out all day and pivoting on it, the Germans counter-attacked during the night of 16/17 August to get between the French and British. The attack failed and the next morning the troops on the army boundary had observation across the narrow Broombeek valley. Apart from resistance at Les Lilas and Mondovi blockhouses, the French had achieved their objectives of 16 August relatively easily. The German garrisons at Champaubert Farm and Brienne House held out until French artillery deluged them with shells, which induced the garrisons to surrender thirty minutes later. The French took more than 300 prisoners, numerous guns, trench mortars and machine-guns.[52]
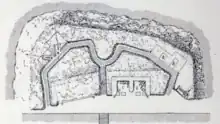
North and north-east of Bixschoote, the ground sloped towards the Steenbeek and was dotted with pillboxes. Just west of the junction of the Broombeek and Steenbeek the Les Lilas and Mondovi blockhouses were in the angle between the streams. The French artillery had bombarded the Drie Grachten bridgehead for several days and reduced it to ruins, the concrete works being easily hit by heavy artillery and on 16 August, the French infantry waded through the floods and occupied the area. On the Poelsele peninsula the German defenders resisted until nightfall before being driven back, as the French closed up to the west bank of the Martjewaart reach of the Steenbeek. North and north-east of Bixschoote, the French reached the west bank of the St Janshoek reach and surrounded Les Lilas. On the night of 16/17 August, French airmen set fire to the railway station at Kortemarck, 9.3 mi (15 km) east of Dixmude.[52]
On 17 August, French heavy howitzers battered Les Lilas and Mondovi blockhouses all day and by nightfall both strong points had been breached and the garrisons captured. The bag of prisoners taken since 16 August was more than 400, along with fifteen guns. From the southern edge of the inundations between Dixmude and Drie Grachten, the French line had been pushed forward to the west bank of the Steenbeek as far as the south end of St Janshoek. South of Mondovi blockhouse, the Steenbeek had been crossed and on the extreme right, the 1re Armée had swung northwards to the south bank of the Broombeek, eliminating the possibility of the Fifth Army being outflanked from the north. French engineers had worked in the swamps and morasses to repair roads, bridge streams and build wire entanglements, despite constant German artillery fire.[53] The advance brought the French clear of the northern stretch of the Wilhelmstellung (third position).[30]
Air operations
Mist and cloud made air observation difficult on the morning of 16 August, until a wind began to blow later in the day but this shifted the smoke of battle over the German lines, obscuring German troop movements. Corps squadrons were expected to provide artillery co-operation, contact and counter-attack patrols but low cloud, mist and smoke during the morning resulted in most German counter-attack formations moving unnoticed.[54][lower-alpha 3] Flash spotting to find the positions of German artillery was much more successful than in previous attacks and many more flares were lit by the infantry when called for by the crews of contact aeroplanes. Army squadrons, Royal Naval Air Service (RNAS) and French aircraft flew over the lines and attacked German aerodromes, troops and transport as far as the weather allowed.[56]
V Brigade RFC tried to co-ordinate air operations over the battlefield with the infantry attack. Two Airco DH.5 aircraft per division were provided to engage any German strong points interfering with the infantry attack on the final objective. Two small formations of fighters were to fly low patrols on the far side of the final objective of the Fifth Army, from the beginning of the attack for six hours, to break up German attempts to counter-attack and to stop equivalent German contact-patrols.[56] After six hours, the aircraft on low patrol were to range further east to attack troop concentrations. Aircraft from the corps and army wings were to attack all targets found west of Staden–Dadizeele, with the Ninth (Headquarters) Wing taking over east of the line.[56] German aerodromes were attacked periodically and special ground patrols were mounted below 3,000 ft (910 m) over the front line, to defend the corps artillery-observation machines.[57]
Attempts to co-ordinate air and ground attacks had mixed results; on the II Corps front, few air attacks were co-ordinated with the infantry and only a vague report was received from an aircraft about a German counter-attack, which was further obscured by a smoke-screen.[57] On the XIX Corps front, despite "ideal" visibility, no warning by aircraft was given of a German counter-attack over the Zonnebeke–St Julien spur at 9:00 a.m., which was also screened by smoke shell. To the north on the XVIII and XIV Corps fronts, the air effort had more effect, with German strong-points and infantry being attacked on and behind the front.[57] Air operations continued during the night, with more attacks on German airfields and rail junctions.[58]
German 4th Army
The troops of 169th Brigade, 56th (1/1st London) Division, which tried to follow the leading waves from Glencorse Wood, were stopped at the edge of Polygon Wood and then pushed back by a counter-attack by the German 34th Division around 7:00 a.m., the troops ahead of them being overwhelmed. Later in the afternoon, the brigade was driven back to its start line by attacks from the south and east by a regiment of the 54th Division sent back into the line.[59] The 167th Brigade pulled back its right flank as the 169th Brigade was seen withdrawing through Glencorse Wood and at 3:00 p.m. the Germans attacked the front of 167th Brigade and the 25th Brigade of the 8th Division to the north. The area was under British artillery observation and the German attack was stopped by massed artillery fire. At 5.00 p.m. the brigade withdrew to a better position 1,150 ft (350 m) in front of its start line to gain touch with 25th Brigade.[60] German artillery fired continuously on a line from Stirling Castle to Westhoek and increased the rate of bombardment from noon, which isolated the attacking British battalions from reinforcements and supplies and prepared the counter-attack made in the afternoon.[61]
As the German counter-attacks by the 34th Division on the 56th (1/1st London) Division gained ground, the 8th Division to the north, about 3,300 ft (1,000 m) ahead of the divisions on the flanks, found itself enfiladed as predicted by Heneker. At about 9:30 a.m. reinforcements for Reserve Infantry Regiment 27 of the 54th Division from Infantry Regiment 34 of the 3rd Reserve Division, the local Eingreif division, attacked over Anzac Farm Spur. SOS calls from the British infantry were not seen by their artillery observers, due to low cloud and smoke shell being fired by the Germans into their creeping barrage. An observation report from one British aircraft, failed to give enough information to help the artillery, which did not fire until too late at 10:15 a.m.[62] The German counter-attack pressed the right flank of the 25th Brigade, which was being fired on from recaptured positions in Nonne Bosschen and forced it back, exposing the right of the 23rd Brigade to the north, which was already under pressure on its left flank and which retired slowly to the Hanebeek stream. Another German attack at 3:45 a.m. was not fired on by the British artillery, when mist and rain obscured the SOS signal from the infantry. The Germans "dribbled" forward and gradually pressed the British infantry back to the foot of Westhoek Ridge.[63] That evening both brigades of the 8th Division withdrew from German enfilade fire coming from the area of the 56th (1/1st London) Division, to ground just forward of their start line.[64]
At around 9:00 a.m. the 16th (Irish) and 36th (Ulster) Divisions were counter-attacked by the reserve regiment of the 5th Bavarian Division, supported by part of the 12th Reserve (Eingreif) Division behind a huge barrage, including smoke shell to mask the attack from British artillery observers. Despite "ideal" weather, air observation failed as it did on the II Corps front. The forward elements of both divisions were overrun and killed or captured.[65] By 10:15 a.m. the corps commander, Lieutenant-General Herbert Watts, had brought the barrage back to the start-line, regardless of survivors holding out beyond it. At 2:08 p.m. Gough ordered that a line from Borry Farm to Hill 35 and Hindu Cottage be taken to link with XVIII Corps. After consulting the divisional commanders, Watts reported that a renewed attack was impossible, since the reserve brigades were already holding the start line.[66]
There were few German counter-attacks on the fronts of XVIII and XIV Corps, which had also not been subjected to much artillery fire before the attack, as the Germans had concentrated on the corps further south. Despite the "worst going" in the salient, the 48th (South Midland) Division got forward on its left, against fire from the area not occupied by 36th (Ulster) Division on its right; the 11th (Northern) Division advanced beyond Langemarck. The 20th (Light) division and the 29th Division of XIV Corps and the French further north reached most of their objectives without serious counter-attack but the Germans subjected the new positions to intense artillery fire, inflicting many losses for several days, especially on the 20th (Light) Division.[30] The German army group commander, Crown Prince Rupprecht wrote that the German defence continued to be based on holding the Gheluvelt Plateau and Houthoulst Forest as bastions, British advances in between were not serious threats.[30] Ludendorff was less sanguine, writing that 10 August was a German success but that the British attack on 16 August was another great blow. Poelcappelle had been reached and despite a great effort, the British could only be pushed back a short distance.[67][lower-alpha 4]
Aftermath
Analysis
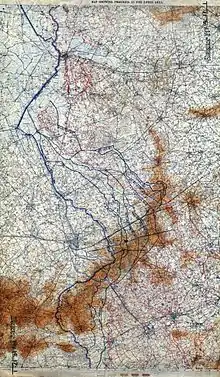
The British plan to overcome the German deep battlefield, was based on a conventional attack in three stages but the artillery was able to arrange a fire plan which was far more sophisticated than in previous attacks. The creeping barrage preceded the infantry and in some places moved slowly enough for the infantry to keep up. New smoke shells were fired when the creeping barrage paused beyond each objective, which helped to obscure the British infantry from artillery observers and German machine-gunners far back in the German defensive zone, who fired at long range through the British artillery barrages. Around Langemarck the British infantry formed up close the German positions, too near to the German defenders for the German artillery to fire on for fear of hitting their infantry, although British troops further back at the Steenbeek were severely bombarded. British platoons and sections were allotted objectives and engineers accompanied troops to bridge obstacles and attack strong points. In the 20th (Light) Division, each company was reduced to three platoons, two to advance using infiltration tactics and one to mop up areas where the forward platoons had by-passed resistance, by attacking from the flanks and from behind.[69]
In the II and XIX Corps areas, the foremost British infantry had been isolated by German artillery and then driven back by counter-attacks. At a conference with the Fifth Army corps commanders on 17 August, Gough arranged for local attacks to gain jumping-off positions for a general attack on 25 August.[70] Apart from small areas on the left of the 56th (1/1st London) Division (Major-General Frederick Dudgeon), the flanks of the 8th Division and right of the 16th (Irish) Division, the British had been forced back to their start line by German machine-gun fire from the flanks and infantry counter-attacks supported by plentiful artillery.[71] Attempts by the German infantry to advance further were stopped by British artillery-fire, which inflicted many losses.[61] Dudgeon reported that there had been a lack of time to prepare the attack and study the ground, since the 167th Brigade had relieved part of the 25th Division after it had only been in the line for 24 hours; neither unit had sufficient time to make preparations for the attack. Dudgeon also reported that no tracks had been laid beyond Château Wood, that the wet ground had slowed the delivery of supplies to the front line and obstructed the advance beyond it. Pillboxes had caused more delays and subjected the attacking troops to frequent enfilade fire.[72]
Major-General Oliver Nugent, the commander of the 36th (Ulster) Division, had used information from captured German orders and noted that German artillery could not bombard advancing British troops since German positions were distributed in depth and the forward zone was easily penetrated. The advance of supporting troops was much easier to obstruct but it was more important to help the foremost infantry. If counter-battery fire was insufficient, the covering fire in front of the advance was more important and counter-battery groups should change target. Nugent recommended that fewer field guns be used for the creeping barrage and that surplus guns should be grouped to fire sweeping barrages (from side-to-side) and that Shrapnel shells should be fuzed to burst higher up, to hit the inside of shell holes. Creeping barrages should be slower with more frequent and longer pauses, during which the barrages from field artillery and 60-pounder guns should sweep and search (move side-to-side and back-and-forth). Nugent suggested that infantry formations should change from skirmish lines to company columns on narrow fronts, equipped with a machine-gun and Stokes mortar and move within a zone, since lines broke up under machine-gun fire in crater-fields.[73][lower-alpha 5]
Tanks to help capture pillboxes had bogged down behind the British front-line and air support had been restricted by the weather, particularly by low cloud early on and by sending too few aircraft over the battlefield. Only one aircraft per corps was reserved for counter-attack patrol, with two aircraft per division for ground attack. Only eight aircraft covered the army front to engage German infantry as they counter-attacked.[75] Signalling had failed at vital moments and deprived the infantry of artillery support, which had made the German counter-attacks much more formidable in areas where the Germans had artillery observation. The 56th (1/1st London Division) Division recommended that advances be shortened, to give more time for consolidation and to minimise the organisational and communication difficulties caused by the muddy ground and wet weather. Divisional artillery commanders asked for two aircraft per division, exclusively to conduct counter-attack patrols. With observation from higher ground to the east, German artillery-fire inflicted many casualties on the British troops holding the new line beyond Langemarck. [76] [lower-alpha 6]
The success of the German 4th Army in preventing the Fifth Army from advancing far along the Gheluvelt Plateau, led Haig to reinforce the offensive in the south-east, along the southern side of Passchendaele Ridge. Haig transferred principal authority for the offensive to the Second Army (General Herbert Plumer) on 25 August. Like Gough after 31 July, Plumer planned to launch a series of attacks with even more limited geographical objectives, using the extra heavy artillery brought in from the armies further south, to deepen and increase the weight of the creeping barrage. Plumer intended to ensure that the infantry were organised on tactically advantageous ground and in contact with their artillery, when they received German counter-attacks.[78] Minor operations by both sides continued in September along the Second and Fifth army fronts, the boundary of which had been moved northwards, close to the Ypres–Roulers railway at the end of August.[79]
Casualties
The British official historian, James Edmonds, recorded 68,010 British casualties for 31 July to 28 August, of whom 10,266 had been killed, with a claim that 37 German divisions had been exhausted and withdrawn.[80] Calculations of German losses by Edmonds have been severely criticised ever since.[81] By mid-August the German army had mixed views on the course of events. The defensive successes were a source of satisfaction but the cost in casualties was thought unsustainable.[82] The German Official History recorded 24,000 casualties from 11 to 21 August, including 5,000 missing, 2,100 prisoners and c. 30 guns lost.[83] Rain, huge artillery bombardments and British air attacks greatly strained the fighting power of the remaining German troops.[84] In 1931, Hubert Gough wrote that 2,087 prisoners and eight guns had been captured.[85]
Subsequent operations
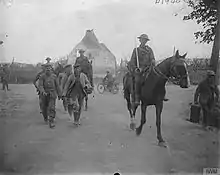
Gough called a conference for 17 August and asked for proposals on what to do next from the corps commanders. Jacob (II Corps) wanted to attack the brown line and then the yellow line, Watts (XIX Corps) wanted to attack the purple line but Maxse (XVIII Corps) preferred to attack the dotted purple line, ready to attack the yellow line with XIX Corps. Gough decided to attack in different places at different times, risking defeat in detail. Infantry tactics would be irrelevant if the artillery failed to suppress the German defenders as the infantry struggled through mud and waterlogged shell-holes.[86]
On 17 August, a 48th (South Midland) Division (XVIII Corps) attack on Maison du Hibou failed; next day the 14th (Light) Division (II Corps) attacked with a brigade through Inverness Copse, although held up further north by fire from Fitzclarence and L-shaped farms. A German counter-attack forced the British half way back through the copse; with support from two tanks on the Menin Road, the British held on there, despite three more German attacks. In the XIV Corps area, the 86th Brigade of the 29th Division pushed forward and established nine posts over the Broombeek.[87]
Action of the Cockcroft
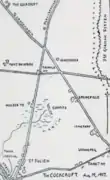
On 19 August parties from the 48th (South Midland) Division (XVIII Corps) and a composite company of the 1st Tank Brigade, attacked up the St Julien–Poelcappelle road to capture the fortified farms, blockhouses and pillboxes known as Hillock Farm, Triangle Farm, Maison du Hibou, the Cockcroft, Winnipeg Cemetery, Springfield and Vancouver.[88] The advance was covered by a smoke barrage and low-flying aircraft disguised the sound of the tanks. The infantry followed up when the tank crews signalled and occupied the strong points. Hillock Farm was captured at 6:00 a.m. and fifteen minutes later Maison du Hibou was taken. Triangle Farm was overrun soon afterwards, when tanks drove the garrisons under cover from where they were unable to defend themselves.[89]
A Female tank ditched 50 yd (46 m) from the Cockcroft at 6:45 a.m.; the crew dismounted their Lewis guns and dug in to wait for their infantry party. The tank crews suffered 14 casualties and the attacking infantry 15, instead of the expected 600 to 1,000; the Germans suffered about 100 casualties and 30 Germans were taken prisoner.[89] On 20 August, a special gas and smoke bombardment was fired by the British on Jehu Trench, beyond Lower Star Post, on the front of the 24th Division (II Corps). The 61st (2nd South Midland) Division (XIX Corps) took a German outpost near Somme Farm and on 21 August the 38th (Welsh) Division (XIV Corps), pushed forward its left flank.[90]
Notes
- Aid posts on the east bank were to be arranged once the advance began; seriously wounded men would have to wait and walking wounded recross the stream to reach Advanced Dressing Stations at Elverdinghe and Cheapside, 6,000–7,700 yd; 3.4–4.3 mi (5,500–7,000 m) away. Non-walking wounded were to be carried by 200 men from the division reserved as stretcher-bearers to Gallwitz Farm 3,000 yd (2,700 m) back, then evacuated by light railway.[27]
- The assembly areas were termed Fredericus Rex Raum and Triarier Raum, an analogy with the formation of a Roman legion, in which troops were organised into hastati, principes and triarii.[37]
- From 30 January 1916, each British army had a Royal Flying Corps brigade attached, which was divided into a corps wing with squadrons responsible for close reconnaissance, photography and artillery observation on the front of each army corps and an army wing which by 1917 conducted long-range reconnaissance and bombing, using the aircraft types with the highest performance.[55]
- In 2011, Gary Sheffield wrote that Ludendorff was correct to describe the battle as "another great blow". Sheffield called the battle a sobering reminder that military operations can only be judged by considering their effect on both sides.[68]
- Cyril Falls, the 36th (Ulster) Division historian, wrote that on 20 September, the 9th (Scottish) Division attacked Frezenburg behind a slower barrage, halted on intermediate objectives for an hour and that each creeping barrage to successive objectives was slower than the one before. Lines of infantry sections at 20 yd (18 m) intervals leap-frogged, rather than advancing in front of mopping up parties and had "complete success".[74]
- The German order of battle was the 5th Bavarian (Eingreif), 34th, 214th, 3rd Reserve, 119th, 183rd, 32nd, 9th Bavarian Reserve, 204th, 54th, 12th Reserve (Eingreif), 26th Reserve, 79th Reserve (Eingreif), 26th and 26th Reserve divisions.[77]
Footnotes
- Doughty 2005, pp. 379–383.
- Edmonds 1991, p. 231.
- Edmonds 1991, pp. 219–230.
- Edmonds 1991, p. 190.
- Sheffield 2011, p. 233.
- Hamilton 1990, p. 360.
- Edmonds 1991, pp. 180–182.
- Hamilton 1990, pp. 369–370.
- Liddle 1997, pp. 147–148.
- McCarthy 1995, pp. 7–39.
- Liddle 1997, pp. 149–151.
- Falls 1996, p. 121.
- Edmonds 1991, pp. 183–184, 189–190.
- Moorhouse 2003, pp. 146–148.
- Moorhouse 2003, pp. 148–149.
- Sheldon 2007, p. 101.
- Sheldon 2007, pp. 101–104.
- Edmonds 1991, pp. 184–190.
- Bax & Boraston 1999, p. 142.
- Edmonds 1991, pp. 190–191.
- Dudley Ward 2001, pp. 154–159.
- Bax & Boraston 1999, pp. 142–143.
- Edmonds 1991, pp. 191–192.
- Edmonds 1991, p. 195.
- Edmonds 1991, pp. 194–195.
- Edmonds 1991, p. 199.
- Moorhouse 2003, p. 151.
- Moorhouse 2003, pp. 149–150.
- Moorhouse 2003, p. 150.
- Edmonds 1991, p. 201.
- Edmonds 1991, p. 143.
- Sheldon 2007, pp. 99–100.
- Wynne 1976, p. 292.
- Wynne 1976, p. 284.
- Wynne 1976, p. 297.
- Wynne 1976, p. 288.
- Wynne 1976, p. 289.
- Wynne 1976, p. 290.
- Samuels 1995, p. 193.
- Times 1918, pp. 362–363.
- Times 1918, p. 364.
- McCarthy 1995, pp. 39–66.
- Dudley Ward 2001, pp. 156–158.
- Dudley Ward 2001, pp. 158–159.
- Bax & Boraston 1999, p. 146.
- Edmonds 1991, pp. 195–196.
- Edmonds 1991, p. 196.
- McCarthy 1995, p. 52.
- McCarthy 1995, pp. 53–55.
- McCarthy 1995, p. 55.
- Edmonds 1991, pp. 200–201, sketch 19.
- Times 1918, p. 365.
- Times 1918, p. 367.
- Jones 2002a, p. 172.
- Jones 2002, pp. 147–148.
- Jones 2002a, pp. 172–175.
- Edmonds 1991, p. 193.
- Jones 2002a, pp. 175–179.
- Dudley Ward 2001, p. 158.
- Dudley Ward 2001, p. 159.
- Edmonds 1991, p. 194.
- Bax & Boraston 1999, pp. 146–147.
- Bax & Boraston 1999, pp. 148–149.
- Edmonds 1991, pp. 193–194.
- Edmonds 1991, pp. 196–197.
- Edmonds 1991, p. 197.
- Terraine 1977, p. 232.
- Sheffield 2011, p. 237.
- Moorhouse 2003, pp. 162–164.
- Edmonds 1991, p. 202.
- Edmonds 1991, sketch 18.
- Bax & Boraston 1999, p. 153.
- Falls 1996, pp. 122–124.
- Falls 1996, p. 124.
- Wise 1981, p. 424.
- Dudley Ward 2001, pp. 160–161.
- USWD 1920.
- Nicholson 1964, p. 308.
- McCarthy 1995, pp. 66–69.
- Edmonds 1991, p. 209.
- McRandle & Quirk 2006, pp. 667–701.
- Sheldon 2007, p. 119.
- Foerster 1956, p. 69.
- Sheldon 2007, p. 120.
- Gough 1968, p. 204.
- Simpson 2006, p. 101.
- Gillon 2002, p. 133.
- Williams-Ellis & Williams-Ellis 1919, p. 151.
- Fuller 1920, pp. 122–123.
- McCarthy 1995, pp. 55–58.
References
Books
- Bax, C. E. O.; Boraston, J. H. (1999) [1926]. The Eighth Division in War 1914–1918 (Naval & Military Press ed.). London: Medici Society. ISBN 978-1-897632-67-3.
- Doughty, R. A. (2005). Pyrrhic victory: French Strategy and Operations in the Great War. Cambridge, MS: Belknap, Harvard. ISBN 978-0-674-01880-8.
- Dudley Ward, C. H. (2001) [1921]. The Fifty Sixth Division 1914–1918 (1st London Territorial Division) (Naval and Military Press ed.). London: Murray. ISBN 978-1-84342-111-5.
- Edmonds, J. E. (1991) [1948]. France and Belgium 1917: 7th June – 10th November. Messines and Third Ypres (Passchendaele). History of the Great War Based on Official Documents by Direction of the Historical Section of the Committee of Imperial Defence. Vol. II (Imperial War Museum and Battery Press ed.). London: HMSO. ISBN 978-0-89839-166-4.
- Falls, C. (1996) [1922]. The History of the 36th (Ulster) Division (Constable ed.). Belfast: McCaw, Stevenson & Orr. ISBN 978-0-09-476630-3. Retrieved 18 November 2014.
- Foerster, Wolfgang, ed. (1956) [1942]. Der Weltkrieg 1914 bis 1918: Militärischen Operationen zu Lande Dreizehnter Band, Die Kriegführung im Sommer und Herbst 1917 [The War in the Summer and Autumn of 1917]. Vol. XIII (online scan ed.). Berlin: Verlag Ernst Siegfried Mittler & Sohn. OCLC 257129831. Retrieved 15 November 2012 – via Die digitale Oberösterreichische Landesbibliothek.
- Fuller, J. F. C. (1920). Tanks in the Great War, 1914–1918. New York: E. P. Dutton. OCLC 559096645. Retrieved 28 March 2014 – via Archive Foundation.
- Gillon, S. (2002) [1925]. The Story of the 29th Division, A record of Gallant Deeds (Naval & Military Press ed.). London: Thomas Nelson. ISBN 978-1-84342-265-5.
- Gough, H. de la P. (1968) [1931]. The Fifth Army (repr. Cedric Chivers ed.). London: Hodder & Stoughton. OCLC 59766599.
- Hamilton, R. (1990). The War Diary of the Master of Belhaven. Barnsley: Wharncliffe. ISBN 978-1-871647-04-4.
- Histories of Two Hundred and Fifty-one Divisions of the German Army which Participated in the War (1914–1918). Document (United States. War Department) No. 905. Washington D.C.: United States Army, American Expeditionary Forces, Intelligence Section. 1920. OCLC 565067054. Retrieved 22 July 2017 – via Archive Foundation.
- Jones, H. A. (2002) [1928]. The War in the Air, Being the Story of the Part Played in the Great War by the Royal Air Force. Vol. II (Imperial War Museum and Naval & Military Press ed.). London: Clarendon Press. ISBN 978-1-84342-413-0. Retrieved 20 September 2014 – via Archive Foundation.
- Jones, H. A. (2002a) [1934]. The War in the Air, Being the Part Played in the Great War by the Royal Air Force. Vol. IV (Imperial War Museum and Naval & Military Press ed.). Oxford: Clarendon Press. ISBN 978-1-84342-415-4. Retrieved 20 September 2014 – via Archive Foundation.
- Liddle, P., ed. (1997). Passchendaele in Perspective: The 3rd Battle of Ypres. Barnsley: Pen & Sword. ISBN 978-0-85052-588-5.
- McCarthy, C. (1995). The Third Ypres: Passchendaele, the Day-By-Day Account. London: Arms & Armour Press. ISBN 978-1-85409-217-5.
- Moorhouse, B. (2003). Forged by Fire: The Battle Tactics and Soldiers of a World War One Battalion: The 7th Somerset Light Infantry. Kent: Spellmount. ISBN 978-1-86227-191-3.
- Nicholson, G. W. L. (1964) [1962]. Canadian Expeditionary Force 1914–1919. Official History of the Canadian Army in the First World War (2nd corr. ed.). Ottawa: Queen's Printer and Controller of Stationery. OCLC 557523890. Retrieved 6 November 2022 – via Archive Foundation.
- Samuels, M. (1995). Command or Control? Command, Training and Tactics in the British and German armies 1888–1918. London: Frank Cass. ISBN 978-0-7146-4214-7.
- Sheffield, G. (2011). The Chief: Douglas Haig and the British Army. London: Aurum Press. ISBN 978-1-84513-691-8.
- Sheldon, J. (2007). The German Army at Passchendaele. London: Pen & Sword. ISBN 978-1-84415-564-4.
- Simpson, A. (2006). Directing Operations: British Corps Command on the Western Front 1914–18. Stroud: Spellmount. ISBN 978-1-86227-292-7.
- Terraine, J. (1977). The Road to Passchendaele: The Flanders Offensive 1917, A Study in Inevitability. London: Leo Cooper. ISBN 978-0-436-51732-7.
- Williams-Ellis, A.; Williams-Ellis, C. (1919). The Tank Corps. New York: G. H. Doran. OCLC 317257337. Retrieved 29 March 2014 – via Archive Foundation.
- Wise, S. F. (1981). Canadian Airmen and the First World War. The Official History of the Royal Canadian Air Force. Vol. I. Toronto: University of Toronto Press. ISBN 978-0-8020-2379-7.
- Wynne, G. C. (1976) [1939]. If Germany Attacks: The Battle in Depth in the West (Greenwood Press, NY ed.). London: Faber & Faber. ISBN 978-0-8371-5029-1.
Encyclopaedias
- The Times History of the War. Vol. XV. London: The Times. 1914–1921. OCLC 642276. Retrieved 11 November 2013 – via Archive Foundation.
Journals
Further reading
- Maude, A. H. (1922). The 47th (London) Division 1914–1919. London: Amalgamated Press. ISBN 978-1-84342-205-1. Retrieved 28 July 2017 – via Archive Foundation.
- Miles, W. (2009) [1920]. The Durham Forces in the Field 1914–18, The Service Battalions of the Durham Light Infantry (Naval & Military Press ed.). London: Cassell. ISBN 978-1-84574-073-3.
- Mitchinson, K. W. (2017). The 48th (South Midland) Division 1908–1919 (hbk. ed.). Solihull: Helion. ISBN 978-1-911512-54-7.
- Munby, J. E. (2003) [1920]. A History of the 38th (Welsh) Division, by the G. S.O.'s I of the Division (Naval & Military Press ed.). London: Hugh Rees. ISBN 978-1-84342-583-0.
- Nugent, Micheal (2023). A Bad Day I Fear: The Irish Divisions at the Battle of Langemarck 16 August 1917 (1st ed.). Warwick: Helion. ISBN 978-1-80451-326-2.
- Rogers, D., ed. (2010). Landrecies to Cambrai: Case Studies of German Offensive and Defensive Operations on the Western Front 1914–17. Solihull: Helion. ISBN 978-1-906033-76-7.
- Sandilands, H. R. (2003) [1925]. The 23rd Division 1914–1919 (Naval & Military Press ed.). Edinburgh: Wm. Blackwood. ISBN 978-1-84342-641-7.
- Stewart, J.; Buchan, J. (2003) [1926]. The Fifteenth (Scottish) Division 1914–1919 (Naval & Military Press ed.). Edinburgh: Wm. Blackwood and Sons. ISBN 978-1-84342-639-4.

