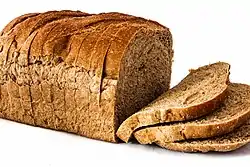
Straight dough
Straight dough is a single-mix process of making bread. The dough is made from all fresh ingredients, and they are all placed together and combined in one kneading or mixing session. After mixing, a bulk fermentation[1] rest of about 1 hour or longer occurs before division.[2] It is also called the direct dough method.[3][4]
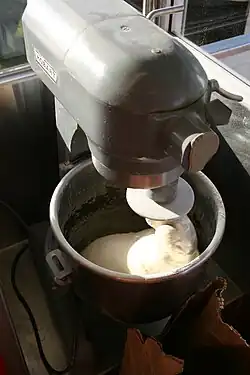 Dough being mixed in a commercial planetary mixer. | |
| Main ingredients | Wheat flour, water. |
|---|---|
Formula
A straight dough formula might look like this:
Baker's
percentageingredient % flour 100% water 60% sugar 4% fat 4% yeast[note 1] 1%–5% salt 2%
Process
In general, the process steps for making straight dough are as follows:[8][10]

- Mise en place: The first step is to look at the formula ("recipe"), familiarize yourself with the ingredients and process, get ready to perform the task at hand. Assess the availability of tools, consider the batch size and time schedule, and gather what is needed.[11]
- Weigh ingredients: This is also called scaling.[12] If more yeast is chosen for the initial mixing and it is viable, faster fermentation occurs. If too much yeast is used the result is a noticeable yeast flavor.[5]
- Mixing: The ingredients are all placed in a mixing bowl at once and combined.[3] A variation of this technique is to add ingredients sequentially.[note 2] This mixing process may be done by hand kneading or by machine. Once fermentation has commenced, it will continue until the heat of the oven kills the yeast during baking. For fast fermentations, long, intense mixing techniques are recommended for dough development, whereas for long-fermented doughs, short-mixing techniques on slow speeds or hand kneading may be used with sufficient later folding.[16]
- It is known that mixing adds heat to dough, and more intense mixing adds heat more quickly.[17] Doughs mixed at warmer temperatures of 79 °F (26 °C) are known to have more oxidation than doughs mixed at lower temperatures of 73 °F (23 °C).[18] Oxidation results in loss of color and flavor.[14] Bakers sometimes substitute a weight of crushed ice for some of the dough's water to compensate for the expected temperature rise, while other bakers use "water-jacketed or refrigerated mixer bowls" to keep the dough cooler during mixing.[19]
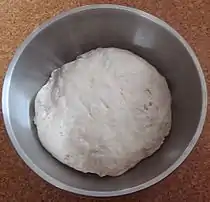
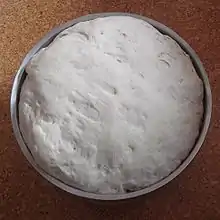
- Bulk fermentation: After mixing, the dough is allowed to rest in a bowl or container of large enough size to accommodate dough expansion, usually in a warm location of about 75–80 °F (24–27 °C).[20] The container is often covered so the dough remains in a humid environment, ideal is 74–77% relative humidity. Without some humidity the dough surface will tend to dry and develop a skin. As the dough rests, it will expand in volume due to the carbon dioxide created as it ferments. The dough will expand to a certain point, then volume growth will stall, and eventually the peak of the dough will begin to fall. When it reaches this point, it is at about 66–70% of its total fermentation time.[23]
- Stretch and folds or degassing: When the dough reaches a specified size or scheduled time it is removed from the bowl and stretched and folded on a flour-dusted surface for the purposes of degassing the bubbles that have formed as well as stretching and aligning the gluten, then it is returned to the bowl for continued bulk fermentation.[20] Prior to folding, the dough surfaces that are folded together should be brushed to remove excess dry flour.[24] This is also called knock back[25] or punch down, and may occur in an oiled bowl followed by a few folds, then flipped over so the seam side is down. This stretching and folding develops the gluten and equalizes the dough temperature. Long bulk fermentations may have as many as 4 to 5 folding sessions.[16] Some schedules begin degassing at half the total fermentation time,[20] while others degas once just before the peak begins to fall. A fermentation ratio is described as the time the dough takes from leaving the mixer to just before the peak begins to fall — when degassing occurs — relative to the remaining bulk fermentation time afterwards. Folding or knock back may also be omitted: after sufficient bulk fermentation time, the dough may go straight to make-up.[27]
- Make-up[note 3]

- Dividing: This is also called scaling or portioning. The bulk dough is divided to smaller, final weights. This step is used when making more than one loaf of bread, or many rolls.
- Bench or intermediate proofing: A rest period of 8 to 30[29] minutes follows which allows the dough to relax, easing shaping.

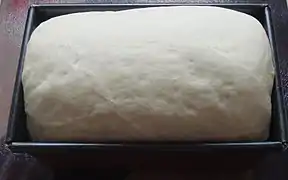
- Proofing [or, outside USA, Proving]: The final fermentation rest before baking. Like bulk fermentation, proofing is ideally done in a humidity- and temperature-controlled environment. It may be performed at bulk-fermentation temperatures,[29] or temperatures up to about 95–100 °F (35–38 °C), and with 83–88% relative humidity. Yeast thrives within the temperature range of 70–95 °F (21–35 °C), and within that range, warmer temperatures result in faster baker's yeast fermentation times. The proofing dough rests and ferments until it reaches about 85% of its final volume.
- Scoring:[note 4] If desired, proofed dough is scored with a lame or razor to slash the top of the dough to direct oven-spring expansion. It is also used for its decorative effect.[29]
- Baking: The proofed dough is loaded into a hot oven for baking. During the first few minutes, the remaining rise will occur in the dough and is known as oven spring. Starch gelatinization begins at 105 °F (41 °C),[34] the yeast dies at 140 °F (60 °C),[35] and the baking is finished when the product reaches an internal temperature of 208–210 °F (98–99 °C).
- Cooling: Once the bread is fully baked, it is removed to racks to cool. Bread is sliced once it has cooled to 95–105 °F (35–41 °C).

History
The straight dough method became popular after the discovery and later mass production of baker's yeast, as well as the mass production of mixing machines.[36] Straight dough was simpler than sponge and dough, took less time and effort, and was considered superior for commercial purposes. Baking expert Julius Emil Wihlfahrt of The Fleischmann Company wrote in 1915:
Generally speaking, sponge is best used for fancy breads and straight dough for the average bread, for in this manner the advantages of both systems can be best appropriated.[37]
Prior to 1920, there were two basic kinds of breads, naturally leavened French bread,[38] and Vienna bread leavened with cereal press yeast, an early form of baker's yeast. After 1920, when mixing machines became popular among bakers,[36] rural bakers began to make more sponge doughs and city bakers more straight doughs, both replacing sourdough. By the 1930s, straight dough had mostly replaced sponge dough, and the terms "French" and "Vienna" breads were used less often. Bakers who continued using older methods were generally unable in America to compete on a cost basis, and so with "rare exceptions," were limited to local niche markets.[39]
See also
Notes
- A yeast flavor in the baked bread is generally not noticeable when the bakers' percent of added fresh yeast is less than 2.5%.[5] Conversion factors exist for dry yeasts, they will be of lower percentage values due to their lower water content.[6]
- "For straight dough—which is the more simple way of making bread—the yeast is dissolved in part of the water, the salt in another, then all the water lifted in a trough or machine and the flour added. The dough should be worked for at least ten minutes before the lard is added, and as soon as the lard is added and the dough worked smooth with the same, then allow to rest for proof. It is a wrong theory to add the lard at the first stages of doughing, as it will not give the best results and the flour will not absorb the same quantities of water as if the lard is added after the dough is partly mixed smooth."[13] A more modern sequential technique adds dry salt last.[2] Salt retards oxidation when it is added earlier, preserving flavor, but some dough oxidation is desirable, it increases gluten strength.[14] Salt has a retarding effect on yeast growth and fermentation.
- Baking texts sub-divide this section somewhat differently from each other.
- In this context, scoring should not be confused with judging or ranking the quality of an already-baked product.
Footnotes
- Weekendbakery.com (2010), p. Baking Glossary | Weekend Bakery.
- Young & Cauvain (2007), p. 26.
- Gisslen (2012), p. 108.
- Theartisan.net (1999), p. Direct and Indirect Methods.
- Cauvain (2003), p. 475.
- Hamelman (2004), p. 57-58.
- Hitz (2009), p. 50-56.
- Gisslen (2012), p. 107-124.
- Hitz (2009), p. 51-52.
- Gisslen (2012), p. 107.
- Wihlfahrt (1915), p. 42-43.
- Gisslen (2012), p. 97.
- Gisslen (2012), p. 110-111.
- Young & Cauvain (2007), p. 42-43.
- Calvel (2001), p. 27.
- Calvel (2001), p. 28.
- Hitz (2009), p. 53.
- Ramaswamy & Marcotte (2004), p. 194.
- Gisslen (2012), p. 114.
- Young & Cauvain (2007), p. 28.
- Kulp (2000), p. 541.
- Hitz (2009), p. 54.
- Gisslen (2012), p. 115-116.
- Gisslen (2012), p. 99.
- Gisslen (2012), p. 100.
- Gisslen (2012), p. 8.
- Wihlfahrt (1915), p. 44.
- Watts (1868), p. 657.
- Calvel (2001), p. 191.
References
- Calvel, Raymond (2001). The taste of bread. Gaithersburg, Md: Aspen Publishers. ISBN 0-8342-1646-9.
- Cauvain, Stanley P. (2003). Bread making: improving quality. Boca Raton: CRC Press. ISBN 1-85573-553-9.
- Gisslen, Wayne (2012). Professional baking (6th ed.). New York: John Wiley. ISBN 978-1-118-08374-1.
- Hamelman, Jeffery (2004). Bread: a baker's book of techniques and recipes. New York: John Wiley. ISBN 0-471-16857-2.
- Hitz, Ciril (2009). Baking Artisan Bread: 10 Expert Formulas for Baking Better Bread at Home. Quarry Books. ISBN 9781616735265.
- Kulp, Karel, ed. (2000). Handbook of Cereal Science and Technology. New York, New York: Marcel Dekker, Inc. ISBN 9781420027228.
- Navy (1961). Baking handbook. Washington D.C.: Navy Department, Bureau of Supplies and Accounts. NAVSANDA publication 342.
- Ramaswamy, H; Marcotte, M (2004). Food processing: principles and applications. Cambridge, Massachusetts: Blackwell Pub. ISBN 0-8138-1942-3.
- Theartisan.net (1999). "Bread Basics".
- Watts, Henry (1868). A dictionary of chemistry and the allied branches of other sciences. Vol. 1. London: Longmans, Green, and Company.
- Weekendbakery.com (2010). "Baking Glossary | Weekend Bakery". Retrieved 2015-05-03.
- Wihlfahrt, Julius Emil (1915) [1905]. A Treatise on Baking. The Fleischmann Co.
- Young, Linda; Cauvain, Stanley P. (2007). "2.3. Major Breadmaking Process Groups". Technology of Breadmaking. Berlin: Springer Science & Business Media. ISBN 978-0-387-38565-5.
External links
- Straight dough at Bakerpedia.
